Configuring Cisco SG Switches for Tesira Control and Dante
This article describes how to configure a Cisco SG small business series switch for use with Tesira and Dante. The examples given are for the SG350-28P model. The SG family contains several series of switches and the configuration process is similar.
Tesira Control traffic and Dante will operate using the out-of-box defaults of the switch. Tesira Control and Dante do not inherently require separation and can both exist in the same default VLAN.
Separating Tesira Control and AV media into different VLANs is a best practice as the network increases in size or if numerous multicast devices are added to a standalone switch. If VLANs are created you will need to configure multicast behaviors per VLAN.
Configuring the switch
The following configuration process is performed on the SG350-28P. The process is similar for other SG Series switches. Please refer to the Cisco documentation for specific details.
Connect to the switch
The Cisco SG switches have the Web UI enabled by default. Using the command line interface is beyond the scope of this article. Connect to the switch using the following default values:
| Parameter | Default Value |
|---|---|
| LAN Management IP | 192.168.1.254 / 24 |
| Username | cisco |
| Password | cisco |
The default VLAN is configured to 192.168.1.254 with a subnet of /24 or 255.255.255.0. Any port on the switch will access the management IP since it is the default VLAN. Configure the connected computer to the same subnet and browse to http://192.168.1.254/ for the login page. If login in for the first time, the switch will require changing the password from the default. Follow Cisco's instructions to factory reset the switch in the event the password or management IP has been lost.
Once connected to the switch management page, switch the Display Mode from Basic to Advanced:

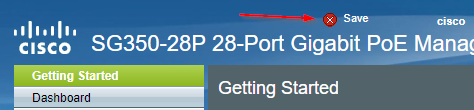
Remember to Save after applying any new values by clicking the flashing Save button at the top of the window.
Enable portfast on all Tesira expander ports
Enable fast link mode on ports with Tesira expanders when STP is enabled. If this is disabled or left in the default auto mode you may experience discovery or DHCP address acquisition issues with Biamp Tesira expanders. This is the same as applying the command line spanning-tree portfast option.
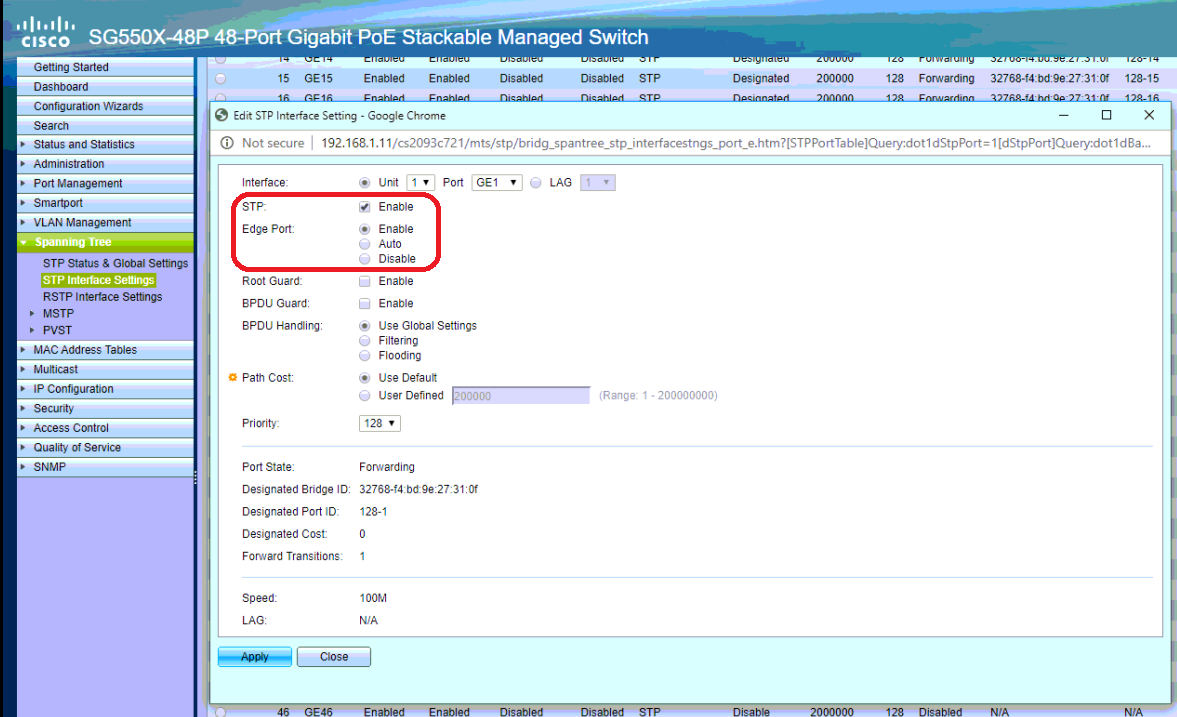
Under Spanning Tree > STP interface Settings choose a port, then click "Edit" at the bottom of the screen.
Set Edge Port to Enable rather than Auto. If Fast Link mode is enabled on a port, the port is automatically set to Forwarding state when the port link is up. Fast Link is also known as port-fast. STP works by “listening” for about 30-45 seconds. With Fast Link enabled, it only listens for about 5 seconds before transitioning into forwarding state.
The options are defined as:
- Enable – Enables Fast Link immediately.
- Auto – Enables Fast Link a few seconds after the interface becomes active. This allows STP to resolve loops before enabling Fast Link.
- Disable – Disables Fast Link.
Click Apply.
Copy these settings to any other ports which require them.
Save the configuration.
Disable EEE
Energy Efficiency Ethernet (EEE, a.k.a Green Ethernet) allows link states to enter low power mode for energy savings. While it works extremely well for business applications on computers, this often results in disruptions to AV device communication and network media clocking.
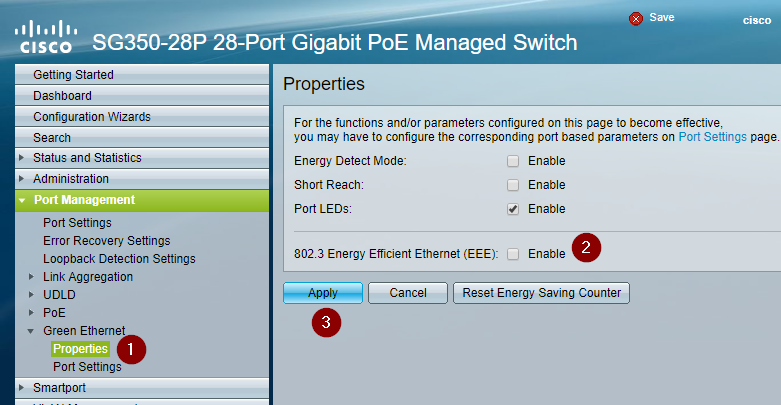
- Navigate to Port Management > Green Ethernet > Properties
- Uncheck Enable on 802.3 Energy Efficient Ethernet (EEE)
- Click Apply
Multicast traffic
Tesira and Dante use multicast traffic for peer discovery, hostname resolution, and clocking. Traffic is delivered to a multicast address and the switch sends it to all ports by default. This is also known as traffic flooding. This is not problematic for a small network with a limited number of devices. It does become an issue as more devices are actively transmitting on the network. IGMP Snooping provides a mechanism to constrain multicast traffic to specific ports. Devices join multicast groups and receive only the desired traffic. However, not all multicast address ranges are managed by IGMP and not all switches implement IGMP Snooping in the same manner.
Local-scope multicast addresses are defined in the range of 224.0.0.x. IGMP Snooping on Cisco SG Series switches does not register group joins on local-scope multicast addresses. The switch refers to this as unregistered multicast traffic and filters (drops) it by default. Tesira and Dante discovery mechanisms utilize local-scope addresses to communicate with other devices and Tesira expanders, such as the HD-1 dialer or EX-AEC. When IGMP Snooping and Bridge Filtering is enabled on SG switches to manage large quantities of traffic, Tesira devices will lose communication and discovery.
Careful configuration is required when mixing Control, Dante and other network streaming services such as video-over-IP devices or networked cameras.
Configure Multicast Management with IGMP Snooping
Enable Bridge Filtering on Multicast Properties
Enable the bridge filtering to activate the multicast management protocols on the switch.
- Use the left navigation menu to open Multicast > Properties
- Check enable on Bridge Multicast Filtering Status
- Click Apply

Enable IPv4 IGMP Snooping
Enable IGMP snooping on the switch.
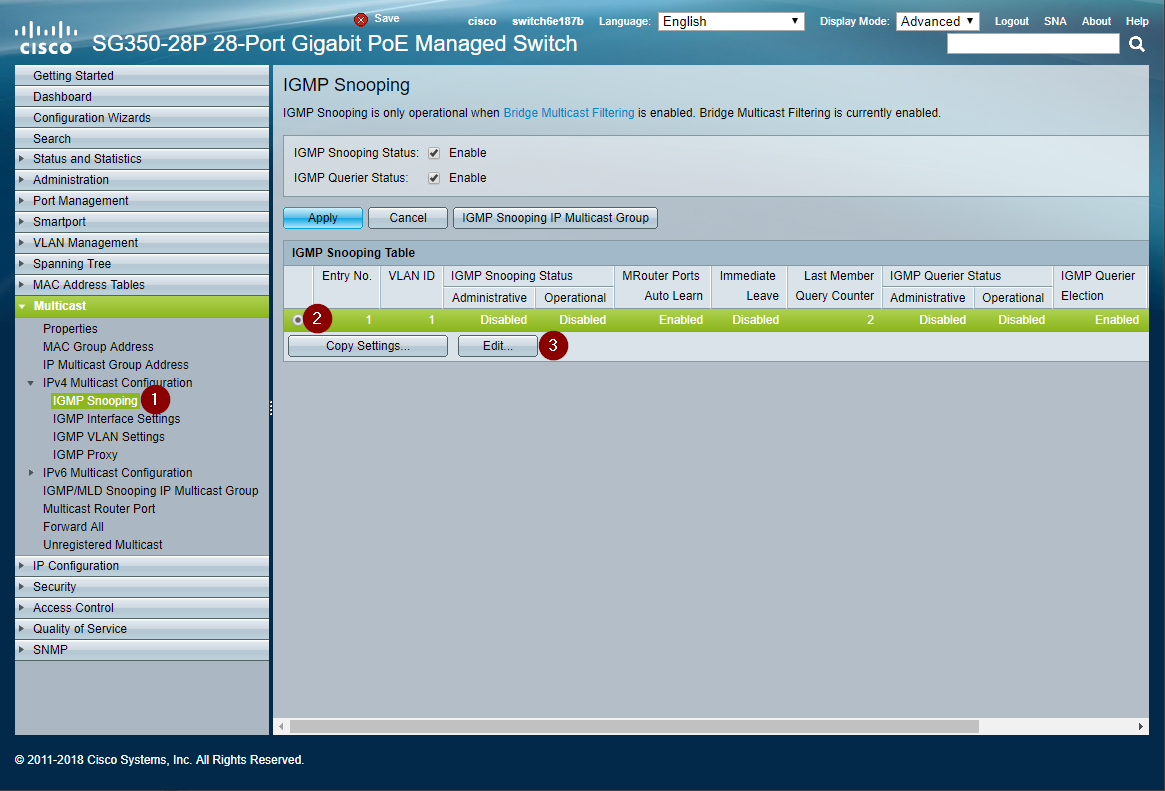
- Navigate to Multicast > IPv4 Multicast Configuration > IGMP Snooping
- Check enable for IGMP Snooping Status
- Click Apply to change the setting

Edit IGMP Snooping Settings
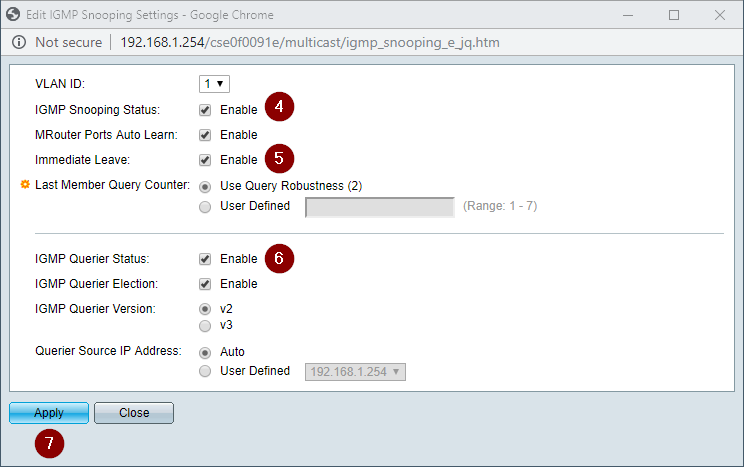
Now edit the IGMP settings for VLAN 1. If multiple VLANs are configured, edit the appropriate Control or Dante VLAN number.
- Keep the same IGMP Snooping settings page open
- Select the radio button for the VLAN to edit
- Click the Edit... button to open the edit window (Verify the browser did not block a pop-up window.)
- Click Enable on IGMP Snooping Status
- Click Enable on Immediate Leave
- Click Enable on IGMP Querier Status
- Click Apply and close the window
Note: Anecdotally, on some versions of SG300 firmware Tesira server-class devices and/or expanders can lose discovery at this point. Continue to the next section to modify how the switch filters (drops) or forwards multicast traffic.
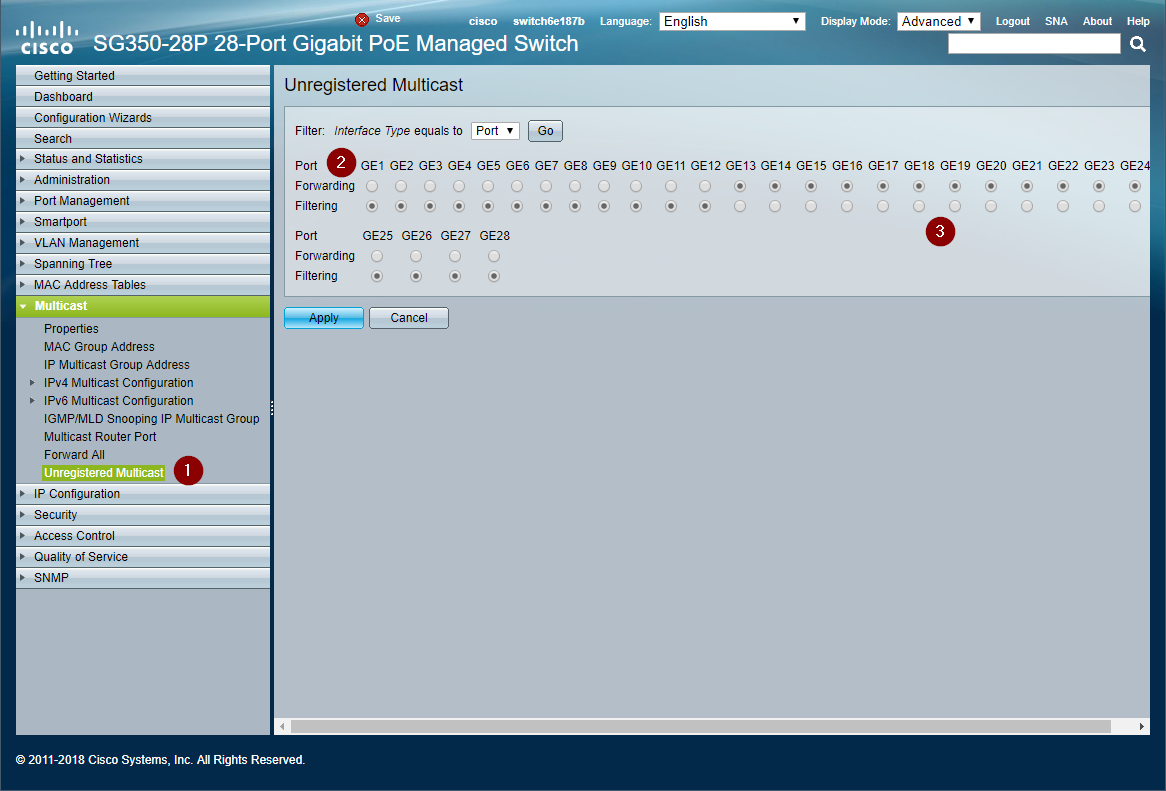
Configure Unregistered Multicast
The switch by default will forward unregistered multicast traffic. Tesira utilizes unregistered multicast for device discovery. Enable forwarding on all the Tesira control and expander device ports. Enable filtering for all Dante ports. The following example shows Dante on ports 1-12 and Tesira control on ports 13-24. It may be configured in any manner required.
- Navigate to Multicast > Unregistered Multicast
- Enable Filtering on Dante device ports
- Leave Forwarding enabled on Tesira device control ports
Tesira Control and Discovery will function properly after the ports have been configured to allow forwarding of registered traffic. Note that some Dante functions use unregistered local-scope multicast addresses. See the Dante network overview from Audinate for specific details. Certain monitoring or mDNS functionality may necessitate configuring all Dante ports to also use unregistered multicast Forwarding or manually configuring 224.0.0.x multicast groups show in the optional section below.
Save Changes
Any applied changes require saving to the startup configuration. Unsaved changes will be lost if the switch reboots or loses power. Click the flashing Save option to write changes to memory.
Optional configuration
In some cases, forwarding of unregistered multicast is not allowed on the network. This requires extra steps to manually configure multicast groups and statically assign ports to received that traffic. Blocking unregistered multicast and not configuring groups will cause Tesira and Dante automatic device discovery mechanisms to fail.
The following multicast address groups will need to be configured on the switch for Tesira functionality. See references for Dante addresses:
| Multicast Address | Usage |
|---|---|
| 224.0.0.251 | mDNS hostname resolution |
| 224.0.0.252 | Server-Class peer discovery |
| 224.0.0.253 | Sever-to-Remote device discovery |
| 224.0.0.254 | Remote-to-Server device discovery |
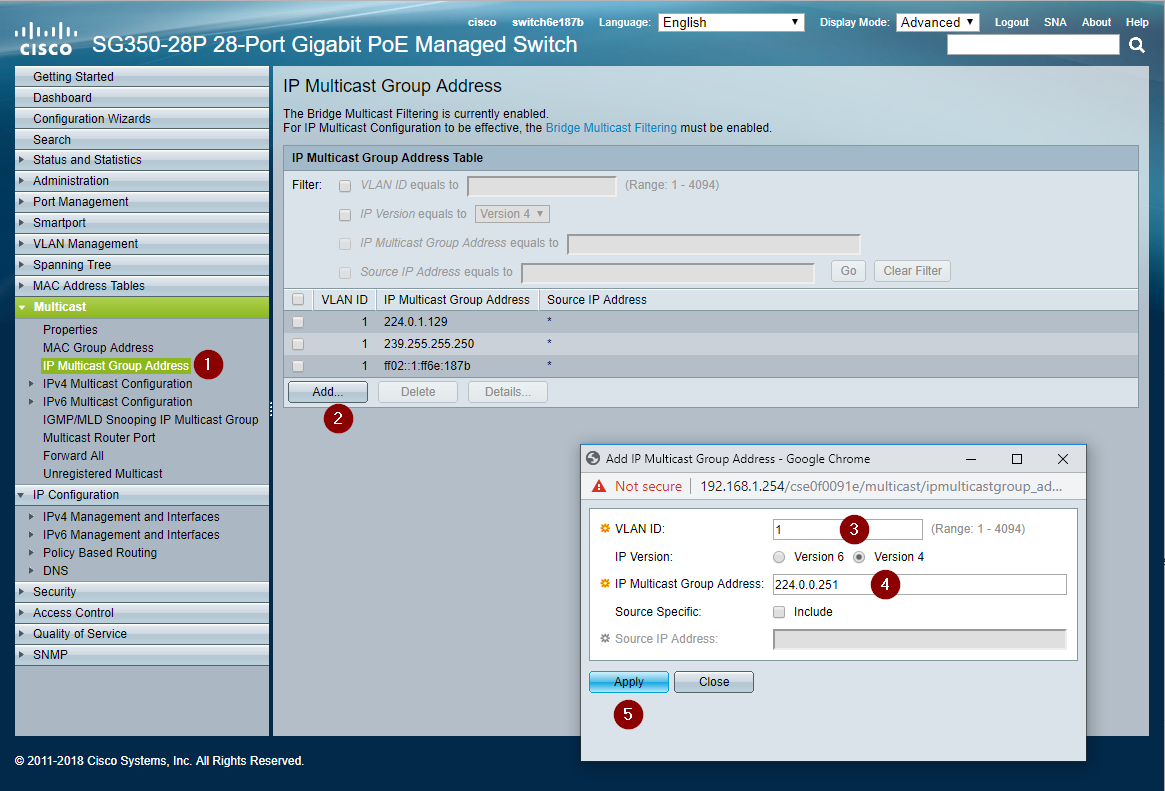
Add multicast group addresses
- Navigate to Multicast > IP Multicast Group Addresses
- Click Add... to bring up the add window. (Verify the browser did not block a pop-up window.)
- Check the correct VLAN ID is present.
- Add the IP Multicast Group Address
- Click Apply.
- Repeat steps 1 - 5 for all multicast addresses used by Tesira in the table above.
Statically Assign Groups to Ports
The switch does not automatically understand which ports should receive traffic from a given Multicast Group. Every Tesira control port needs all the multicast groups assigned to it for discovery to operate. The following example shows Tesira control devices on ports 13-24. The switch may be configured in any manner.
- After adding all the multicast IP address groups from the previous step, select the first IP address check box.
- Click the Details... button. (Verify the browser did not block a pop-up window.)
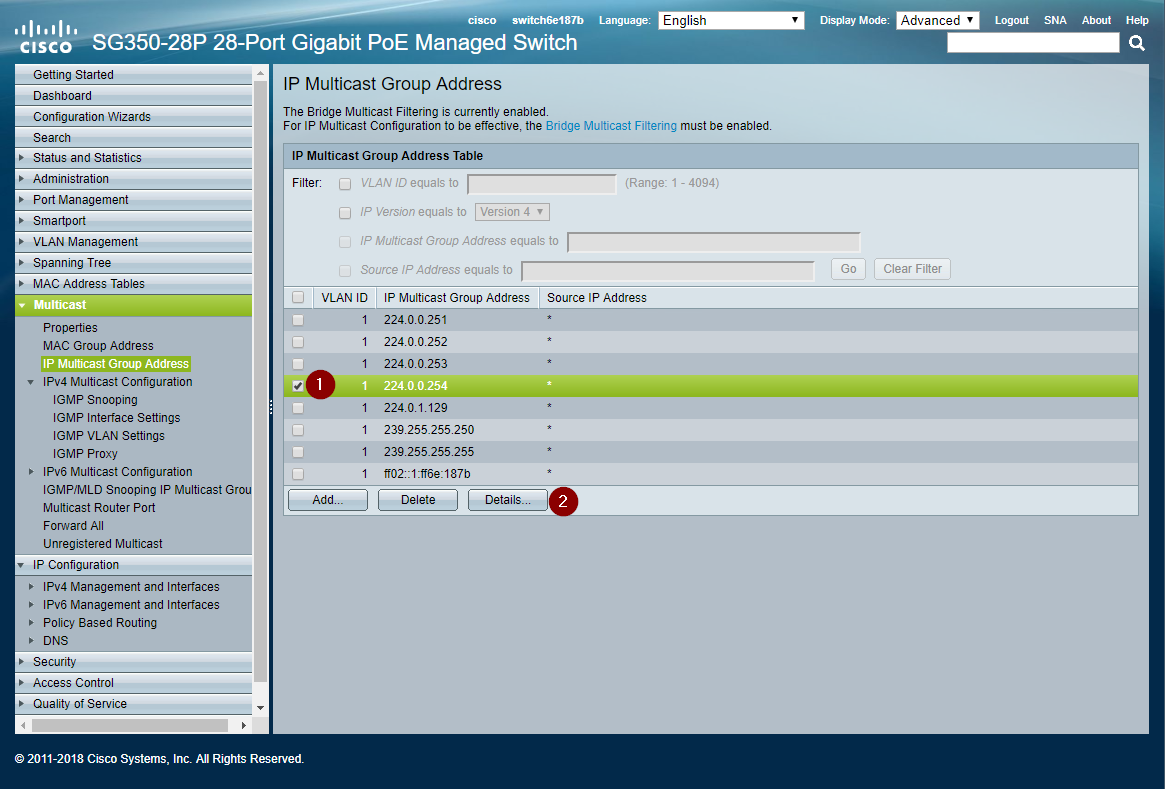
3. Set the ports with Tesira control devices to Static. Forbidden or None will prevent delivery of traffic for the given address.
4. Click the Apply button and close the window.
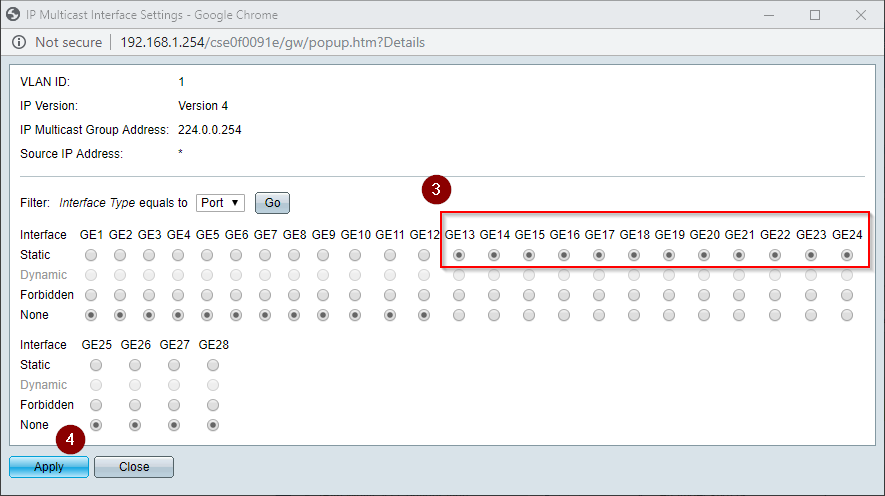
5. Repeat the above steps for all the 224.0.0.x multicast addresses used by Tesira.
6. Save the configuration or else any changes are lost when the switch reboots.