How to reset a Tesira device to factory defaults
The factory reset feature quickly clears all user data from Tesira devices, restoring them to their factory default settings. The article covers the effects of a factory reset and how to reset several Tesira devices.
Reset Effects
User data
The factory reset permanently clears all user data from your Tesira device. If you need to keep the configuration file, please save it to a PC before performing the reset. The configuration file cannot be recovered from any Biamp Tesira device once the reset has been performed.
A factory reset also erases the device's Event Logs. The log of a factory-reset device contains its first boot-up sequence.
Network settings
The factory reset procedure will affect the networking settings of your Tesira device.
The Host Name will change back into the default format: for example TesiraForte01234567. The device description will be emptied.
The factory default setting for all Tesira devices is to obtain an IP address automatically. In this mode, the device will first try to contact a DHCP server in order to request an IP address from it. If no DHCP server is present on the network, the device automatically assigns itself a link-local IP address.
DHCP
When using a DHCP server, the assigned IP address depends on the DHCP server's configuration.
Link-local
A link-local IP address is self-assigned when a DHCP server is not present on the network. Expressed in CIDR notation, a link-local IP address is an IP address in the block:
169.254.0.0/16
In other words, it will be an address in the form:
|
IP Address: |
169.254.xxx.xxx |
(169.254.0.1 to 169.254.255.254) |
Resetting Tesira Devices
Tesira servers
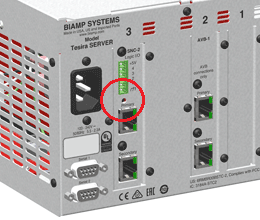
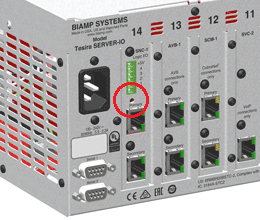
The SERVER and SERVER-IO have a recessed reset button on the rear of the unit.
- First, locate the left-most card slot (slot 3 on a SERVER and Slot 14 on a SERVER-IO).
- Next, locate the small hole directly above the Primary RJ45 network socket and directly below the green GPIO connector. The reset button is recessed just inside.
- Find a suitable tool to insert into the hole and gently push the button - you should feel a small click as the button depresses slightly.
- Press and hold the reset button for at least 10 seconds and then release. The reset process will begin after a few moments.
 |
 |
TesiraFORTÉ
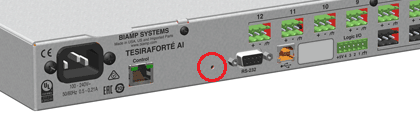
The TesiraFORTÉ has a recessed reset button on the rear of the unit.
- First, locate the RS232 connector on the left of the unit.
- Next, locate the small hole approximately 1 inch (2 cm) to the left of the RS232 connector. The reset button is recessed just inside.
- Find a suitable tool to insert into the hole and gently push the button - you should feel a small click as the button depresses slightly.
- Press and hold the reset button for at least 10 seconds and then release. The reset process will begin after a few moments.
TesiraFORTÉ X
The TesiraFORTÉ X has a recessed reset button on the rear of the unit.
- First, locate the power supply on the back of the unit to the right.
- Next, locate the small hole to the left of the power supply. The reset button is recessed just inside.
- Find a suitable tool to insert into the hole and gently push the button - you should feel a small click as the button depresses slightly.
- Press and hold the reset button for 10-15 seconds and then release. The reset process will begin after a few moments.

Rack-mount expander
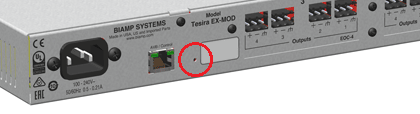
The EX-MOD audio expander has a recessed reset button on the rear of the unit.
- First, locate the RJ45 network socket on the left of the unit.
- Next, locate the small hole approximately 1/2-inch (1.5 cm) directly to the right of it. The reset button is recessed just inside.
- Find a suitable tool to insert into the hole and gently push the button - you should feel a small click as the button depresses slightly.
- Press and hold the reset button for at least 10 seconds and then release. The reset process will begin after a few moments.
Mini Expanders - Audio
Audio expanders have a recessed reset button on the rear of the unit.
- First, locate the RJ45 network socket on the left of the unit.
- Next, locate the small hole 1/2"-inch (1.5 cm) directly to the right of it. The reset button is recessed just inside.
- Find a suitable tool to insert into the hole and gently push the button - you should feel a small click as the button depresses slightly.
- Press and hold the reset button for at least 10 seconds and then release. The reset process will begin after a few moments.

Mini Expander - Logic
Logic expanders have a recessed reset button on the rear of the unit.
- First, locate the RJ45 network socket on the left of the unit.
- Next, locate the small hole directly to the left of it. The reset button is recessed just inside.
- Find a suitable tool to insert into the hole and gently push the button - you should feel a small click as the button depresses slightly.
- Press and hold the reset button for at least 10 seconds and then release. The reset process will begin after a few moments.

TEC-1
The TEC-1 has a reset option that can be accessed in the onboard configuration menu.
- First, remove the rear panel of the TEC-1 and connect it to a PoE source.
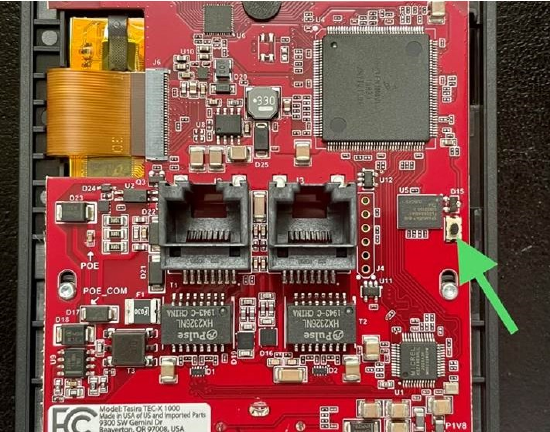
- Locate the two pins of the "locksmith" header, found in the bottom right corner of the printed circuit board.
- The configuration menu can be enabled by briefly shorting the two pins of the "locksmith" header, using a jumper or any metal object. Note: A jumper, if used, must be removed to resume normal operation after the factory reset has completed.
- Use the scroll to highlight the reset icon (the exclamation mark inside the circular arrow) and press the Select button. Scroll to Yes and press the Select button again. The reset process will begin immediately.


TEC-X
The TEC-X has a reset button on the back of the unit. You will only need to press it once while it is operating. It will reset the unit to factory default and DHCP network configuration.
HD-1
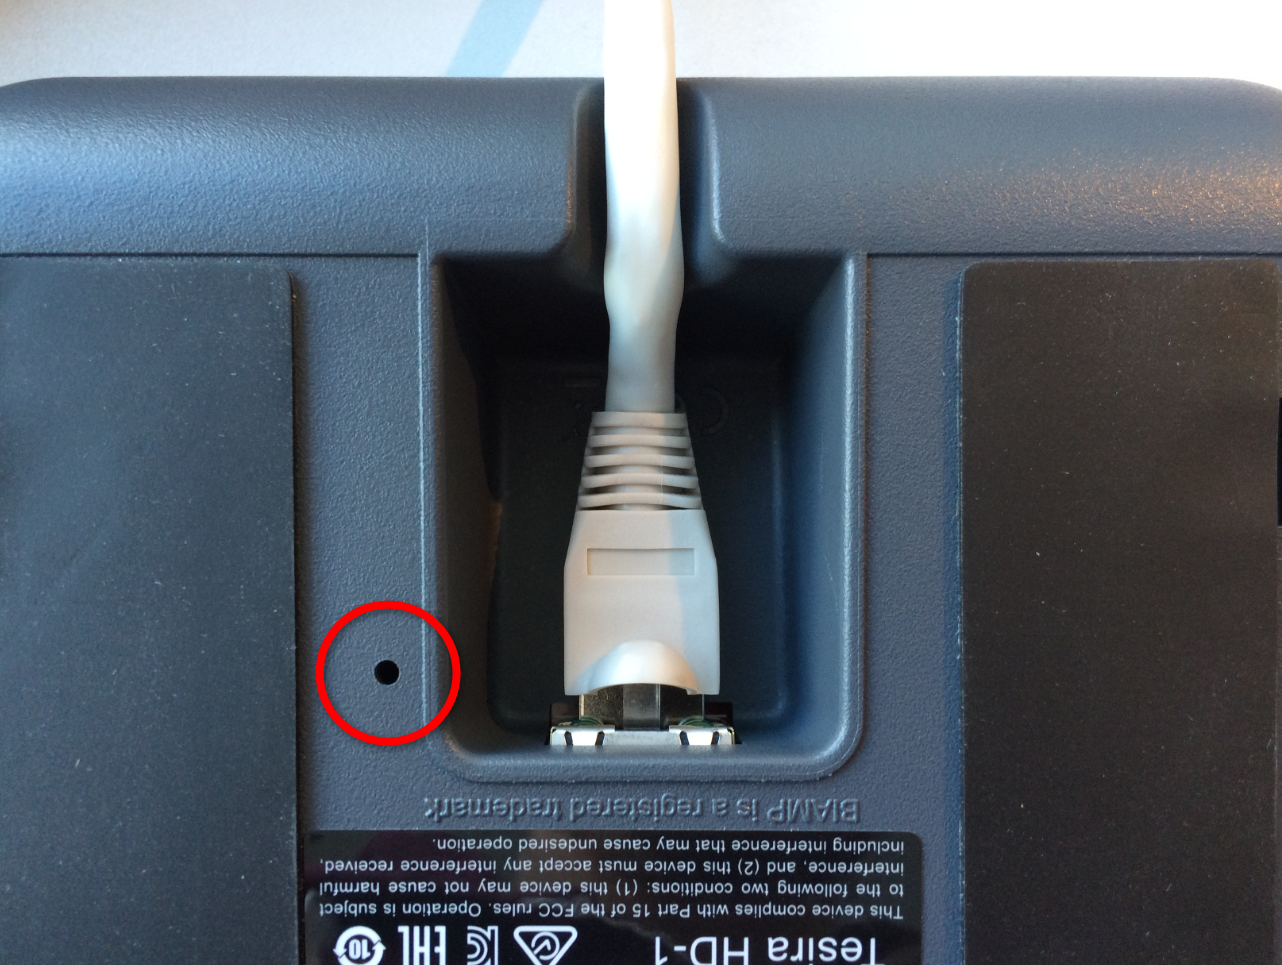
The HD-1 has a recessed reset button on the bottom of the unit.
- First, locate the RJ45 network socket on the bottom.
- Next, locate the small hole directly to the left of it. The reset button is recessed just inside.
- Find a suitable tool to insert into the hole and gently push the button - you should feel a small click as the button depresses slightly.
- Press and hold the reset button for at least 3 seconds and then release. The reset process will begin after a few moments.
Note: After the reset process, the display indicates "Configuring Network Interface..." and set itself to automatic IP addressing. The HD-1 will now obtain an IP address from a DHCP server or uses the "Link Local" configuration scheme.
TesiraXEL Amplifier
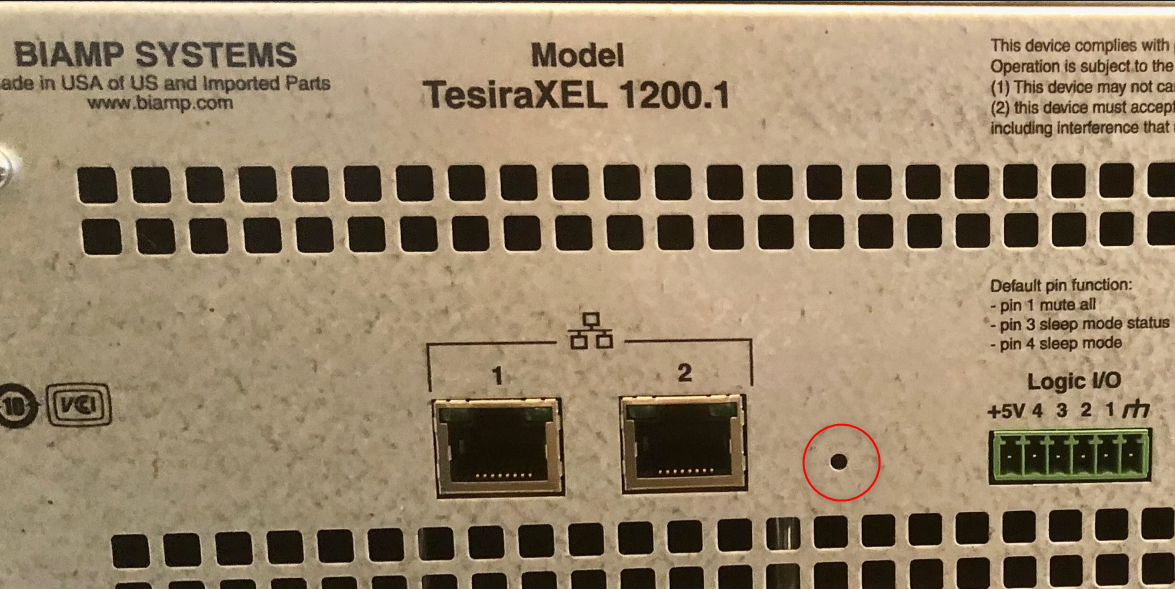
The TesiraXEL Amplifiers have a recessed reset button on the rear of the unit.
- First, locate the RJ45 network sockets on the rear of the unit.
- Next, locate the small hole approximately 1/2-inch (1.5 cm) directly to the right of the network sockets. The reset button is recessed just inside.
- Find a suitable tool to insert into the hole and gently push the button - you should feel a small click as the button depresses slightly.
- Press and hold the reset button for at least 10 seconds and then release. The reset process will begin after a few moments.
Note: After the reset process, TesiraXEL will default to Daisy Chain / Single-cable mode. Connect the PC via port 1 (left port) of the XEL amplifier for discovery. Port 1 will now obtain an IP address from a DHCP server or uses the "Link Local" configuration scheme.
TesiraCONNECT
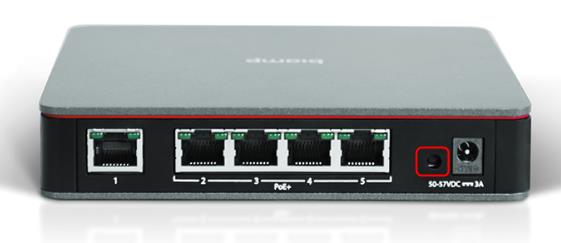
The TesiraCONNECT audio expander has a recessed reset button on the rear of the unit.
- First, locate the power port on the right side of the unit.
- Next, locate the small hole approximately 1/2-inch (1.5 cm) directly to the left of it. The reset button is recessed just inside.
- Find a suitable tool to insert into the hole and gently push the button - you should feel a small click as the button depresses slightly.
- Press and hold the reset button for at least 10 seconds and then release. The reset process will begin after a few moments.
Note: This process resets the IP address to DHCP and disables Telnet, SSH, and RSTP options for the TesiraCONNECT.
Tesira NPX Paging Stations
The Tesira NPX series Paging Stations have a recessed reset button on the rear of the unit.
- First, locate the lower-left sticky foot of the unit.
- Next, peel back the foot trying to retain as much adhesive and rubber stuck to the unit so as the foot can be re-used. The reset button is recessed just inside, towards the upper-right-most position of the footing.
- Find a suitable tool to insert into the hole and gently push the button - you should feel a small click as the button depresses slightly.
- Press and hold the reset button for at least 10 seconds and then release. The reset process will begin after a few moments.

Note: This process resets the IP address to DHCP, clears any Page Code assignment, and removes any security applied to the device.
Parlé VBC/ABC 2500

Factory reset is available via the launch button on the Parlé conferencing bars. If reset is required, push and hold the launch button for 10 seconds to reset the ABC 2500 back to its factory settings, including the current Launch configuration.
Voltera D
Voletra D has a recessed reset button on the rear of the unit.
- First, locate the analog input ports on the rear of the unit.
- Next, locate the small hole approximately 1/4-inch (0.6 cm) to the right of the analog inputs. The reset button is recessed just inside.
- Find a suitable tool to insert into the hole and gently push the button - you should feel a small click as the button depresses slightly.
- Press and hold the reset button for at least 10 seconds and then release. The reset process will begin after a few moments.
This will revert Voltera D back to running the default VenueTune configuration.
