TesiraFORTÉ Quickstart
This article contains instructions on how to get started with a new TesiraFORTÉ device, including software installation, network connections, and IP addressing.
Prerequisites
Before getting started, please check the following:
1. Install Tesira software on a Windows PC.
- The software must be Tesira version 2.0 or later.
- The most up-to-date version can be downloaded here: https://support.biamp.com/Tesira/Software-Firmware.
2. Minimum PC requirements:
- Windows® 7 SP1, 32-bit or 64-bit.
- Windows® 10 Anniversary Update, 32-bit or 64-bit.
- 1GB RAM
- Pentium® 4, 2.4GHz or faster
- 1280x1024 screen resolution (recommended)
3. Cables required:
Connection to the device should be made using either a direct connection or connection via an Ethernet switch.
- Direct Connection - 1x Cat5E cable to connect from the PC to the TesiraFORTÉ Control Port
- Via a Switch - 2x Cat5E cables and 1 Ethernet switch
Connecting to a system
1. Connect the PC and TesiraFORTÉ to the network.
Connect a Cat5E cable between your PC and the TesiraFORTÉ device.
- Direct connection: Attach an Ethernet cable from the PC’s network card to the TesiraFORTÉ Ethernet port. The TesiraFORTÉ Ethernet port is autosensing so a straight or crossover cable can be used.
- Connecting via Ethernet switch: Attach an Ethernet cable from the network card to a 100/1000 Base-T Ethernet switch.
NOTE: The TesiraFORTÉ Ethernet port is autosensing so a straight or crossover cable can be used.
2. Power up TesiraFORTÉ devices.
Connect the supplied power cord to a grounded AC mains voltage of 100-240VAC @50/60Hz. Connect the other end of the power cord to the power entrance located on the rear of the TesiraFORTÉ unit. Note the status of the front panel LED’s. Under normal conditions, the Power, Activity and Status LEDS’s will remain green once power-up sequence has completed.
3. Assign an IP address to the PC.
The PC must have a unique IP address in the same subnet as the TesiraFORTÉ device. A TesiraFORTÉ device is configured from the factory with DHCP or Zero Conf (Link Local) address. If you wish to verify your PC network interface is set correctly, please review the Setting an IP address section.
4. Configure the software to use the correct Network Interface.
Tesira software should automatically discover the available network interfaces and enable them. If you wish to verify the network interfaces you are using, open the Tesira software and select Tools > Options > Application settings > Network > Device Discovery. Selecting Interfaces will list the available connections. These can be enabled or disabled individually. Confirm the expected Network interface is selected and IP addressing is in the correct range.
5. Connect to the network with Tesira software.
Open the Tesira software. Connect to the network by going to System > Network > Connect to System. The System Connect dialog will appear. Select the desired system in the System List and press Connect to System.
The software will connect and allow real time user control. When the required changes have been made, disconnect the PC from the Tesira system by going to System > Network > Disconnect from system.
Setting an IP address
It may be a requirement to configure your PC or TesiraFORTÉ IP address. Please review the following section.
Configure your computer
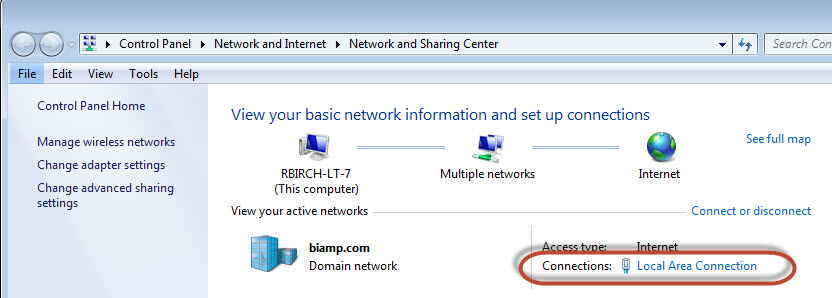
Go to Control Panel > Network and Sharing Center. Click on Local Area Connection.
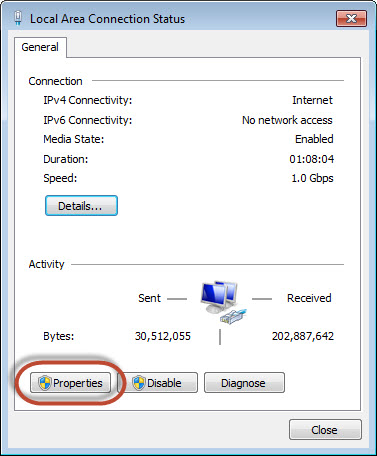
The Local Area Connection Status Dialog will open. Select Properties.
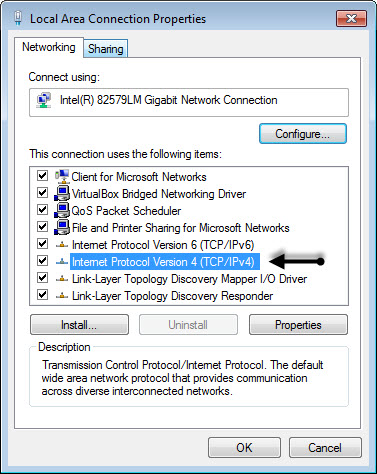
The Local Area Connection Properties Dialog will open. Double-Click Internet Protocol Version 4 (TCP/IPv4).
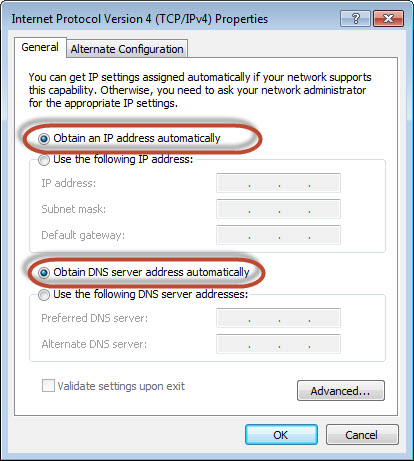
The Internet Protocol Version 4 (TCP/IPv4) Properties will open.
Update the IP address and Subnet mask to ‘Obtain an IP address automatically’
Click OK when complete.
Click OK on the Local Area Connection properties dialog to confirm the changes.
The PC may take up to one minute to resolve an IP address. If a DHCP server is available the PC will resolve to an address served to it. If no DHCP server is available the PC will resolve to a link local address in the 169.254.xxx.xxx range with a subnet mask of 255.255.0.0.
Auto assignment
All TesiraFORTÉ units ship from the factory configured for DHCP or Zero Conf (Link Local) address. If a DHCP server is available, the PC and the TesiraFORTÉ will resolve to an address served to it. If no DHCP server is available, the PC and the TesiraFORTÉ will resolve to a link local address in the 169.254.xxx.xxx range with a subnet of 255.255.0.0.
When using more than one device in a system, each device must have a unique IP address. Tesira device IP addresses must be different from any IP address that will be used on the same network segment. Please note that adjusting a TesiraFORTÉ IP address will momentarily stop the system audio.
Manual assignment
To make changes to the TesiraFORTÉ IP address you must first be disconnected from the system.
- In the Tesira software, go to System > Network > Perform Device Maintenance.
- Select the device in the Device List. Select Network Settings.
- Update the IP Address, Subnet mask and Gateway values to the new settings.
- Click OK when complete.
- Close Device Maintenance when complete.
- Change the PC IP address to reside on the same subnet as the Tesira Device.
- Re-start the system audio as needed.


