Connecting to an MS-1(e)
This article explains how to connect to a Vocia MS-1(e) using Vocia software. The steps taken will vary depending on if the IP address of the MS-1(e) is known.
- If you have no knowledge of the MS-1(e)'s IP address, the IP can be discovered and/or changed by first connecting via CobraNet.
- If the IP address of the MS-1(e) is known, you can directly connect via IP.
When servicing an existing Vocia system, it is necessary to first extract the existing configuration file from the system rather than work off an archive.
Always be sure to install (not update) the latest ALL PRODUCT (including MS-1) Vocia firmware package on your PC along with the latest Vocia software. Updating the MS-1(e) firmware effectively reformats the MS-1(e) and clears all files.
MS-1(e) ports
The MS-1(e) has four separate RJ-45 Network ports that can be configured for separate Network communications tasks.
| LAN-1 |
IP Port - to connect Vocia Software and VTP (optional - VoIP network) (optional - Interword Paging MS-1e only) |
| LAN-2 | Cobranet Port - to connect to other Vocia CobraNet devices |
| LAN-3 | VoIP - To connect to a dedicated VoIP network |
| LAN-4 | MS-1 - Not used MS-1e - Interworld Paging |
MS-1(e) default IP
The MS-1(e) ships from the factory with the following default IP address
- IP address - 192.168.1.101
- Subnet - 255.255.255.0
- Gateway - 0.0.0.0
Connecting via CobraNet
This method can be used when the IP address of the MS-1(e) is not known. The Vocia software can discover an MS-1(e) via the Device ID in the same manner it discovers other CobraNet devices on the Vocia network. If the IP address of the MS-1(e) is known please refer to the Connecting via IP section.
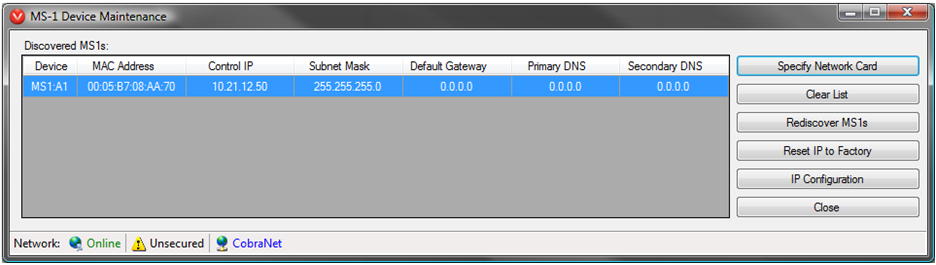
The Vocia MS-1(e) Device Maintenance dialog always communicates over the CobraNet port and discovers all of the MS-1(e)'s on the CobraNet network. It provides options to set the IP configuration, reset the IP configuration to factory default etc for each MS-1(e).
Physical connection
Ensure that the PC with Vocia software and MS-1(e) LAN-2 CobraNet port are connected to the CobraNet network Switch. Alternately, an Ethernet patch cable can be used to connect the PC directly to the MS-1(e) CobraNet port. The PC LAN port can be configured to use any IP address and subnet as CobraNet communicates over layer 2.
Software connection
Open the Vocia Software. Create a new or open an existing project.
- Create a new project by clicking ‘New Project’.
- Open an existing project by selecting 'Open'.
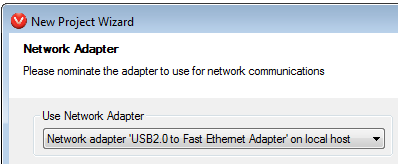
- When creating a new project ensure the correct Network adapter is selected.
- Go Online. The layout tree will go green once connected.
- Under the Tools menu , select MS-1(e) Device Maintenance. This brings up the Device Maintenance dialog.
- The Discovered MS-1(e) device should appear in the list. Select the MS-1(e) and select 'IP Configuration' or 'Reset IP to Factory' (192.168.1.101/24).
Once the IP configuration is found or updated for the relevant MS-1(e), refer to the steps under Connecting via IP.
Troubleshooting
If the MS-1(e) does not appear in the Device Maintenance view please confirm the correct network interface is selected by using the "Specify Network Card" dialog.
If the MS-1(e) has a newer version of firmware than the other devices in the system you will get errors when trying to update the firmware in the rest of the system. Messages include a warning that the update has failed and you should not power cycle the device. The easiest way to resolve this issue is to remove (unplug) the MS-1(e) from the system's CobraNet network, discover the CobraNet devices and update their firmware, and then add the MS-1(e) back to the system.
Connecting via IP
This method can be used when the IP address of the MS-1(e) is known. This is the default way the Vocia software communicates with the MS-1(e).
If the IP address is not known, please refer to the Connecting via CobraNet section before completing the following tasks.
Physical connection
Ensure that the PC with Vocia software and MS-1(e) LAN-1 IP port are connected to the IP network switch. Alternately, an Ethernet patch cable can be used to connect the PC directly to the MS-1(e) LAN-1 IP port. The PC and MS-1(e) must be in the same subnet. If using factory default IP address, the PC must use a unique IP address in the 192.168.1.x range.
Note: The MS-1(e) acts as an IP to CobraNet bridge and the software discovers other Vocia CobraNet devices via this bridge. Hence the MS-1(e) CobraNet port (LAN-2) will also need to be connected to the Vocia CobraNet network for non-processor paging devices to be discovered.
Software connection
Open the Vocia Software. Create a new or open an existing project.
- Create a new project file by clicking ‘New Project’.
- Open an existing project by selecting 'Open'
- When creating a new project ensure the correct Network Adapter is selected
- Add or confirm there is an MS-1(e) in the project under the 'Processors' line item.
- If required, add an MS-1(e) either by:
- right-clicking Processors in the layout and 'add MS-1(e)'
- via the 'Project' Menu 'Add Processors'
- If required, add an MS-1(e) either by:
- Vocia software must be configured properly to route data to an MS-1(e) on the IP Control Network.
- Open the MS-1(e) configuration dialog and select ‘General’ tab.
- Enter the IP address of the MS-1(e) under ‘Control Network Settings’.
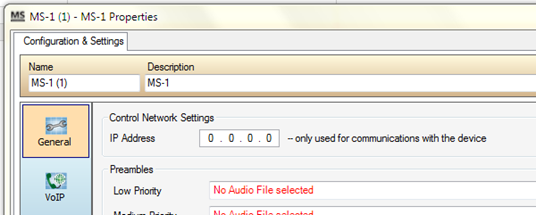
- Set the Device ID in the configuration dialog to match the physical rotary encoder Device ID setting on the MS-1(e) unit.
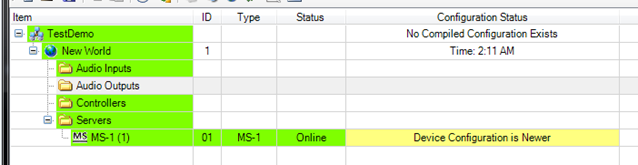
- Go Online - Click the ‘Online’ button to connect to the MS-1(e).
- If successful, the MS-1(e) will indicate it's Status as Online.
- Other CobraNet devices discoverable by the MS-1(e) via the LAN-2 connection will be available once Online
Note: ID and Type columns for MS-1(e) in green indicate the processor providing the IP to CobraNet bridge.
Vocia Universe with multiple MS-1(e) connections
Vocia software is assuming the MS-1(e)'s are online at all times. In the instance one or more MS-1(e)'s of the Vocia Universe are offline Vocia software will need to be able to connect to MS-1(e) #1 as a minimum requirement.
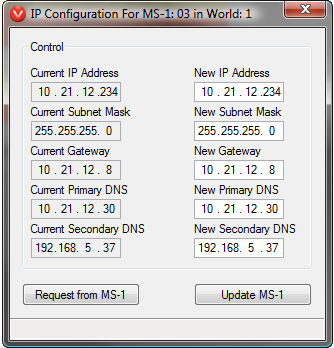
Change MS-1(e) IP address
Once connected to the MS-1(e), the right-click Context menu can be accessed to review the current IP settings and update a new IP address if required.
- Right click MS-1(e) in the software and select ‘IP configuration’ in the context menu to access the IP configuration dialog.
- The current IP configuration is shown and a new IP configuration can be set.
Extracting a configuration
Once connected to the MS-1(e), to retrieve an existing system configuration click ‘Extract configuration from System’ under Network menu or simply click the shortcut icon. See this article on Extracting configuration from an MS-1(e) in an existing system.
Updating firmware
MS-1(e) firmware updates are done over the LAN-1 IP connection to the host PC. When an MS-1(e) is present, firmware updates for Vocia CobraNet devices (including TTS-1(e)) are proxied by the MS-1(e) over the LAN-2 CobraNet link. Firmware is found at Vocia Software & Firmware.
If there are difficulties updating firmware on the MS-1(e) there are a few items to check.
- confirm the IP adress in the MS-1(e) dialog is correct and the PC resides on the same subnet
- ensure that you are logged into the PC as a local admin
- ensure that you are running Vocia software as a local admin
If difficulties still persist
- disable anti-virus (temporarily) and retry
- disable firewall service (temporarily) and retry
- Add Vocia to the list of trusted programs to pass through the firewall and access to Public, Private and Domain networks have been selected, even if Firewall is disabled
- Ping the device to validate network connectivity
- verify the Vocia software and firmware were installed as a local admin