Mitel 3300 ICP configuration for Vocia VoIP-1
Biamp’s VoIP-1 allows Biamp Vocia systems to utilize Voice-over-IP (VoIP) systems that adheres to the SIP (Session Initiation Protocol) standard. The interface permits live, real-time paging using any page code within the Vocia system using the VoIP telephone extension as the paging source. The VoIP-1 is available with one or two VoIP network ports. Each port will support up to two lines. This document details the steps required to configure a Mitel 3300 ICP VoIP system to work with Biamp’s VoIP-1. For information regarding the parameters not covered in this article, please refer to the Vocia help.
Mitel configuration
First, we'll focus on setting up the Mitel server.
SIP Device Capabilities
After logging in to the Mitel server and entering the System Administration Tool, the first step is to ensure that there is a SIP Device Capabilities Number that is compatible the VoIP-1.
- In the category tree, select System Properties—>System Feature Settings—>SIP Device Capabilities.
- Select an unused SIP Device Capability Number.
- Click on the SDP Options tab and ensure that “Prevent the Use of IP Address 0.0.0.0 in SDP Messages” is set to Yes. This option is critical to ensure compatibility with the VoIP-1.
- All other options can remain at their default setting. Take note of the SIP Device Capabilities Number that was used, as it will be needed in a later step.
Add User and Device
The next step is to set up a new user profile for the VoIP-1.
 |
 |
- In the category tree, select Users and Devices—>User and Device Configuration.
- Click the Add button and select Default User and Device.
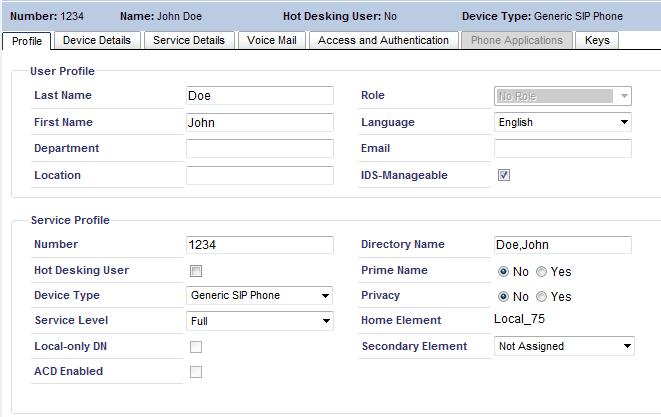
- In the Profile tab, enter a Last Name and First Name for the user under the User Profile section.
- Under the Service Profile section, enter the desired extension number in the Number field.
- For Device Type, select Generic SIP Phone.
- For Service Level, select Full.
- All other fields in the Profile tab can remain at their default values.
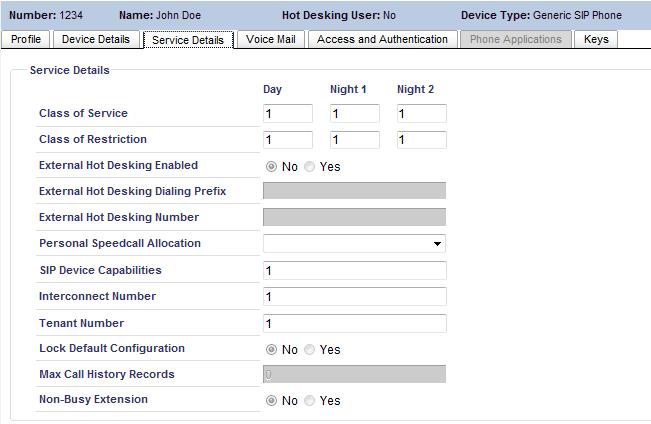
- Select the Service Details tab.
- For SIP Device Capabilities, enter the SIP Device Capability Number that was set up previously (see SIP Device Capabilities, step 4).
- Select the Access and Authentication tab.
- Enter a PIN code in the User PIN and Confirm User PIN field. The PIN code must be a number.
- All other fields in the remaining tabs can be left at their default values.
- Click the Save button to save the configuration.
VoIP-1 Configuration
Next, we'll focus on setting up the VoIP-1 configuration to match the settings that were used in the Mitel setup.
Configuring the network settings
 Open the Vocia software, and connect to your system.
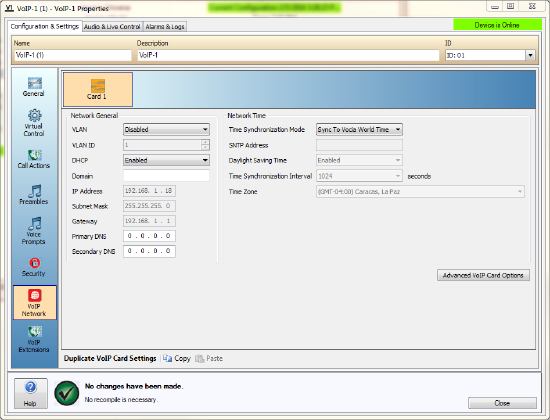
- Double-click on the VoIP-1 that is located in the Audio Inputs folder of your World. At the top of the window, the Configuration & Settings tab should be selected.
- Select the VoIP Network icon located on the left side of the window.
- Under the Network General section in the Properties Sheet, set VLAN to Enabled if your VoIP network uses a tagged VLAN. If the network uses an untagged VLAN or no VLAN, leave this value as Disabled. If VLAN is enabled, enter the correct VLAN ID.
- Under the Network General section, leave DHCP set to Enabled if the VoIP-1 will obtain an IP address automatically from a DHCP server. Otherwise, set it to Disabled, and manually enter an appropriate static IP Address, Subnet Mask, and Gateway for the device.
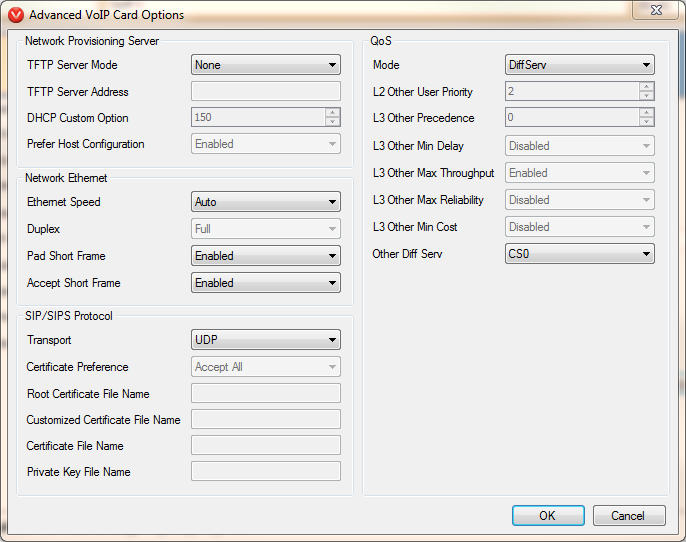
 Select the Advanced VoIP Card Options button to open the advanced settings window.
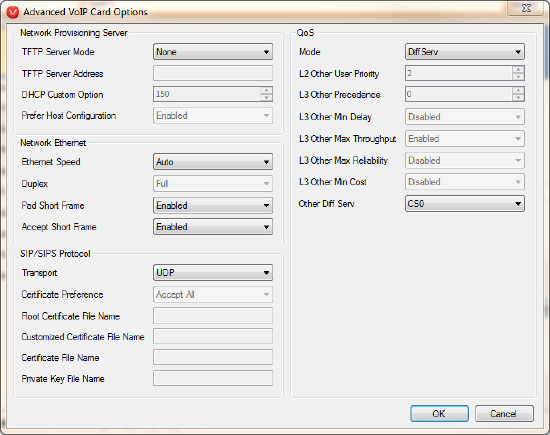
- Under the SIP/SIPS Protocol section, ensure that Transport is set to UDP.
- Configure any other options as necessary in this window and click the OK button to close the window.

Configuring the VoIP settings
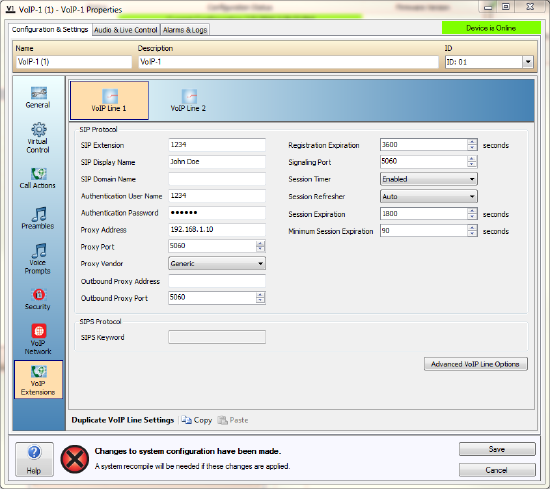 Select the VoIP Extensions icon located on the left side of the window.
- Select the appropriate VoIP line at the top that is to be configured.
- In the SIP Extension field, enter the Extension Number used in the Mitel setup.
- In the SIP Display Name field, optionally enter a name for the extension for Caller ID purposes. Note that this name may be overridden by the proxy server, and therefore may not show up as the Caller ID name.
- In the Authentication User Name field, enter the Extension Number again. This field must match the SIP User Name field.
- In the Authentication Password field, enter the PIN code used in the Mitel setup.
- Select Generic as the Proxy Vendor.
- In the Proxy Address field, enter the IP address of the Mitel server.
- Custom RTP, QoS, and NAT features are configured by selecting the Advanced VoIP Line Options button. If your network prioritizes VoIP traffic using Quality of Service (QoS), select the QoS tab and enter the appropriate settings for your network. Otherwise, skip this step. By default, only the Diffserv attributes are available. If you prefer specifying QoS using TOS, select TOS as the QoS mode from the Advanced VoIP Card Options and return to this page.
- If you’re configuring multiple lines, select the line at the top of the page and repeat steps 8-14.
- All other settings can remain at their default values in most cases.
- Once all changeds have been made, you must send the system configuration. Send the system configuration to the Vocia system (Network—>Send Configuration to System). Once the configuration is loaded, the VoIP-1 will attempt to register with the proxy server. You can check the status by opening the VoIP-1 properties page and selecting the Audio & Live Control tab. Select the VoIP General icon at the top check the SIP Registered field for the current registration status.
Further reading
- Online Vocia VoIP-1 Help
- For more in-depth troubleshooting a Wireshark Trace should be performed on the system.