Mitel 3300 ICP configuration for Audia VoIP-2
Biamp’s VoIP-2 card allows Biamp AudiaFLEX digital signal processors to make and receive phone calls over any Voice-over-IP (VoIP) system that adheres to the SIP (Session Initiation Protocol) standard. This document details the steps required to configure a Mitel 3300 ICP VoIP system to work with Biamp’s VoIP-2 card.
Mitel configuration
First, we'll focus on setting up the Mitel server.
SIP Device Capabilities

After logging in to the Mitel server and entering the System Administration Tool, the first step is to ensure that there is a SIP Device Capabilities Number that is compatible the Biamp VoIP-2 card.
- In the category tree, select System Properties—>System Feature Settings—>SIP Device Capabilities.
- Select an unused SIP Device Capability Number.
- Click on the “SDP Options” tab and ensure that “Prevent the Use of IP Address 0.0.0.0 in SDP Messages” is set to “Yes”. This option is critical to ensure compatibility with the VoIP-2 card.
- All other options can remain at their default setting. Take note of the SIP Device Capabilities Number that was used, as it will be needed in a later step.
Add User and Device
The next step is to set up a new user profile for the VoIP-2 card.
 |
 |
- In the category tree, select Users and Devices—>User and Device Configuration.
- Click the "Add" button and select "Default User and Device".
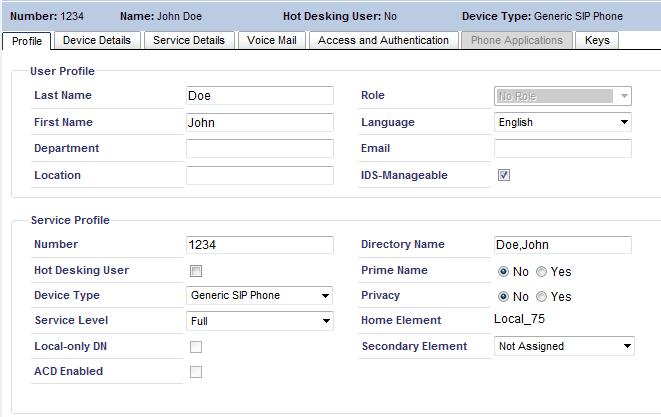
- In the Profile tab, enter a Last Name and First Name for the user under the User Profile section.
- Under the Service Profile section, enter the desired extension number in the Number field.
- For Device Type, select “Generic SIP Phone”.
- For Service Level, select “Full”.
- All other fields in the Profile tab can remain at their default values.
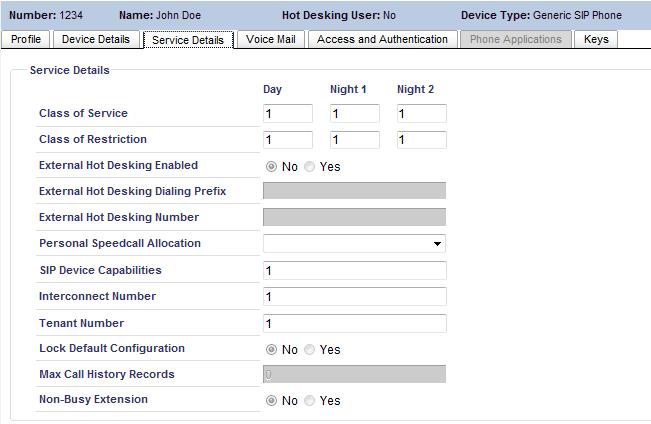
- Select the Service Details tab.
- For SIP Device Capabilities, enter the SIP Device Capability Number that was set up previously (see SIP Device Capabilities, step 4).
- Select the Access and Authentication tab.
- Enter a PIN code in the “User PIN” and “Confirm User PIN” field. The PIN code must be a number.
- All other fields in the remaining tabs can be left at their default values.
- Click the “Save” button to save the configuration.
Audia Configuration
Next, we'll focus on setting up the AudiaFlex configuration to match the settings that were used in the Mitel setup.
VoIP Console
 |
 |
 |
- Open the Audia software, and open the .dap file for your project. Do not connect to the Audia system yet, because the information below cannot be entered while you are connected to the Audia system.
- Double-click on the VoIP Console block and click on the “Advanced” button. In the Advanced Settings window, select the Network page.
- If the VoIP-2 card is connected via a tagged VLAN, then click the “Enable VLAN” check box and enter the VLAN ID. If the VoIP-2 card is on an untagged VLAN (or no VLAN), leave the "Enable VLAN" check box unchecked.
- If the VoIP-2 card is intended to obtain its networking information via DHCP, click on the “Use DHCP” check box. Otherwise, manually enter the networking information into the fields below. If you’re not sure what information to enter for steps 3 and 4, contact the IT administrator who manages the VoIP network.
- Select the Protocol page.
- Enter the Subscriber Number (the extension number entered under Add User and Device, step 4).
- Enter the Proxy Username. This will be the same as the Subscriber Number that was entered in the previous step.
- Enter the Proxy Password (the PIN number entered under Add User and Device, step 11).
- For Proxy Address, enter the IP address of the Mitel 3300 ICP server. If the VoIP port is different than the standard port of 5060, enter it under Proxy Port.
- If your system has a separate proxy server for outbound traffic, enter its IP address under “Outbound Proxy Address” (this is not common). Otherwise, leave it blank.
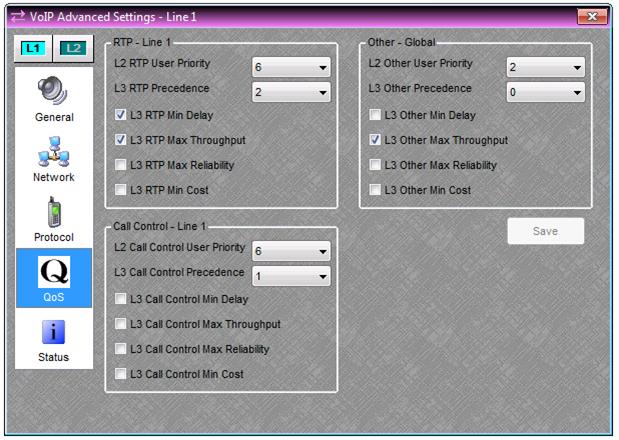
Steps 11-12 only apply if your VoIP network prioritizes traffic using Quality of Service (QoS). If your VoIP network doesn’t use QoS, skip to step 13.
- Select the QoS page.
- Enter the appropriate L2 (Layer 2) and/or L3 (Layer 3) QoS parameters for your network.
Note: The VoIP-2 card defines QoS parameters based on the ToS (Type of Services) code. If your network defines QoS parameters based on the DiffServ code, please refer to this conversion table to convert DiffServ to ToS.
- Close the VoIP Advanced Settings window, and send the system configuration to the Audia (File—>Network—>Send System Configuration). Once the file is loaded, the VoIP card will attempt to register with the proxy server. Various status messages will appear in the top left of the VoIP Console window (above the dial pad) to let you know where the VoIP card is in the registration process. If a status message is displayed in the VoIP console, this indicates there is a problem with the registration process. See VoIP-2 status messages for a description of the possible status messages and their meanings.
Further reading
- If you've followed these steps and the VoIP card isn't registering, check to see if a VoIP-2 status message is indicating a problem.
- If you need to input Quality of Service (QoS) settings, but only have those settings in a DiffServ format, see the DiffServ to ToS conversion table.