Modena Hub network parameters
Networking is an important consideration when deploying Modena Hub, and correct configuration is important to provide a smooth user experience. In this article, we review the parameters that may be adjusted to achieve the best performance from the system.
Connecting to the Web admin
The network parameters are accessed via the Web Administration Console; detailed information on how to enter the Web Administration Console (web admin) can be found here: Accessing the Modena web admin. Once connected to the web admin, select the Network item on the left hand sidebar.
Network configuration
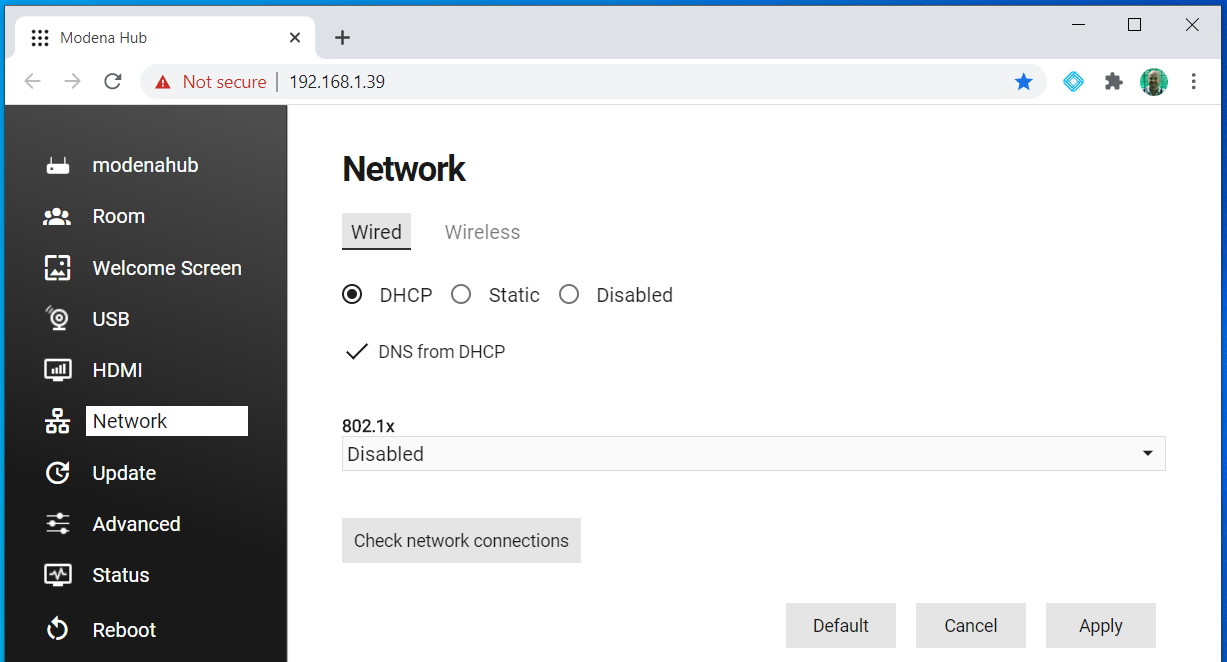
Wired network
This section manages the behavior of the wired connection to the local area network (LAN).
DHCP
When the wired connection is set to DHCP mode, the IP address of the Ethernet interface is assigned by the DHCP server of the connected LAN.
- DNS from DHCP: If this checkbox is ticked, the DNS (Domain Name System) address is assigned by the DHCP server. When unchecked, the DNS field must contain the DNS server address.
If a DHCP server is not available, Modena Hub will automatically assign itself a link-local IP address, with the format 169.254.0.0/16 (169.254.0.0 through 169.254.255.255).
Static
When the wired connection is set to Static mode, the IP configuration of the Ethernet interface must be configured manually.
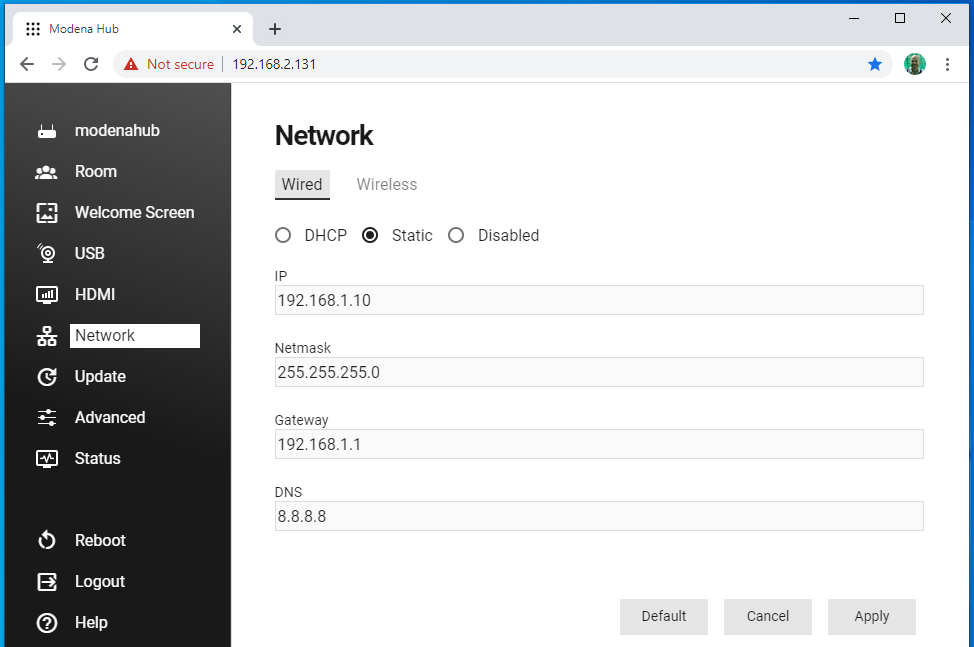
- IP: This is the static IP address of Modena unit on the wired network. It’s important to use private address space to avoid conflict with public addresses.
- Netmask: The netmask identifies the address range of the local subnet.
- Gateway: The gateway is the address of the device managing traffic external to the local subnet.
- DNS: In static mode, the DNS server address must be configured.
Disabled mode (Modena Hub+ only)
When disabled, the wired connection is not in use. Note it is not possible to disable both the wireless and wired interfaces at the same time.
802.1x
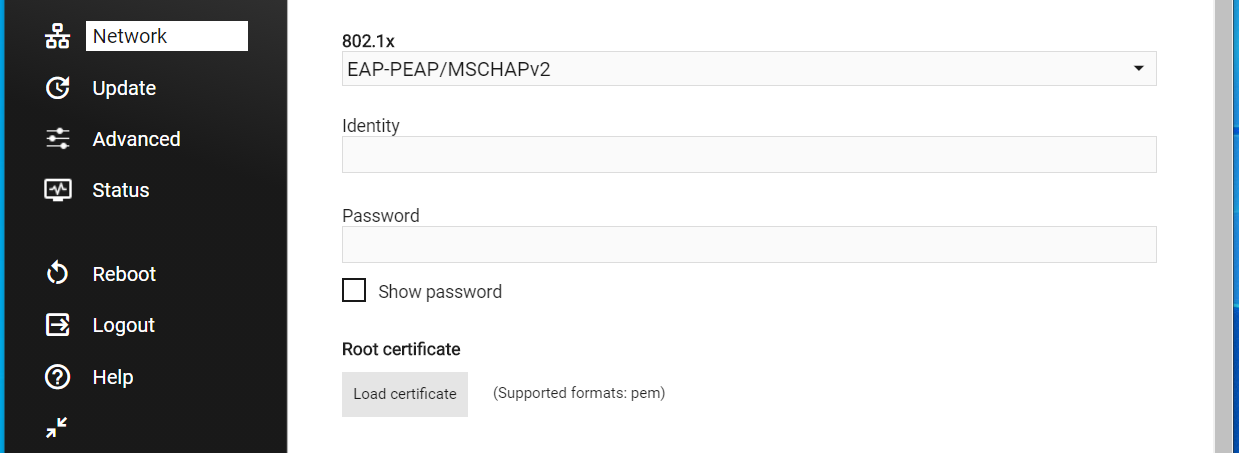
IEEE standard 802.1x is a network protocol that enables security authentication to protect corporate LAN and WLAN. Modena Hub supports this standard and acts as a trusted supplicant when connecting to a network authentication server. Supported protocols are:
- EAP-MD5
- EAP-TLS
- EAP-PEAP/MSCHAPv2
- EAP-FAST
- EAP-TTLS/EAP-MSCHAPv2
When selecting the required protocol, the interface changes to allow inserting the necessary data (Identity, Password, Root certificate, Client certificate).
Check network connections
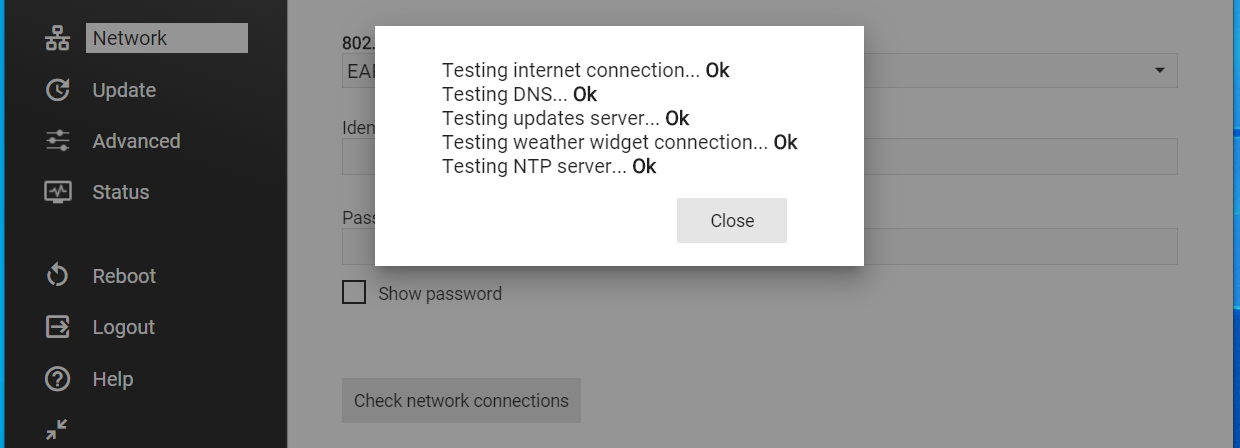
By clicking on this button the system performs a connectivity test, by pinging a series of IP addresses. This is a useful tool to check that Modena can reach the internet and the servers used for the different Hub functionalities.
Wireless network (Modena Hub+ only)
Access Point mode
When configured in "Access point" mode, Modena Hub+ creates its own wireless network and operates as a common WiFi access point.
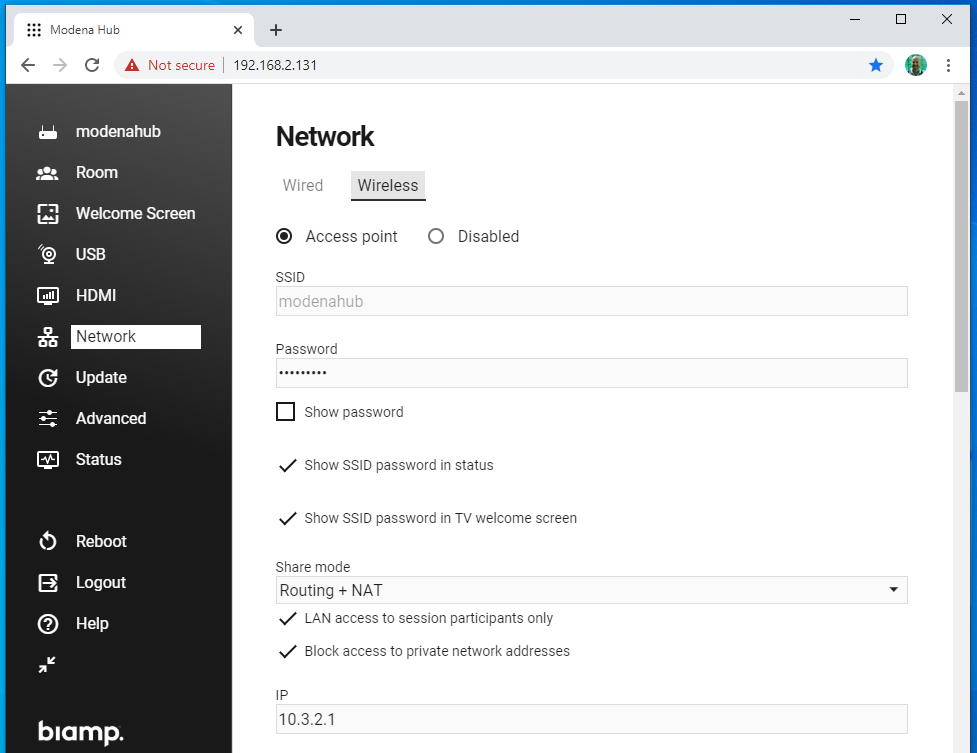
- SSID: this is the WiFi SSID of Modena Hub+ and corresponds to the unit name as defined in the General Settings menu.
- Password: The password field contains the keyword for the wireless connection to Modena Hub+. The password must conform to the industry standard 8 to 63 character requirement. The default value is “modenahub"
- Show password: Tick this checkbox to make your password visible while typing.
- Show SSID password in status: Tick this checkbox to show your password on the status page of Modena Hub+.
- Show SSID password in TV welcome screen: Tick this checkbox to show your password on the welcome screen of the Modena Hub+.
- Share mode: This setting is important to user experience as well as security, as it manages the link between Modena Hub+ wireless and wired interfaces:
- Routing + NAT: Modena Hub+ manages NAT translation, allowing the WiFi clients access to the company LAN resources (which may include internet access), Modena Hub+ proves NAT of the wireless client interfaces to the Ethernet interface. With this configuration there is no firewall isolation between the two subnets.
- Routing: Modena Hub+ routes the WiFi traffic to the Ethernet interface, without natting the addresses. In this configuration there is no firewall isolation between the wired and wireless subnets. The dialog between the two interfaces is managed by the client's LAN route tables.
- Bridge: The Modena Hub+ WiFi network is configured as an extension of the company LAN, using the same subnet. In Bridge mode the IP address of Modena Hub+ WiFi interface is the same as the wired network interface. It is important to consider that the WiFi clients are essentially part of the corporate LAN, and thus correct WiFi operation depends on Modena Hub+ wired interface settings.
- None: There is no connection between Modena Hub+ WiFi clients and the wired LAN. This is useful if you wish guests to have access to a Modena Hub+ session without allowing them access to the corporate LAN.
- LAN access to session participants only: If either of the sharing modes "Routing + NAT" or "Routing" are in use, selecting this checkbox will only allow access to the LAN while a user is in an active session, even if they are connected to the Modena Hub+ access point whilst idle.
- Block access to private networks: When this option is active (recommended), clients connected to the WiFi adapter will not be permitted to reach private IPv4 addresses when "Routing + NAT" or "Routing" modes are in use. Private addresses are defined by the following ranges:
10.0.0.0 – 10.255.255.255
172.16.0.0 – 172.31.255.255
192.168.0.0 – 192.168.255.255
- IP: This is the static IP address of Modena Hub+ within the wireless subnet. The default is 10.3.2.1 and it is recommended to use private address space to avoid conflict with public addresses. Other possible private networks are 172.16.0.0 and 192.168.0.0.
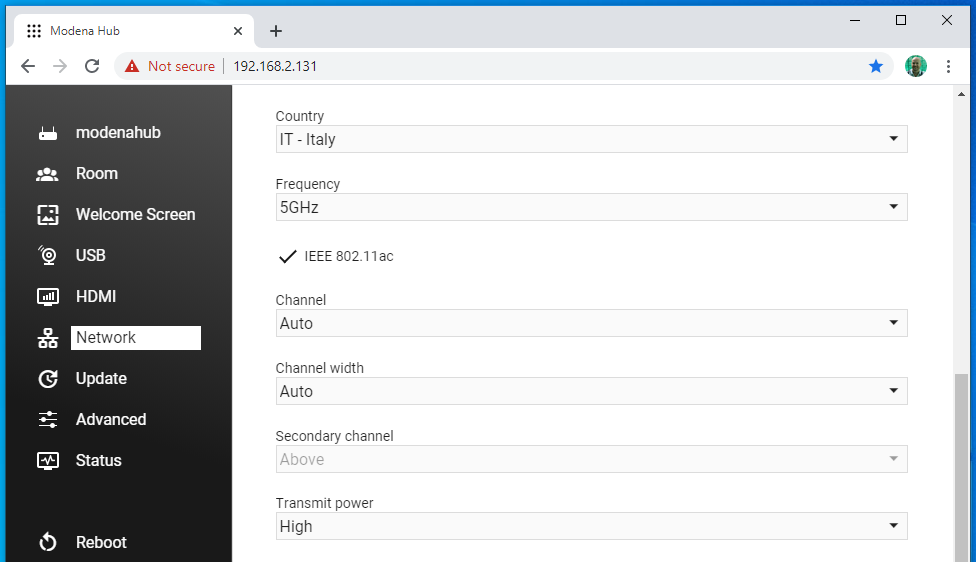
- Country: Every Modena Hub+ unit is configured at the factory for use in a specific region, to conform to local radio frequency laws. The country within this region where Modena Hub+ is to be used must be selected from this list. The WiFi region of your product is visible on the product label.
- Frequency: Modena Hub+ is a non-concurrent dual band WiFi device. It can operate at 2.4 GHz or at 5 GHz and this parameter allows you to change the operating band.
- IEE802.11ac: If the 5 GHz band is selected, the 802.11ac standard can be enabled or disabled. As a general rule, keep the 802.11ac enabled for maximum performance. While the 802.11ac standard is backwards compatible, it may be disabled if 802.11n devices experience problems when using 802.11ac.
- Channel: The Channel parameter allows selection of a static WiFi channel (region dependent). By selecting Auto, the system will choose the best performing channel currently, and every time system is switched on or rebooted.
- Channel width: Channel width should be chosen with consideration of compatibility with the connected devices. Not all devices will work at higher values, especially within the 2.4 GHz band. A good rule of thumb is to use 20 MHz for the 2.4 GHz band and 40 MHz for the 5 GHz band. Use higher values whenever your devices support them, and lower ones for compatibility with older devices. By selecting Auto, the system will choose the best performing setting currently, and every time system is switched on or rebooted.
- Secondary channel: The channels in the 2.4 GHz band are spaced 5 MHz apart. The 5 GHz band channels have 20 MHz bandwidth available Whenever the channel width selected is larger than the available “space” of the configured channel, adjacent channels will be used. The secondary channel selector allows you to specify the direction of the adjacent channel to be used. It will be forced to 'above' when the primary channel is at the beginning of the range, and forced to 'below' when the primary channel is at the end of the range. If your selected channel is in the middle of the range you can manually select from above or below.
- Transmit power: Though it sounds a counter-intuitive, sometimes it is necessary to reduce radio power to improve wireless performance. In a space with high access point density, reducing the transmit power helps to reduce radio interference between the access point and eliminates the "sticky AP" effect. This can improving routing between the access points when devices move around the area.
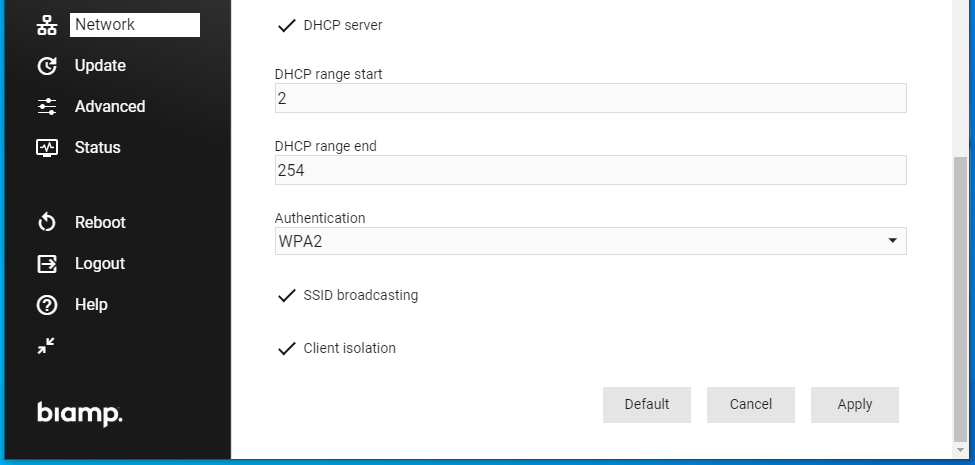
- DHCP server: Tick this checkbox to enable the internal DHCP server of Modena Hub+. This DHCP server automatically configures the IP address and network parameters of the connected clients.
- DHCP range: specifies the range of addresses that may be be automatically assigned to the connected clients.
- Authentication: The available authentication standards for the WiFi clients are WPA and WPA2. Selecting the WPA/WPA2 option allows Modena Hub+ to negotiate the preferred standard with the client.
- SSID broadcasting: Tickt this checkbox to enable broadcasting of the SSID to make it visible to WiFi scanners. Hiding the SSID is possible but not recommended.
- Client isolation: Tick this checkbox to prevent devices connected to Modena Hub+ from interacting with each other.
WiFi Considerations (Modena Hub+ only)
For optimal performance, Modena Hub+ requires the correct selection of WiFi frequencies and channels.
- Frequency: The WiFi standard offers two frequency ranges: 2.4 GHz and 5 GHz, the latter of which is recommended, as The 2.4 GHz band is generally crowded with radio traffic from other devices.
- Channels: Modena Hub+ supports auto selection of the best performing channel: by selecting Auto, the system will choose the best option at the moment of configuration and every time system gets switched on or rebooted. To make the most from this feature, we suggest you reboot the system periodically, or at minimum when changes to the WiFi environment are made. If you wish to manually select the channel, we recommend using a WiFi analyzer tool to understand which channels are occupied and which are not. Select a free channel, or a channel that contains only weak signals from other access points. The web admin will only allow selection of channels legally permitted within the region that the Modena Hub+ has been configured for.
- Place the unit away from “WiFi obstacles” like walls, metallic surfaces and other radio equipment.
Further reading
- Next configuration page: Modena discovery service
- Previous configuration page: Configuring USB devices and HDMI displays on Modena Hub
- Index of configuration pages: Modena system configuration
