Parlé room tuning guide
This guide provides an approach to tuning a conference room that uses Biamp Parlé series microphones. There are many factors that go into tuning a room and many of them exist outside of the microphone and processor. That being said, a good room with appropriately-placed microphones and adequate processing can go a long way towards provide an extraordinary conferencing space.
Getting started
Before getting audio passing through the microphones or DSP, the acoustic environment must be taken into account. A conferencing space should be an acoustically controlled environment that reinforces the reproduction of human speech. Taking initial measurements of the room will help set the expectations for the performance.
Using the table below, estimate the room's performance using an sound level meter and use the Parlé microphone calculators to verify microphone placement.
|
Room Acoustics setting |
Noise Floor |
Reverb Time (RT60) |
Max. Mic-to-Talker Distance | ||
|---|---|---|---|---|---|
| TCM-1 | TCM-X | TTM-X | |||
| Poor | more than 50 dBA | more than 1000 ms | 1.5 meters (5 feet) | 1.8 meters (6 feet) | 1 meter (3.3 feet) |
| Fair | 43-50 dBA | 500-1000 ms | 2 meters (6.5 feet) | 2.3 meters (7.5 feet) | 1.3 meters (4.3 feet) |
| Good | 35-43 dBA | 400-500 ms | 2.4 meters (8 feet) | 3 meters (10 feet) | 1.7 meters (5.6 feet) |
| Great | 30-35 dBA | 300-400 ms | 3 meters (10 feet) | 3.8 meters (12.5 feet) | 2.1 meters (6.9 feet) |
| Perfect | less than 30 dBA | less than 300 ms | 4 meters (13 feet) | 5 meters (16.3 feet) | 2.5 meters (8.2 feet) |
Parlé Processing Block
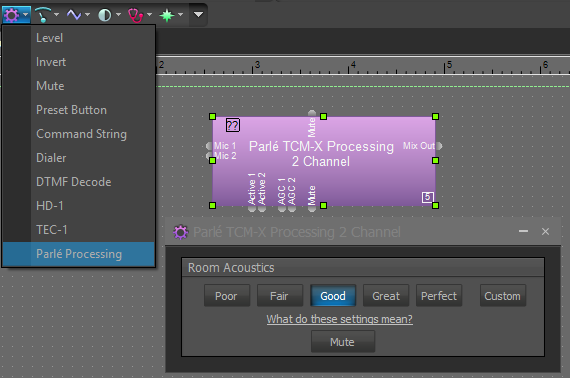 When using any Parlé Beamtracking microphone, it is highly recommended to start with the Parlé processing block, which includes Biamp-recommended processing tailored to Parlé microphones. The Parlé processing block requires firmware version 3.14.1 or later.
There are five presets based on the acoustics table listed above. Start out with the preset according to the initial room measurements from the table above.
These presets can be triggered in a live file so the settings can be auditioned. To learn more about the Parlé processing block, see the Parlé Processing Block - control block article.
UC Platform
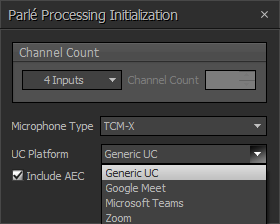
As of Tesira firmware version 3.16, the Parlé Processing Block contains room acoustics presets that are tailored to specific Unified Communications (UC) platforms. When the block is added, the UC Platform can be selected from a drop-down in the initialization window. This can be adjusted later by right-clicking on the block and selecting Edit Block Parameters...
Selecting the correct UC Platform is necessary to ensure proper system performance with any certified UC platforms.
Output Setup
Due to the interaction between the AEC and beamtracking algorithms, it is beneficial to add some delay to the local output path. By adding delay to the local output path, but not to the AEC Ref block, the AEC reference receives a slight advantage in terms of applying the reference signal to the necessary algorithms before the audio signal actually enters the physical space.
Note that too much delay can negatively affect AEC performance, so no more than 10-12 milliseconds of delay should be added. In the example below, a Delay block has been placed just prior to the amplifier feeding the local space, while there is no additional delay added prior to the AEC Ref block.

Custom Parlé Tuning
If the preset selections in the Parlé processing block don't quite sound the way you want them to, the internal processing can be altered just like any other DSP object within Tesira. Follow this tuning guide for a methodical approach to get the most out of the processing available.
The primary tip to tuning Parlé microphones is gain structure. All of the processors covered here rely on proper gain structure to function. It is recommended to leave the input level control in the Parlé input at 0dB and adjust level later in the file.
By selecting the Custom preset, an expand button is exposed on the block in the layout. This shows all of the DSP objects inside the Parlé Processing Block. When selecting Custom, the DSP objects will be set in their last recalled state so try selecting the best fitting preset before selecting Custom so there is a starting point to work with.
WARNING: Selecting Poor, Fair, Good, Great, or Perfect after making adjustments using the Custom setting will override any adjustments and restore the settings to the current selection.

AEC channel
 Regardless of whether or not the AEC channel processing is placed within the Parlé processing block or outside of it, it is important that it's pre-configured for beamtracking. AEC blocks configured for beamtracking will have a "BT" in the lower right corner of the DSP object. What this does is disable the internal AGC processing to be handled later in the signal path.
There are two other settings to adjust in this block: noise reduction and non-linear processing (NLP).
- Noise reduction - This setting helps reduce any steady, static noise floor in a room.
- The higher the noise floor in the room, the higher the noise reduction should be set.
- Higher settings increase the risk of audible audio artifacts being introduced.
- NLP - This processing helps improve AEC when the space suffers from poor acoustics or high reverb times.
- The higher the reverb time in the room, the higher the NLP should be set.
- Higher settings impact double-talk performance of AEC (when both the near-end and far-end are talking simultaneously).

Start both processors at Low and increase according to acoustic performance of the room (see table at the top of the article). The higher the processing, the more artifacts can be introduced so only increase to high if the room conditions demand it. To read up more on this processing, check out the article AEC In Tesira.
Digital Mic Gain
This is a fixed gain increase to bring the microphone up post AEC to ensure proper dynamics processing for later DSP objects.
All level adjustments up to this point should be left at 0dB.
EQ
Before entering the custom editing of the Parlé Processing block, try selecting the most fitting preset as the changes will persist into custom editing. A big part of the presets are focused on the level of filtering the microphones go through. Set this to the best fit before entering custom tuning.
The best way to tune the EQ is to dial into the room on the far end and listen. That way the microphone's audio is heard post-telephony codecs.
Advanced Compressor
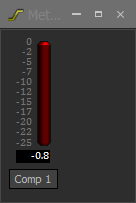
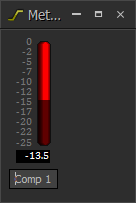
This compressor is configured as a soft noise gate, or an expander. It is used to reduce the noise floor of the room more dynamically than noise reduction can. Use "show meter" to monitor the performance of this processor. There should be little-to-no gain reduction when speaking.
When speaking in the room: When not speaking in the room:
If the audio is choppy, adjust the speed settings here. The release time setting applies to the speed with which gain reduction is reduced to 0dB and speech is allowed to pass. The attack speed is the time it takes for gain to be reduced following speech. These are inverse to a compressor.
Gating Auto Mixer
Double check that the gain structure is solid up to the Gating Auto Mixer. All further level changes should be made post-automixer so that the internal thresholds aren't effected. At this point, all prior gain and filtering should be locked in place, and physical microphone locations shouldn't change. If these are adjusted, readdress the Gating Auto Mixer settings.
To validate the functionality of the gating auto mixer, use logic meters attached to the "Active" logic nodes of the Parlé Processing block and walk about the room. These should track from microphone to microphone.
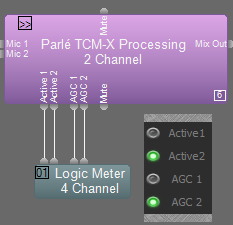
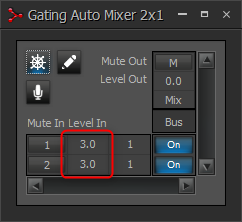
If the gates do not open fast enough, or if the logic does not switch away from one single microphone, apply more input gain to the respective channels:
If the room's noise floor is still high after noise reduction and the advanced compressor reduce it, the gating auto mixer can be used as well. Enabling a number of open microphones (NOM) limit can help reduce the noise floor by reducing the number of microphones active at one time.
When enabling a NOM, it is good practice to reduce the time each microphone channel is held open. This way it can jump between microphones faster. This is done in the channel settings. It is recommended to bring this down to 400-600 milliseconds. Use the logic outputs to ensure the NOM switches channels appropriately while walking about the room.
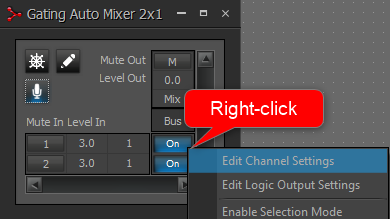
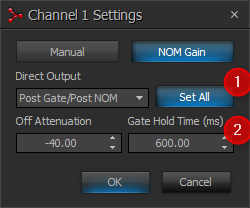
Make sure set all is selected or adjust each channel accordingly.
AGC
The preset parameters in the AGC are carefully chosen for the Parlé series microphones but depending on gain structure, this block can sometimes hinder performance. The only way to test the AGC processor is to speak in the room long enough for the gain meter to stabilize.
The gain meter should read between 0 and +3dB in a normal speaking location. The goal should be that the further away one speaks, more gain can be applied to make up for distance.
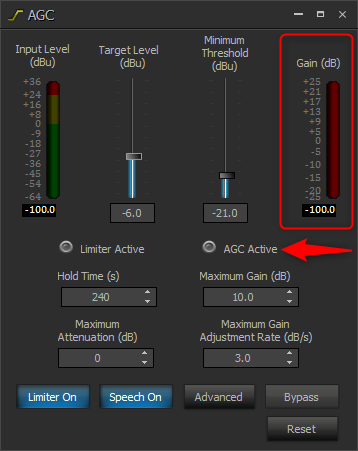
Note that the Maximum Attenuation (dB) is set to 0 and is not intended to decrease the level below zero for loud talkers with beam-tracking microphones. Loud talkers or other loud room noises are attenuated by the compressor located next in the signal flow.
If the gain is ramping up to +10dB and staying there, the input gain is too low. Increase microphone levels at the gating auto mixer inputs so not to effect other prior processing. To read up more on dialing in AGC, check out this article.
Advanced Compressor
The second compressor block is setup as a standard compressor and is there to help any sudden loudness that AGC isn't quick enough to handle.
To ensure it is operating optimally, sit in the typical talker location and speak. There shouldn't be more than 0-3dB of gain reduction (use show meter in the compressor). If there is more gain reduction while speaking at an average volume, raise the threshold until the meter reads about 0-3dB of gain reduction.
Output levels
Once the whole Parlé Processing block dialed in, if the microphone levels need any more adjustments, this will need to take place after the processing block. This applies to all third-party control or minor adjustments. That way, the changes don't interfere with the multiple audio thresholds inside the block like compression, auto-mixing, or AGC. Making audio level changes before the Parlé processing block will throw all of these settings out of balance.
More EQ
Just like with output levels, any extra EQ needed once the processing block is dialed in should be done post processing block so that not to alter the set thresholds. Adding a parametric EQ after the Parlé Processing block is also a good place for setting an EQ on the whole microphone mix.

Try placing a call from the room and adjusting this EQ to fine tune all of the microphones.
More AEC
Once the microphones are sounding good, it's best to ensure there is no echo for talkers on the far end of calls. This process is handled by the AEC algorithm. The key to properly tuning AEC is also tied to gain structure. The AEC Ref block should be receiving the same signal that will be heard in the local conferencing space in order to properly remove far-end talkers from the microphones in the local space.
For Parlé microphones, it is beneficial to provide the AEC reference with the same signal being sent to the local outputs, but with a +12dB increase. This helps it to better capture the signal and apply it to the AEC algorithms. To do so, place a Level block prior to the AEC Ref block, and attach a Peak Meter to it. Adjust the Level block until the signal measures about 12dB higher here than it does on meters placed prior to local room output blocks.

For more precise AEC tuning, open the Ch Processing dialog found in the AEC processing block. The ERL meter found in this dialog shows the difference between the signal being captured at the AEC Ref block and the audio signal being captured by microphones in the local space. This can be used to determine what adjustments to the system may be needed to ensure the best AEC functionality. Below are the recommended adjustments to a system using Parlé mics based upon what the ERL meter shows.
- ERL >15dB: increase amplifier level.
- ERL 0dB-15dB: good performance, no adjustment should be needed.
- ERL < 0dB: reduce amplifier level.
If the ERL meter is reading in the "good performance" range, but there are still AEC echo artifacts heard, see the AEC in Tesira Article for more troubleshooting advice.
