Netgear M4250 - Connecting to the M4250
The M4250 series of switches are equipped with multiple methods of configuration. They include an integrated web server that provides two different Web User Interfaces for configuration. The Main UI contains all switch configuration options while the AV UI contains a simplified set of configuration options specific to audio video systems. A Command Line Interface is also available for those that prefer a console-style configuration.
Connectivity can be accomplished through one of three methods.
- Network to any of the Ethernet network ports through the management VLAN
- Network to the dedicated Out-of-Band (OOB) network port
- Serial or USB connection using the dedicated console or USB port. Note that the console connection requires a specialized serial rollover cable and a Type-C USB cable.
Ethernet connection
1. Configure your computer with a static IP address.
- For access over the OOB port, us an IP address in the 192.168.0.x/24 subnet. (ie. 192.168.0.100/255.255.255.0)
- For access over any other Ethernet port, use an IP address in the 169.254.x.x/16 subnet. (ie. 169.254.100.201/255.255.0.0) Note that you can use “obtain IP address automatically” on the computer adapter and it will self-assign to a link local address in the proper range.
2. Launch a web browser and enter the default IP address of the switch in the address field of the browser:
- For access using the OOB port, enter http://192.168.0.239
- For access using any other Ethernet port, enter http://169.254.100.100
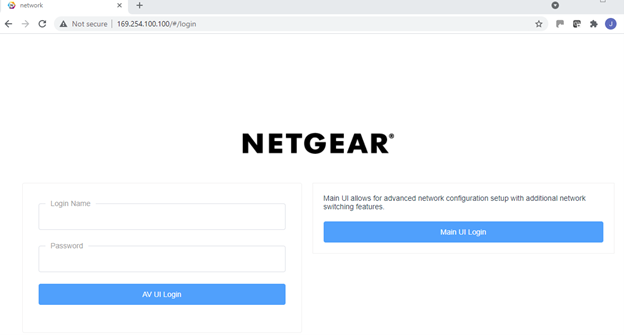
3. The main login page has options to access either the AV UI or the Main UI. To log in for the first time, do one of the following:
- To access the AV UI, enter admin for the user name, leave the password field blank, and click the AV UI Login button.
- To access the main UI, click the Main UI Login button. The main UI login page displays. Enter admin for the user name, leave the password field blank, and click the Login button.
4. On first login, you are required to specify a password. Enter a password and log in again using your new password.
Console connection
To use the CLI for initial configuration, connect a computer to one of the console ports on the switch.
1. Depending on the connector type at your computer or terminal, and the port that you are using on the switch, use one of the following cables:
- USB console cable for use with the Type-C USB console port. Note: To use the Type-C USB port, you must install the USB driver on the computer. You can download the driver by visiting https://www.netgear.com/support/download/.
- Console cable for use with the RJ-45 RS232 console port.
2. Connect one end of the cable to the appropriate port on the switch and connect the other end to your computer or terminal.
3. If you connect a computer to a console port on the switch, start a terminal emulation program:
- On a computer with a Windows operating system, you can use HyperTerminal, Putty, or Tera Term.
- On a computer with a Mac operating system, you can use ZTerm.
- On a computer with a Linux operating system, you can use Minicom.
4. Configure the terminal emulation program to use the following settings:
- baud rate: 115,200 bps
- data bits: 8
- parity: none
- stop bit: 1
- flow control: none
5. At the user prompt, log in to the switch using the user name admin and press Enter. At the password prompt, do not type a password but press Enter. On first login, the switch forces you to specify a password.
6. Specify a password and log in again using your new password. You can now use the CLI to manually configure the switch, including the IP address, or use the ezconfig utility as outlined in the M4250 Series Installation Guide.