Netgear M4250 - Enabling AVB using the AV user interface
This article describes how to enable AVB on the Netgear M4250 switch through the AV User Interface.
November 2023 Netgear AV firmware 13.0.4.17 onwards AVB support is enabled license free.
Please upgrade your Netgear AV switch to the latest release.
Please contact Netgear AV Support for further information.
Enable AVB on Default VLAN
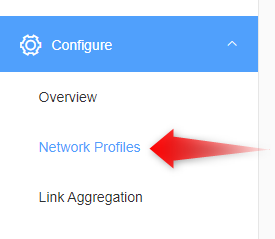
1. In the menu pane located on the left side of the AV User Interface, Select Configure and then Network Profiles.
2. In the Configured Profiles section of the interface, select Edit from the profile configuration menu accessed from the 3 dots as shown below.

3. The default profile template will be Data. Select the Audio AVB option from the Profile Template drop-down menu and then click the Apply button.
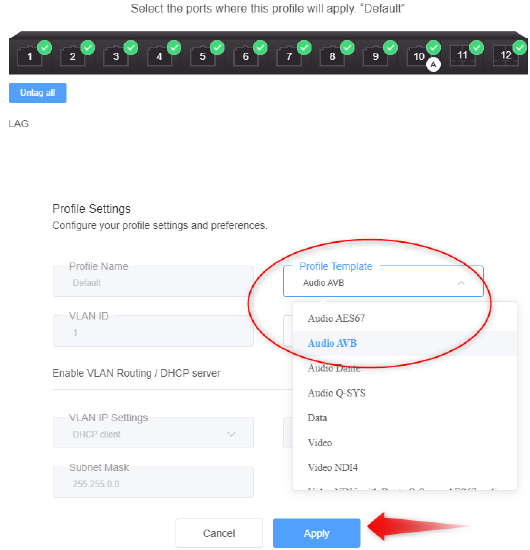
4. Note that you will see a VLAN 2 appear in the Configured Profiles section. This is a dynamic VLAN for AVB stream traffic that is automatically created and managed by the switch as part of the AVB implementation.

5. Click the Save icon at the top of the interface to save the configuration. Note that failure to save the configure will result in AVB no longer passing correctly when the switch is rebooted.

Enable AVB using a new profile and VLAN
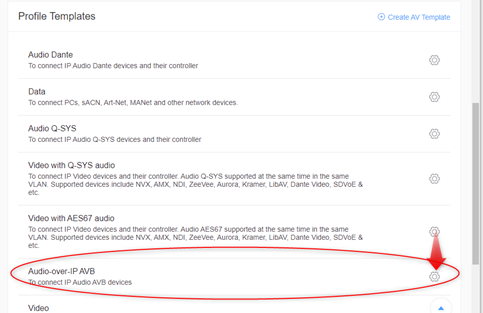
1. To activate AVB on a dedicated VLAN, scroll down to the Profile Templates section and locate the Audio-over-IP AVB profile. Select the gear icon to open the Profile Configuration window.
2. From this window, select the network ports to be included in the profile. In the image below, ports 1 through 16 are assigned to this profile and 17 through 30 are not.
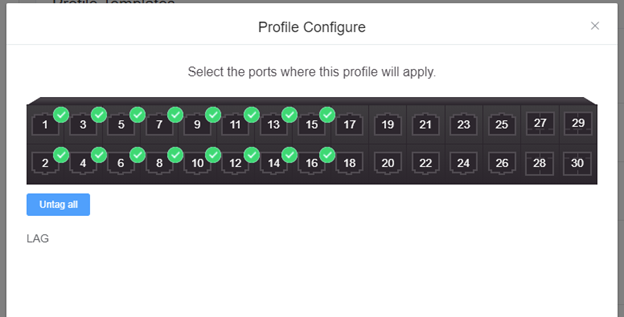
3. A profile will create a VLAN with the settings appropriate for the protocol used on that VLAN.
In the Profile Settings, configure the following:
- Profile Name – Give the profile a descriptive name.
- VLAN ID – Assign a VLAN ID to use. Note that you cannot use the same VLAN ID for a profile that is already active. You must also not use VLAN 2. AVB uses a dynamic VLAN for the audio traffic and VLAN 2 is reserved for this use. The VLAN you are creating will be used for the AVB control traffic.
- Color – Pick a color that will indicate the VLAN in the UI.
- Enable VLAN routing / DHCP Server – This is a switch used to turn on/off the DHCP server for the VLAN. When enabled, the following options must be configured:
- VLAN IP Settings – Select the appropriate mode for configuring the VLAN IP Address
- None
- Static
- DHCP Client
- VLAN IP Address and Subnet Mask – These fields are used to configure the IP address information for the VLAN
- DHCP Server – Set to Off to disable the DHCP Server. Select “DHCP Server” to enable the DHCP server on the VLAN
- Default Router – Address of the default router for the VLAN
- DHCP Server Pool Start – Lowest address to use in the DHCP address pool
- DHCP Server Pool End – Highest address to use in the DHCP address pool
- DNS Server 1 – Address of the primary DNS server
- DNS Server 2 – Address of the secondary DNS server
- Search Domain – Domain used to resolve hostnames that are not fully qualified
- Lease Time (minute) – Lease time for the DHCP reservation
The image of the switch in the Overview tab will indicate VLAN membership based on the switch port color as shown here.
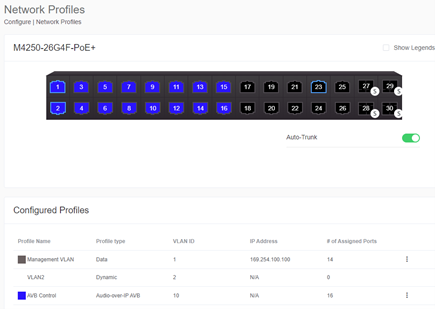
4. Click the Save icon at the top of the interface to save the configuration. Note that failure to save the configure will result in AVB no longer passing correctly when the switch is rebooted.

Netgear M4250 MRP timers
Please follow this article showing how to set the MRP timers to suit AVB endpoints: Netgear M4250 MRP timers
