Recording using TesiraFORTÉ DAN with DVS
The addition of Dante to the Biamp TesiraFORTÉ family not only welcomes support of Dante-enabled devices, but also the benefits of Dante supported software. Audinate's Dante Virtual Soundcard (DVS) turns your computer into a Dante-enabled device, allowing Dante-networked audio to be transmitted to and from your Digital Audio Workstation. Through this article you will learn how to successfully implement a TesiraFORTÉ DAN with DVS into your recording environment and utilize TesiraFORTÉ DAN to produce an exceptional recording.
Preparing the switch
A network switch is required to communicate with both the Control and Dante ports of the TesiraFORTÉ DAN simultaneously. While Dante itself generally doesn't require much setup and can live happily with other networked traffic, there are a few settings to check on beforehand to ensure optimal performance in a Biamp environment:
- Ensure all AVB traffic is on a dedicated switch or isolated from Dante with a VLAN
- Disable IEEE 802.1AS on all ports using Dante. For clocking, Dante uses IEEE 1588 PTP while AVB uses IEEE 802.1AS. 802.1AS is a tighter revision of 1588 PTP and shouldn't be problematic with legacy devices such as Dante endpoints, but appears to present some clocking conflicts. The current resolution is to disable 802.1AS on all ports using Dante.
- It should be noted that at the time of this article's publication the switch which Biamp Systems is reselling, the Netgear GS724Tv4, comes pre-configured with 802.1AS enabled on all ports. Instructions on disabling 802.1AS specifically on the GS724Tv4 can be found here.
- Ensure EEE (Energy Efficient Ethernet) is disabled on all ports used for Dante traffic.
- Adjust Diffserv (SCP) Quality of Services values to below recommended settings for all ports used for Dante traffic:
| Priority | Usage | DSCP Label | Hex | Decimal | Binary |
|---|---|---|---|---|---|
| High | Time critical PTP events | CS7 | 0x38 | 56 | 111000 |
| Medium | Audio, PTP | EF | 0x2E | 46 | 101110 |
| Low | (reserved) | CS1 | 0x08 | 8 | 001000 |
| None | Other traffic | BestEffort | 0x00 | 0 | 000000 |
Connect the TesiraFORTÉ DAN
Now that our switch is properly configured, plug in the TesiraFORTÉ DAN's control and Dante ports to the switch and discover the device. Clear the FORTÉ's default configuration and load the below configuration as a quick start point.
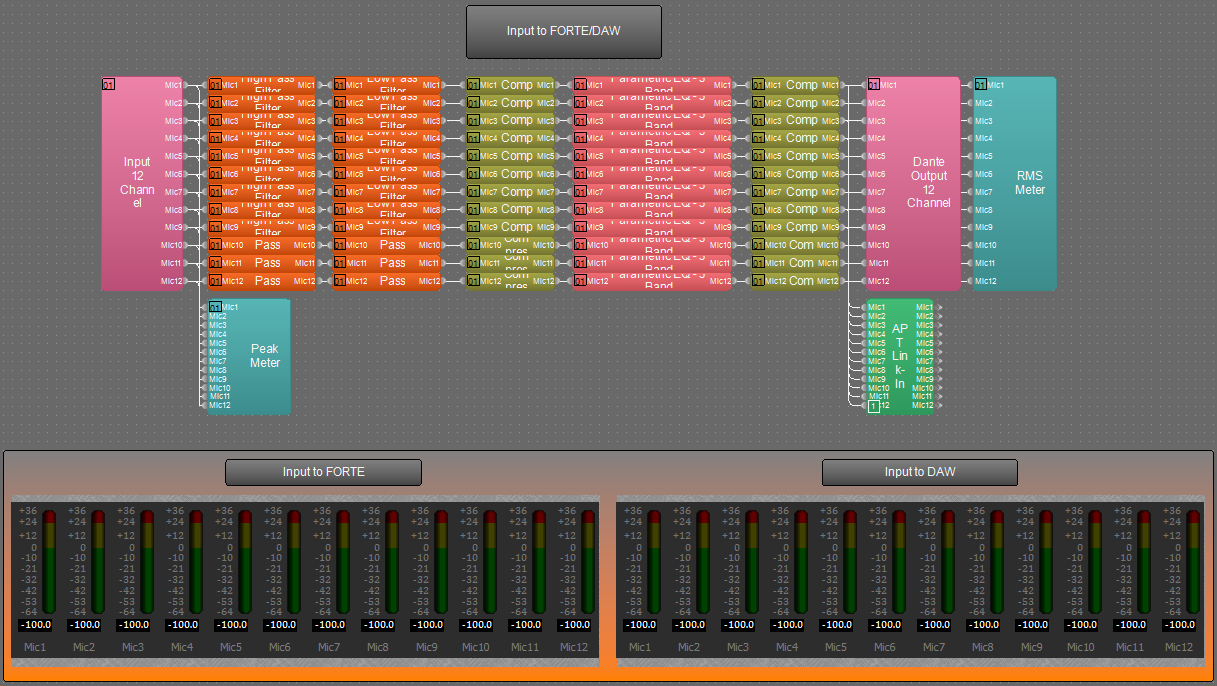
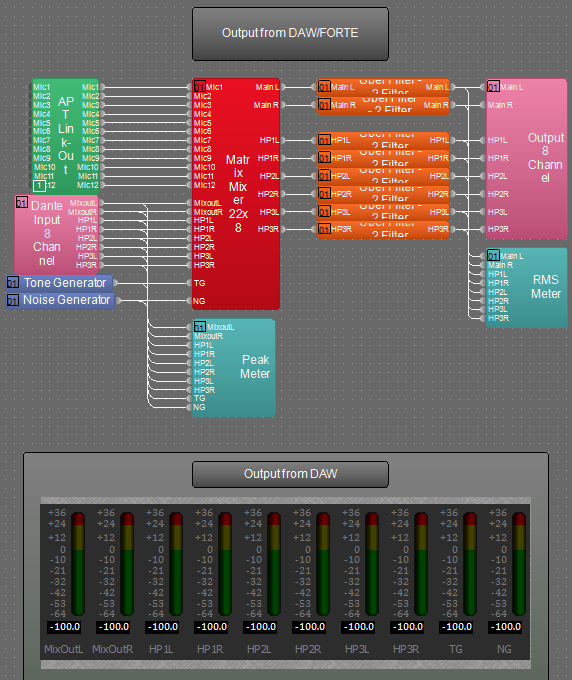
TesiraFORTÉ DAN AI DVS Interface
Starting Dante Virtual Soundcard
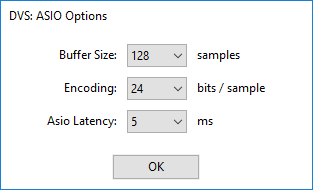
![]() Dante Virtual Soundcard is software developed and sold by Audinate which uses your PC's existing Ethernet port to deliver up to 64X64 channels of bidirectional audio. DVS runs on Windows (ASIO and WDM drivers) and Mac OS X (Core Audio integration) with fixed latencies of 4ms, 6ms, and 10ms. While DVS can support up to 32-bit audio at 192 kHz, The Brooklyn II card in the TesiraFORTÉ DAN is limited to 32X32 streams of 24-bit audio at 48 kHz.
Dante Virtual Soundcard is software developed and sold by Audinate which uses your PC's existing Ethernet port to deliver up to 64X64 channels of bidirectional audio. DVS runs on Windows (ASIO and WDM drivers) and Mac OS X (Core Audio integration) with fixed latencies of 4ms, 6ms, and 10ms. While DVS can support up to 32-bit audio at 192 kHz, The Brooklyn II card in the TesiraFORTÉ DAN is limited to 32X32 streams of 24-bit audio at 48 kHz.
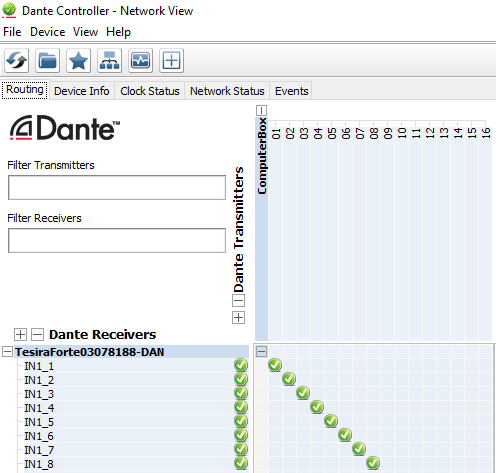
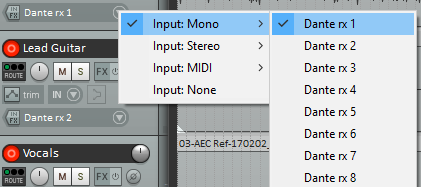
Once you have opened DVS, adjust your settings as desired and click "Start". This will create Dante-audio streams which will now be visible in Dante Controller. Click the cross points to assign desired I/O of Dante channels.
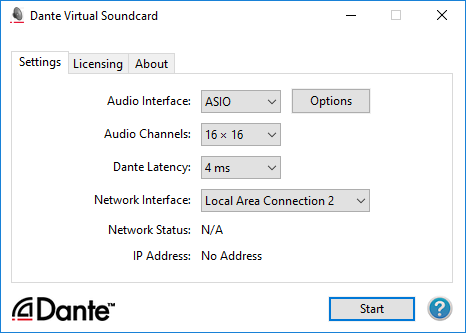

A quick note when using Windows with ASIO, the audio software will dictate to DVS what sample rate and bit depth are to be used. It is recommended to verify your project settings before recording to avoid any issues with sample rate mismatch.
Open your Digital Audio Workstation
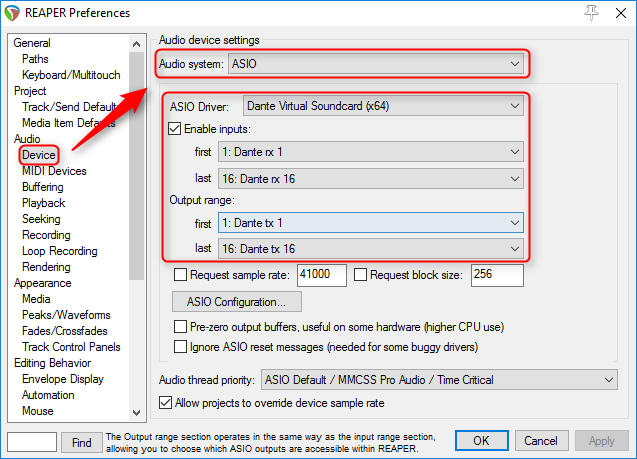
DVS is designed to work with popular Digital Audio Workstations (DAWs) such as ProTools©, Nuendo©, Cubase©, and Logic©. Once started, DVS will appear on your computer as an ordinary Core Audio, ASIO, or WDM device. For this example I am using Reaper© with ASIO drivers.
In your DAW, locate the hardware or device settings and select DVS as the audio system. You can find this in Reaper by going to to Options > Preferences (Ctrl+p) > Audio > Devices. Once enabled, DVS will appear within your DAW's channel I/O.
Verifying levels
As with any audio system, you will want to ensure good gain structure to get the most out of your recordings. To do this properly, is it important to understand that the meters displayed in your GUI are Full Scale meters (dBFS). This means they will show a maximum of 0 and a minimum of -60 dBFS. Meters in Tesira are dBu meters with a maximum of +36 and a minimum of -100 dBu; anything above +24 dBu will be clipped. This means that a signal registering as -24 dBFS in your GUI should register at 0 dBu on the meters in the Tesira file. The following image shows Reaper© and Tesira meters side by side for comparison:
