

TEC-1 Setup and Programming Guide
Overview and Setup
The TEC-1 is a PoE remote control for Tesira systems, capable of controlling up to 32 selectable system volumes and/or triggering actions. The device connects via standard CAT-5/6/7 cabling and is powered over Ethernet (PoE). This article will explain the basics of discovering and configuring a TEC-1 as part of a Tesira system.
Discovery In Tesira Software
The TEC-1 is discovered through a Tesira DSP on the control network, in the Remote Devices section of Device Maintenance. A new unconfigured TEC-1 will default to automatic IP assignment (DHCP). If you need to set a static IP address, you can do so through its Network settings in Tesira Software, or manually through the Setup mode detailed below. You can also change the TEC-1's Host Name from the Network Settings window.

Setup Mode
The TEC-1 can also be configured for discovery using Setup Mode. When using this method, the TEC-1 does not need to be connected to a Tesira Network, though it does need to be powered by PoE. To enter Setup Mode, place a metal object (such as a paper clip) across the locksmith pins.

This will bring up several icons that can be navigated using the scroll wheel. The cursor has two modes: select and modify. In select mode, the cursor appears as a gray box. When scrolling through the available items in the list, the gray box will highlight the current selection.
On fields that can be modified, use the Select button to transition to and from modify mode. In modify mode, the cursor appears as an outline box. Use the scroll wheel to adjust the setting up or down.


The Hostname and IP settings can be changed by selecting the Networking icon, which looks like 3 computers networked together.
For a detailed breakdown of all configuration options in Setup Mode, please review pages 5-8 of the TEC-1 Operation Manual.
Device ID
Once you have discovered your TEC-1 in the Tesira Software, from the Remote Device Maintenance window, select TEC-1 Properties…
From here you should either note down or change the Device ID to something unique. It often helps to name it something location based like LoungeTEC1, LobbyTEC1 etc. In this example I have named my TEC-1 "BestTEC1ever".

The Device ID will become important when matching up your programming block to the correct TEC-1 device. You can optionally set Unlock Code settings at this time if you desire. The Device ID is Case sensitive and must be noted down exactly.
Programming
To program your TEC-1 you will start by adding a TEC-1 programming block to your file. This can be found in the Audio Objects menu under Controls. When you place it in your design it will let you set the number of logic outputs it has, from 0-32. This can be changed later by right clicking on the block and selecting Edit Block Parameters.
Control Items
Double clicking on the TEC-1 block will bring you to the programming interface. By clicking New you will add a control item that will appear as a list on the screen of the configured TEC-1. For instance, in the use case of a hotel, you might want volume controls for several parts of the building accessible from your TEC-1. Each Control item can be programmed with a Level Control, a Logic Control, or both.
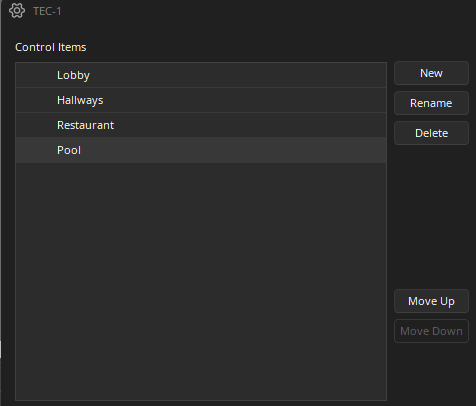
Level Control
The Level Control section is optional and will be controlled by the touch track wheel. It can be programmed to affect any block with a level control in it, such as levels, inputs, outputs, mixers, source selectors etc. Select the block Object Code/Instance Tag and Control ID (Channel) that you want to be controlled. It can be helpful to name your Object Codes and Channel names in the Properties Window if you have a large file with many level blocks.

Logic Control
The Logic Control is optional and is controlled by the selection button in the middle of the track wheel. If programmed to a Logic Index, pushing the button will send a momentary logic high signal from the selected logic node. This logic node can be fed into any block with a logic input such as mute blocks, source selectors or preset buttons. A common use case is to program the button to mute the selected channel. For an example of how to program the Logic Control as a toggle mute, see the article TEC-1 and the Mute Block.

Configuring the TEC-1
Once you have finished programming your TEC-1 block it can be sent to any TEC-1 visible on the control network. The way to assign a particular TEC-1 block to a physical TEC-1 device is by matching the Device ID, which can be found in the bottom right of the TEC-1 block.

You'll recall noting or changing the Device ID during the discovery step, this is where that information comes into use. Make sure the Device ID in the programming block and the Properties of your target TEC-1 match exactly. This field is case sensitive.
Once both Device ID fields match exactly, you can send your configuration, and you should see your programming populate on the screen of the TEC-1.

Advanced Options
It is possible to add the TEC-1 block to a preset in order to give the interface the appearance of having multiple pages, or changing a control item to say something like "Muted" or "Unmuted" to provide visual feedback to the user. This concept can be explored in more detail in the article Creating multi-page TEC-1 configurations.