What is Evoko Booking, and the Evoko Booking Portal?
The article describes the Stand a Alone options in more detail for the Evoko Liso. We refer to the stand alone option as Evoko Booking.
What is Evoko Booking?
Evoko Booking is a stand-alone booking platform that makes it easy for anyone to find and book meeting rooms in a web interface. It includes the same smart filters that Evoko Home provides if you were connecting your Evoko Liso panels to M365 or Google.
Since Evoko Booking is a stand-alone platform it doesn't require any integration with an external booking system (e.g. Office 365 or Google G Suite), instead all meetings are stored within Evoko Home.
How to turn on the Evoko Booking Portal?
If you choose not to go the standalone route for the Liso you can still enable the Evoko Booking web interface for environments syncing to either Google or Microsoft. This provides users on location another avenue to book through a web portal. Keep in mind that all users will need to be added to Evoko Home if you want to provide them the ability to book through the web interface.
To turn on the Evoko Booking option for your rooms you will need access to Evoko Home Global Settings:
- Navigate to Global Settings in Evoko Home
- Scroll down to Evoko Booking and select enable.
- To access the Evoko Booking web interface enter your Evoko Home server base URL folllowed by /evokobooking (https://localhost:3002/evokobooking) and log in with an account that has User level access in Evoko Home. (If you are asking Evoko Home from a different coputer on the same network you will want to type the IP/evokobooking of the Evoko Home server.

How to setup Evoko Booking in Evoko Home?
Before you start setting up Evoko Booking it's important that you have set up a SMTP service on your organization’s email server. Please consult your email service provider or system administrator on how to do this for your organization.
- To start using Evoko Booking you will need to install Evoko Home on a server. It's this server the Evoko Liso units will connect to along with users to access the Evoko Booking web interface. For more information on how to install Evoko Home visit the respectable links below for your server choice (you can read more about server specs here):
- Once you have Evoko Home installed you can access the Web Interface by going to http://localhost:3000/
- Start by selecting Evoko Booking as your booking system, and then press Next.
- Select how Evoko Home will be accessing the internet. Choose between Direct or Proxy (if you choose Via Proxy you will need to enter the required URL and port along with credentials). For this exercise we will be choosing Direct. Press Next.
- You will be prompted to enter your Evoko Booking Admin Account Credentials as shown below:

- Admin Email: This can be any email address that you want to use to login into Evoko Home as a Global Admin. It is not restricted to use the same domain as for the SMTP service. (Note! In Standalone mode the Global Admin won’t see Evoko Booking Reservations. You will have to create a separate account later (User, Local Admin or Statistics User) to be able to use Evoko Booking Reservations.)
- SMTP Server: This will be the server address for your SMTP service.
- TLS Option: In the drop list select which TLS option to use, Auto (default), Force SSL/TLS, STARTTLS or Unencrypted.
- Allow untrusted SSL/TLS certificates: Select whether to allow untrusted SSL/TLS certificates. Default value is unselected/not allowing untrusted SSL/TLS certificates.
- SMTP port: Enter which port number which will be used for service communication. Depending on which TLS option, the default port number changes, Auto - 587, Force SSL/TLS - 465, STARTTLS - 587 or Unencrypted - 25.
- Allow anonymous credentials: Select whether to allow anonymous credentials or not. Default value is unselected/not allowing anonymous credentials.
- SMTP username: Username (email-address) for the SMTP email account. This will also be the email of the sender of all emails from Evoko Booking.
- SMTP password: Password for the SMTP email account.
- You will then be promoted to enter the HTTPS Application Port you would like to use with Evoko Home (Default 3002) Press Next.
- Enter a NTP Server (pool.ntp.org) that Evoko Home and the Evoko Liso units will have access to and then press Next.
- You will then be provided your credentials to log into Evoko Home going forward. It is important to note this password down!
- Now that you have configured Evoko Booking with your SMTP you can proceed the Basic Evoko Home Setup, and then to the Evoko Liso Installation.


How to access Evoko Booking Portal?
To access the Evoko Booking web interface enter your Evoko Home server base URL followed by /evokobooking (https://localhost:3002/evokobooking) and log in with an account that has User level access in Evoko Home.
If you have not added any users to Evoko Home you must add one prior to trying to log in at the above URL.
- Navigate to Users and select Create User.
- Enter the user information and press Save.
- It's important that the user you have added is set to User under User Type.
- An email with Pin and Password will be generated and emailed to the inbox of the user.
- Open an incognito window and navigate it to https://localhost:3002/evokobooking or https://IP/evokobooking of the Evoko Home server.
- Log in with the email and password of the user.
- You will land on a page that shows you visibility of all rooms like below:
- Keep in mind that the same local settings applied to the panel will be applied in this booking portal. For example; if Book Future Meeting is disabled in the Stockholm Room settings, then you will not be able to book any future meetings in the portal.


Evoko Booking Portal Navigation
Via the web interface
To access the Evoko Booking web interface enter your Evoko Home server base URL followed by /evokobooking (e.g. https://localhost:3002/evokobooking) and sign in with your user account.
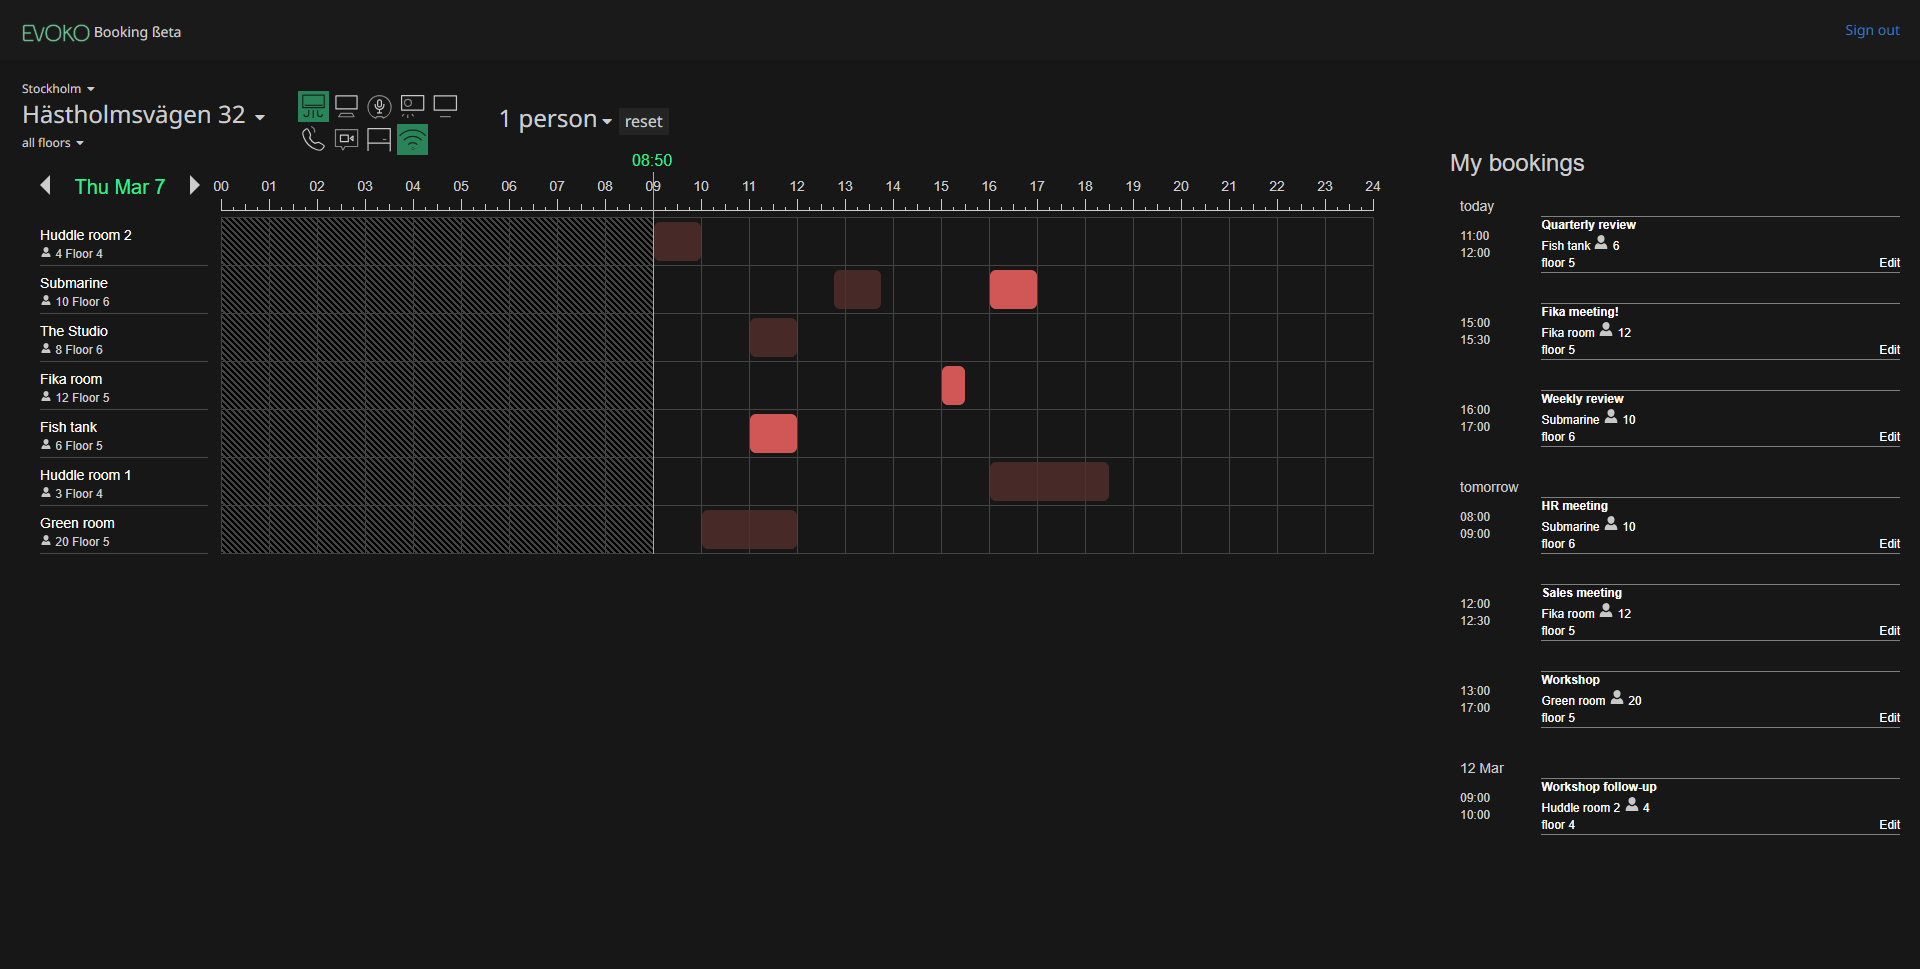
At the top you'll find filters for the location of the meeting rooms along with room equipment and capacity.

Below the room filters you will find a daily timeline off all rooms which fits according to the filter. To book a meeting simply press on an available slot.
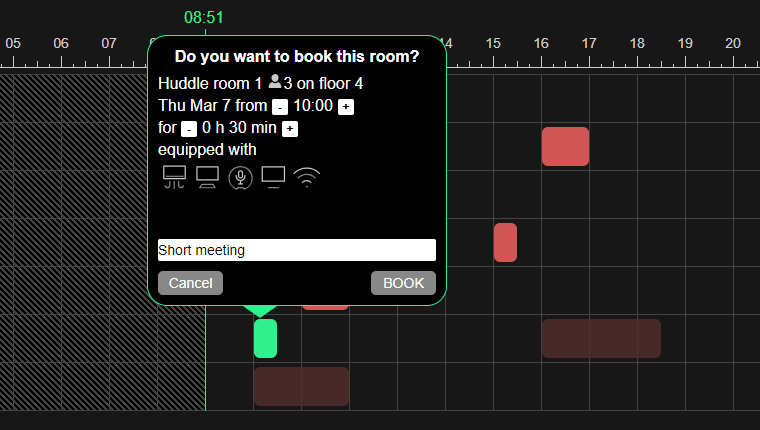
Others meetings will be colored in darker red and your own meetings in bright red. You can edit your own meetings by pressing on them.

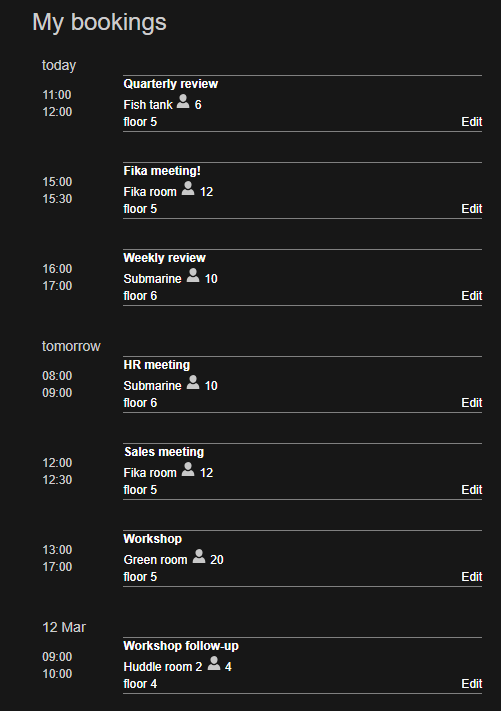
On the right side under My bookings you can see all your upcoming meetings.