Controlling a Room Combiner with a TEC-X Control Pad
The Room Combiner block in Tesira is an easy-to-use tool for implementing room-combining applications. This not only provides a way of managing signal routing in combinable/divisible spaces but also for controlling multiple sources and levels. The Room Combiner can support a maximum of 32 rooms in numerous configurations. It also provides multiple options for control. In this article, we will explore several ways to control a Room Combiner Block with a TEC-X Control Pad.
NOTE: The details in this article apply to Tesira software version 4.4.0 or newer and Tesira Firmware Version 4.4.1 or newer. Both are available for download here (the link opens in a new tab).
Combining/Dividing spaces
Using Command Strings
Let's suppose we have a three-room Room Combiner block that we want to control with a TEC-X 2000. 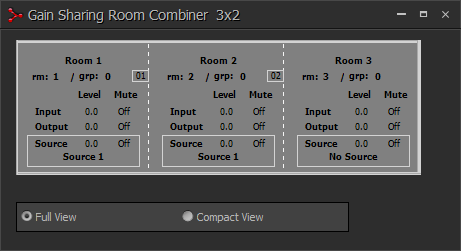 In this simple scenario we have two partition walls so we just need two buttons:
- Go to the Control Blocks menu, select TEC-X and click anywhere on the screen to add the TEC-X Block.
- Select the TEC-X 2000 and click OK.
- Select the 3 Button layout on the Page section on the left side of the dialog.
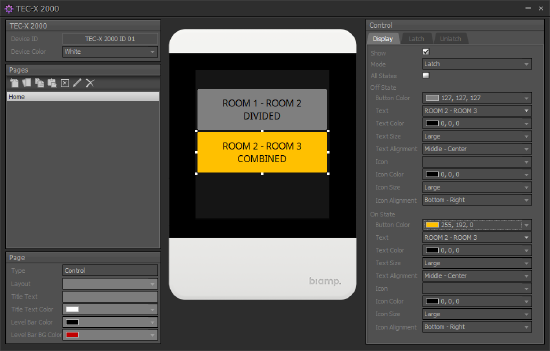
- Select the top button that will be used to control partition 01 (between rooms 1 & 2).
- Set the button mode to Latch and un-check the All States option. This will allow us to indicate with different colors when a partition is open or closed.
- Set the Off State the way the button should look when the rooms are divided. The On State will represent when the rooms are combined. This can be done with both text and color.
- Select the Latch Tab to set the action.
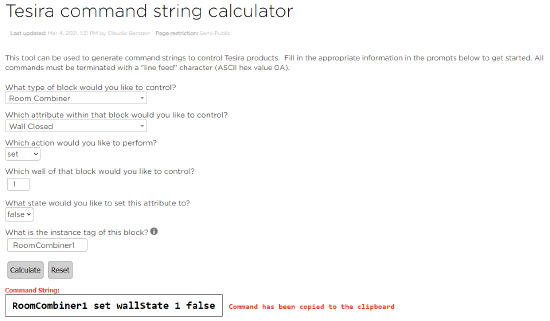 Looking thru the Instance Tag, you'll notice the Room Combiner is not there. To control it, we'll use the TTP Command. Check the Raw String Option and then click the link to the Command String Calculator this will open the Tesira Command String Calculator in Cornerstone which will help define the command. The attribute we're looking for is the Wall State in the Room Combiner block. Note the attribute is called "Wall Closed" and has an attribute of True or False. This means rooms will be combined when the Wall State is set to False (wall not closed). This can seem counterintuitive. The commands for the first button will look something like this:
- Latch: RoomCombiner1 set wallState 1 false
- Unlatch: RoomCombiner1 set wallState 1 true
- Repeat the above steps with the remaining button taking extra care to set the correct wall partition and state.
Quick TIP: If all the buttons will look similar, you can create the first one and then right click on it, copy and paste to the others.
Using Logic
Another option to control the Room Combiner is with Logic. This achieves the same results and user experience. Programming-wise, we just need to add some logic to our file which in turn makes programming the Control Pad a bit easier.
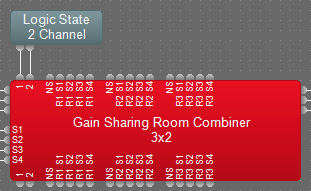 Since we'll be using logic to control the Room Combiner we need to add a Logic State block to control the partition walls. In our case, we only have two partition walls so we need a two-channel Logic State block connected to the Wall Control Logic inputs of the Room Combiner block as shown.
- We can use the same button layout as before. In this case, we will only need to change the Latch and Unlatch. To do this, uncheck the Raw String option and set the following:
- Instance Tag of the Logic State we just added.
- Set the description to State Off for the Latch functionality and State On of the Unlatch functionality. This might seem counterintuitive.
- Set the channel to correspond with the partition wall we want to control.
What about Combine All/Divide All?
Although it might seem like a good idea to implement an overall combine/divide functionality, implementation is not an easy task and results will, most likely, not match expectations. This is due to the "mix states". Say Rooms 1 and 2 are combined and Room 3 is not, what's the state of the combine/divide all button? Or, if all rooms as combined (via this combine all functionality) and we take one room out of the group, what happens with the combine/divide all state? This issue becomes exponentially more complex as more rooms are added to the Room Combiner.
Controlling Sources
Using Command Strings
The Room Combiner block, aside from providing the functionality of combining and dividing spaces, provides a Source Selector per room. The advantage of using the built-in Source Selector rather than an external block is that all the logic is taken care of by the block itself. This means that, if rooms 1 and 2 are divided and both are listening to different sources, combining them will unify the selection and apply that selection to both rooms. Any subsequent changes while the rooms are combined will happen in the combined space (regardless of which room is being controlled). This Application is very similar to one described in the Controlling a Source Selector with a TEC-X Control Pad article. The difference is, for the Room Combiner we still need to use RAW strings. Also, since we're adding this to the TEC-X 2000 we'll several pages. Starting from the previous stage:
- Change the Layout to 7 Buttons (we don't need 7, but it will look better). We will use the top three to navigate to the Room Page and two at the bottom to control Combine/Divide.
- If the Combine/Divide buttons were already configured, they will still be there. To "move" them, right-click on the button, copy and then paste on the corresponding bottom button. It might be required to arrange or change the text to fit the new size buttons.
- Under Pages, add 3 new pages, one for each room. Navigate back to the "home" page.
- Select the top left button, change the display attributes and set the Press Flip Page option to navigate to Room 1's page. Repeat this process for the other two buttons.
- Navigate to the first room page. Here we'll set the Layout to 5 Buttons, 4 to control sources, and one to navigate back to the "home" page.
- For each of the source select buttons, set the Mode to Latch (You have the option to use All State and just rely on the button border to see which source is selected or turn off All State and change the button look when a source is selected or not). These buttons will also be set to send Raw Strings. the commands for the first button will look something like this (all source selection buttons will have the same command for the Unlatch functionality)
- Latch: RoomCombiner1 set sourceSelection 1 1
- Unlatch: RoomCombiner1 set sourceSelection 1 0 ← This command is the same for all source buttons
- Set the bottom button to navigate back to the home page.
- Repeat the steps above for the remaining pages.
Quick TIP: Page settings can be copied and pasted just like the button settings.

Using Logic
As with the case above, we can also control sources for each room in the Room Combiner block using logic.
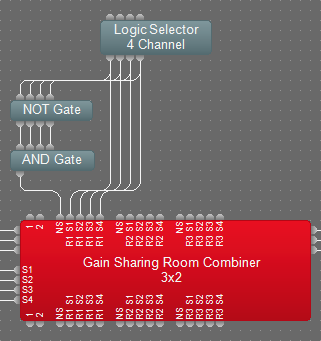 To control source selection with Logic, the best option is to use the Logic Selector block as it includes the functionality we require. In this case, we'll need a block for each room with as many channels as sources we want to control. To add the press to unselect functionality though, we need to add a NOT Gate and an AND Gate and connect them as shown. Note these last blocks are connected to the "NS" port of the Room Combiner. This signal is required to unselect sources.
 - Each Source Button we create in the Control Pad needs to be configured in Latch mode. This will allow selecting and deselecting by pressing the same button or deselecting the previous if a new selection is selected. For each button configure:
- Instance Tag of the Logic Selector corresponding to the room.
- Set description to State On for the Latch functionality and State Off for Unlatch.
- Set the channel to correspond with the source we want to select.
Controlling Levels
Controlling levels is straightforward. In the Room Combiner Block, three levels per room can be controlled: Input Level, Source Level, and Output Level. Determining the best approach depends on whether a single or multiple Control Pads are used to control the Room Combining and level. Levels can be controlled by buttons, which would require two buttons, or with the Level Knob in the TEC-X 1000. Several pages might be required to control multiple levels – see this article for details. In either case, we need to use Raw Strings to control the levels in the Room Combiner block. The Command String Calculator can come in handy when determining the commands required for each level in each room.
Further reading
- Programming a TEC-X Control Pad to control a Tesira system
- Controlling multiple levels with the TEC-X 1000
- Controlling a Source Selector with a TEC-X Control Pad
- TEC-X-1000 Landing Page
- TEC-X-2000 Landing Page
- TEC-X Table Mount Landing Page
- Small hotel ballroom with TEC-X control
- Small hotel ballroom with TEC-X control and Dante inputs
- 4-way Divisible Hotel Ballroom with TEC-X control