Programming a TEC-X Control Pad to control a Tesira system
The Biamp TEC-X Control Pads are wall-mounted control devices used to manage certain functions of a Tesira system. Available models include the TEC-X-1000 with a customizable touch panel and volume knob and the TEC-X-2000 with a larger customizable touch panel. This article explains how to configure a TEC-X Control Pad in a Tesira System.
NOTE: The details in this article apply to Tesira software version 4.4.0 or newer and Tesira Firmware Version 4.4.1 or newer. Both can be downloaded from here (the link opens in a new tab). For previous Tesira versions go here
System topology
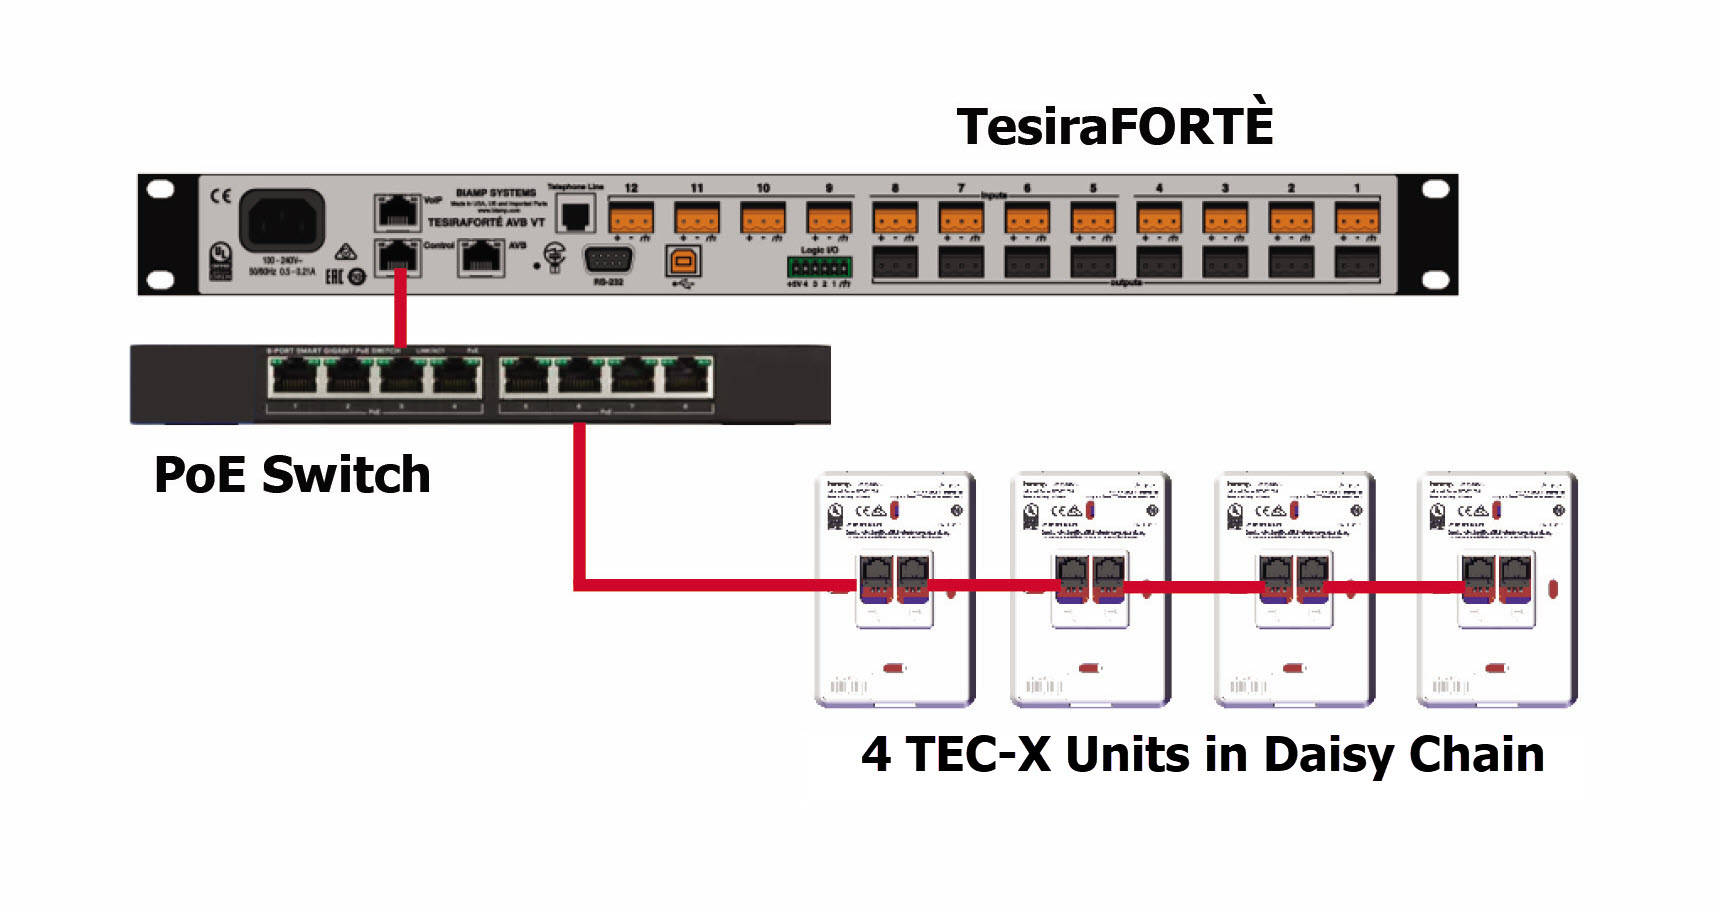
The TEC-X Control Pads are standard Ethernet devices that require PoE. They must be connected to the control Network of a Tesira Server-Class device (such as a TesiraFORTE). Up to four TEC-X Control Pad devices may be connected in a single daisy chain. Multiple daisy chains can be present up to the system limitations. Standard network cable limitations of 100m apply for each link. A daisy chain can contain both TEC-X-1000 and TEC-X-2000 models, so long as only four TEC-X devices are connected. The image below gives a basic layout with a TesiraFORTE and 4 TEC-X 1000 control devices.
The default network configuration of the TEC-X Control Pads is DHCP, so if there is no DHCP server on the Tesira network the units will revert to link local addressing (169.254.xxx.xxx, netmask 255.255.0.0). If the TEC-X Control Pads and the Tesira servers are on the same subnet, the units should be discoverable in Device Maintenance.
Prior to being associated with a system the TEC-X Control Pad will display the model number and its network information on the screen. Once the Tesira server has a configuration file loaded, the TEC-X Control Pads will associate to it via Device ID.
TEC-X device setup
Setting up TEC-X Control Pad properties is done the same way as other Tesira Remote Devices. Depending on the system, it might be necessary to adjust the network settings and change the Host Name and Device ID of the TEC-X Control Pads:
- Open Device Maintenance by navigating to System > Network. Perform Device Maintenance.
- Click Remote Devices.
- Select the TEC-X you want to set up.
- To change network Settings like Host Name and/or IP settings, click Network Settings.
- To change the Device ID, click TEC-X Properties.
Programming a TEC-X
Configuring TEC-X Control Pads is done in Tesira software by inserting the appropriate block and configuring the desired functionality:
- On the object bar, go to Control Blocks and select TEC-X.
- Click anywhere on your screen to insert the TEC-X block.
- Select the Device Type and click OK.
- Open the configuration dialog by double-clicking on the block.
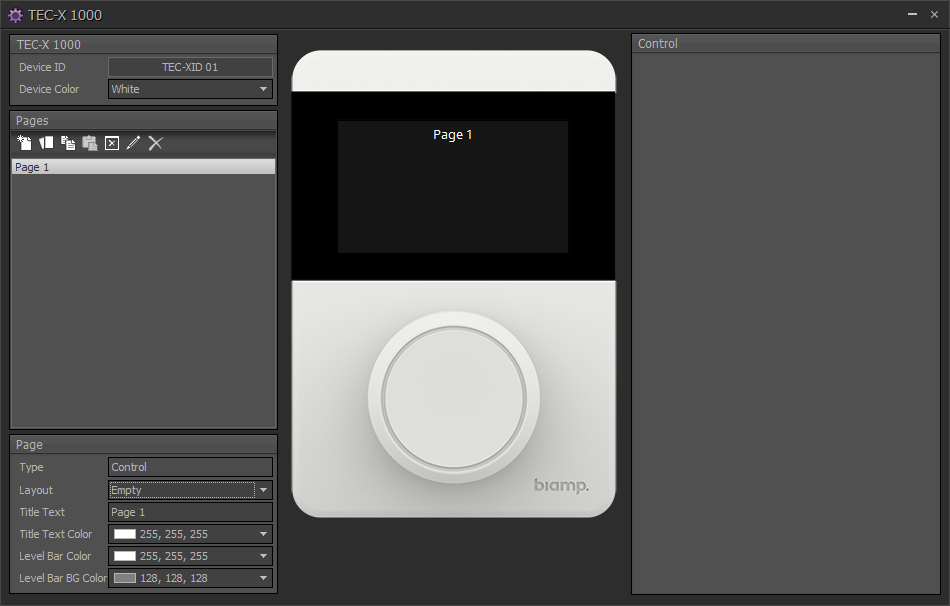
- On the left pane, set the Device ID. This needs to match the Device ID of the physical device (multiple devices can use the same Device ID in which case, they will mimic each other).
- Device Color changes the image in the dialog to match that of the actual device being used.
- Set the button Layout under Page. Depending on the model being used, up to 6 buttons can be configured on the TEC-X 1000 and 12 on the TEC-X 2000.
- Set default Title Text and Level Bar properties (even though the TEC-X 2000 doesn't have a level knob, it can control levels with buttons. If levels are being controlled, the level bar will be shown).
Programming control actions
To start programming buttons (or the volume knob), click the button you want to program. The Control panel on the right will show multiple tabs for Display properties and individual actions
Programming buttons
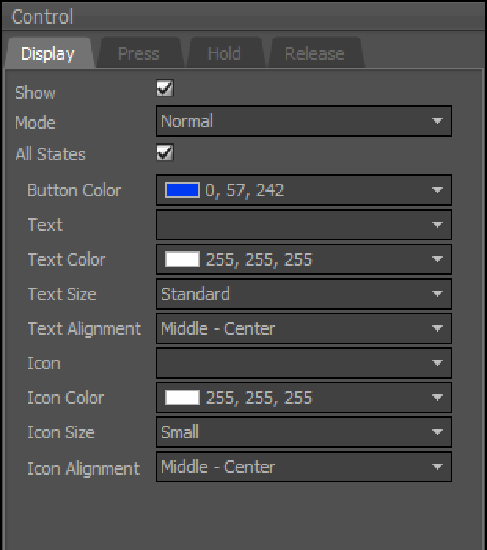 Set the button visibility by checking/un-checking Show. (note: if a button is programmed to perform an action and is not set to show, the button will not be visible but the action will work).
- Set button mode
- Normal is a momentary action and can have up to three actions: Press, Hold and Release.
- Latching is a two-state action. It has two actions Latch and Unlatched.
- Set All State option
- When checked, the display attributes apply to the button regardless of the state or action (i.e. the same color, background color, etc. Will apply to all the actions).
- When unchecked, two display attributes can be created, one for the On State and another for the Off State.
- Set the button attributes as desired.
- Set button Text, Text Color, Text Size, and Text Alignment (if no text is desired, leave the Text field blank).
- Set button Icon, Icon Color, Icon Size, and Icon Alignment (if no icon is desired, leave the Icon field blank)
- Click on the first action tab to set control parameters
- Set the light bar as desired (note: if multiple actions use the light bar, the light bar will remain in the state set up by the last action performed). Leaving this setting blank has the same effect as "No Change".
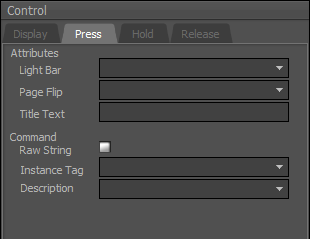 If the TEC-X is configured for multiple pages, a button can perform a control action and change page at the same time. See the Multiple Pages section below.
- Set the Title Text. This text will appear at the top of the LCD screen when the action is executed and will remain there for a brief period of time before reverting to the Title Text set in the Display Section.
- Select the Instance Tag of the block you want to control (to Recall Presets, select System). If the block does not appear in the list, a Raw String (TTP Command) can be entered instead. For ease of programming, a link to the Tesira Command String Calculator is provided
- Select the Description of the action you want to perform within that block. Depending on the selected Description, you may need to also select channels and/or other parameters.
- Repeat the above steps for the remaining button actions and buttons.
Programming the Volume Knob (TEC-X 1000 only)
The volume knob has five actions that can be programmed: Press, Hold, Release, Rotate CW, and Rotate CCW and have the same parameters as the buttons. Note that for Volume control it's necessary to program both the clockwise (CW) and counter-clockwise (CCW) settings.
Multiple Pages
The TEC-X Control Pads support up to 32 pages (since Tesira Firmware v4.6.0). Each page is programmed as described above. To program multiple pages, add pages in the Pages pane on the left side of the dialog. The Pages panel has several functions. From left to right:
 New: creates a new blank page.
- Duplicate: duplicates a page including display and control settings for buttons and knob (if applicable).
- Copy: copies all the settings of a page including display and control settings.
- Paste: pastes all the copied settings from another page. If the page has settings of its own, those will be overwritten by the new settings.
- Clear: clears all the settings of a page without removing the page.
- Rename: allows renaming a page.
- Delete: deletes a page completely.
Further reading
- Controlling a Source Selector with a TEC-X Control Pad
- Controlling multiple levels with the TEC-X 1000
- Controlling a Room Combiner with a TEC-X Control Pad
- TEC-X-1000 Landing Page
- TEC-X-2000 Landing Page
- TEC-X Table Mount Landing Page
- Small hotel ballroom with TEC-X control
- Small hotel ballroom with TEC-X control and Dante inputs
- 4-way Divisible Hotel Ballroom with TEC-X control