NPX paging integration with Qt X controllers
NPX Paging Stations can be configured in the Qt X software application, enabling a convenient way to add paging features to a Qt X sound masking solution. All NPX models feature both AVB and Dante interfaces, making them compatible with AVB or Dante-configured Qt X systems.
This article explains how to manage and configure an NPX device, and to build a paging system within a Qt X design.
Note: A video walkthrough of this functionality is also available to view from this link.
Supported paging actions
On-device actions:
- Live Paging: via the PTT /PTL button on the device
- Playback of Recorded Announcements
- Live recording to available message slots on NPX paging station.
Qt X configuration enabled actions:
- Live and Recorded page code creation, assignment, and management on a per-device basis.
- Paging level control and ducking of other sources
- File management for pre-recorded and preamble messages.
For more information on Qt X configuration refer to this article.
Supported system topologies
- Up to 16 NPX stations of any type or combination may be supported by a Qt X system.
- Any Qt X device can "host" or proxy up to four (4) NPX stations.
- All NPX configuration settings are applied through the QtX software application.
- Qt X topology supports a selection of AVB or Dante on "D" controller types. Mixed media networks is not supported on Qt X or NPX hardware.
- NPX paging station assignment to Qt X and Tesira configurations concurrently is not supported.
- NPX only supported with Qt X controllers running in single cable mode.
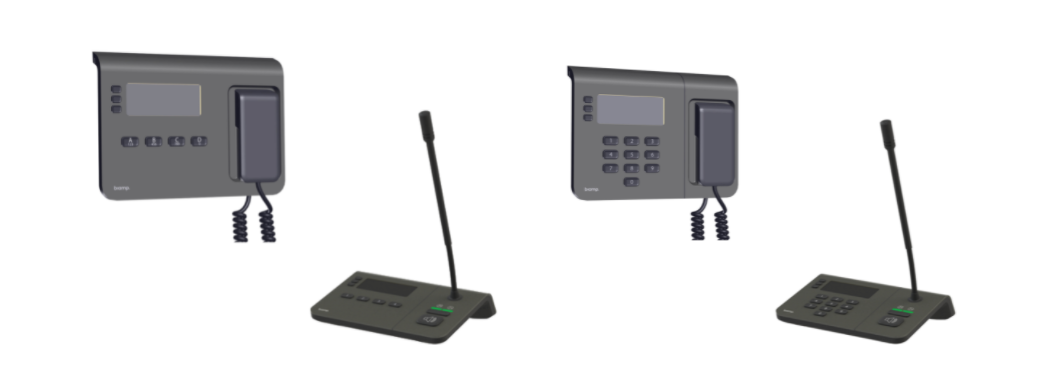
Example: Single Qt X controller with NPX Paging Station
All media traffic and communications are handled with a single Media ot Control port. The NPX unit should be assigned an IP address in the same range as the Media on the Qt X controller. Media mode may be selected for AVB or Dante when using "D" variant controllers. NPX paging stations will run in the selected Media mode to match the Qt X configuration.

Example: Single Qt X controller with (4) NPX Paging Stations
All media traffic and communications are handled with a single to Media/Control port. The NPX unit should be assigned an IP address in the same range as the Media on the Qt X controller. Media mode may be selected for AVB or Dante when using "D" variant controllers. NPX paging stations will run in the selected Media mode to match Qt X configuration.
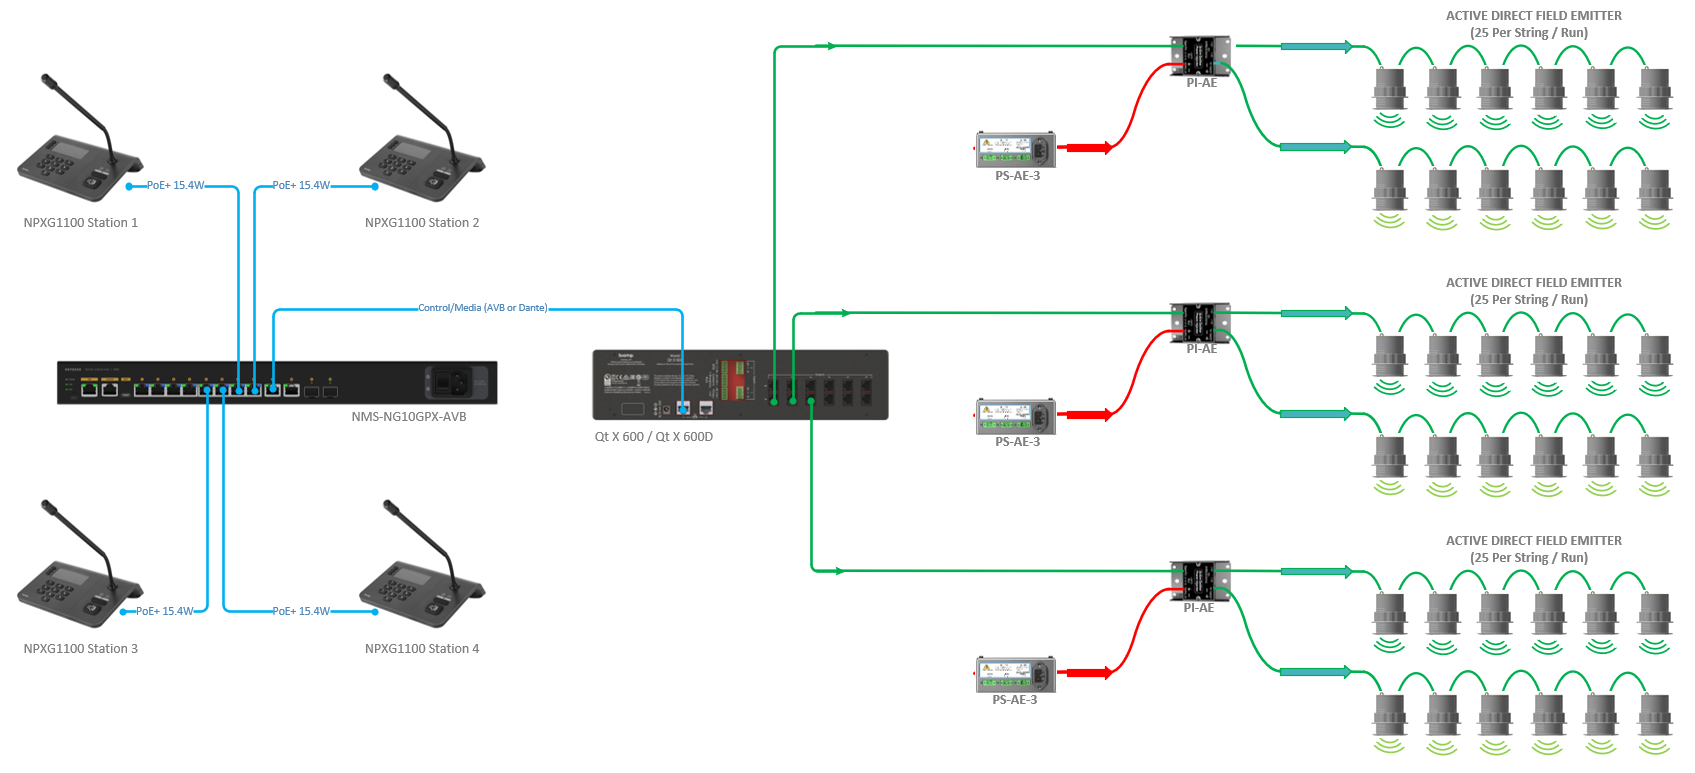
Note: Up to 4 NPX paging stations may be proxied to single Qt X controller in a configuration.
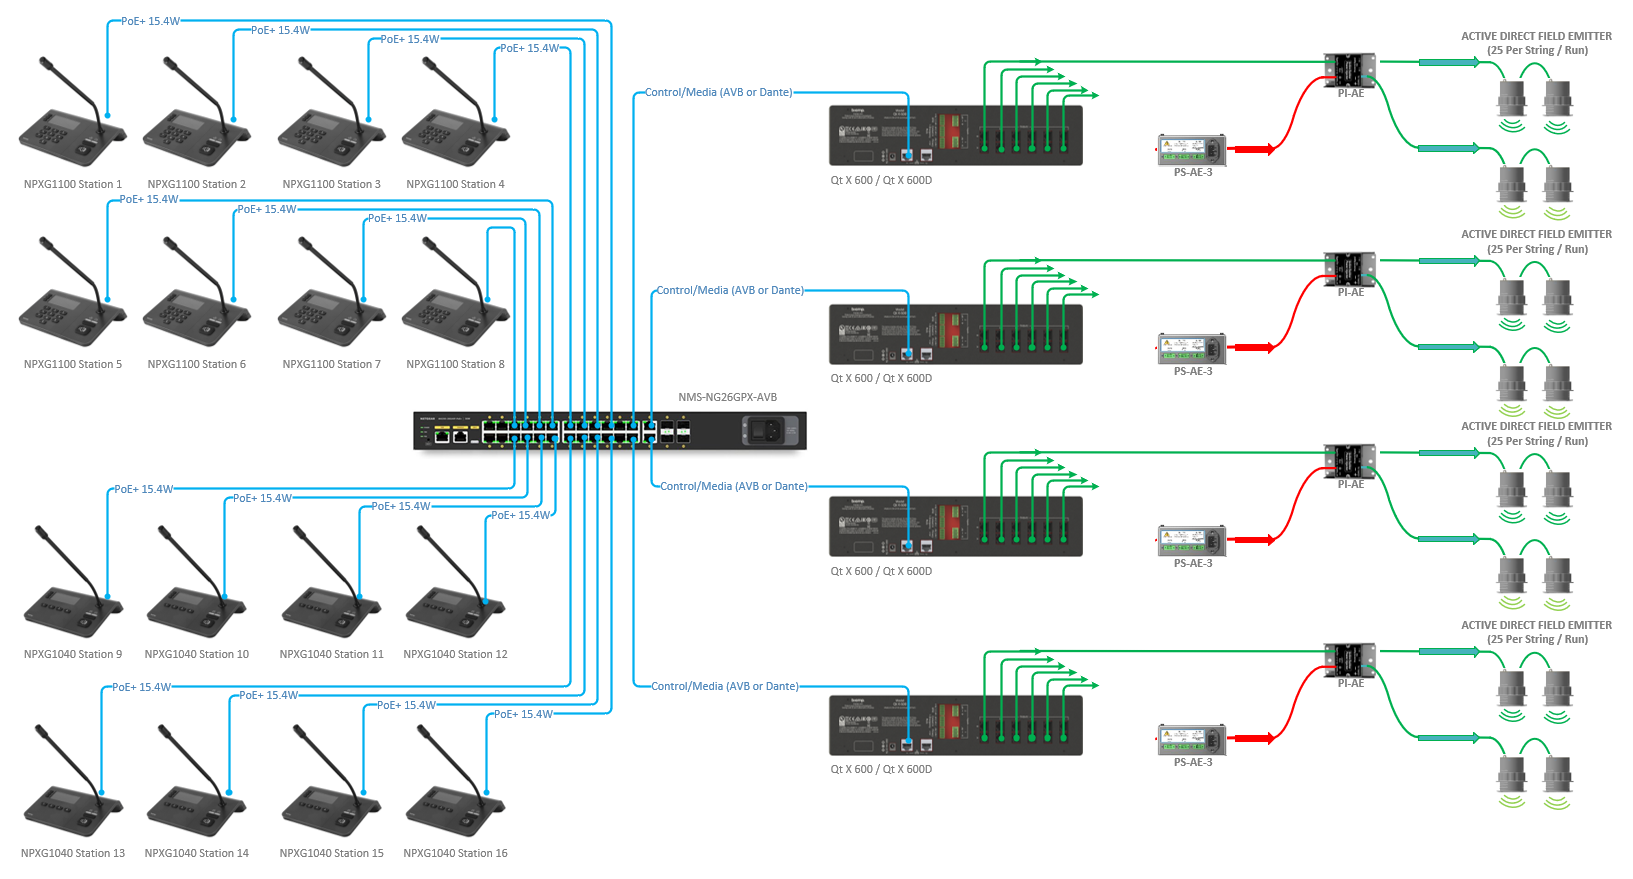
Example: Multiple Qt X controllers with NPX paging stations.
NPX device settings
Network device discovery and system configuration in the Qt X Software is supported in v2.2 (and later) firmware - software release. Qt X software can update the NPX stations' firmware intelligently via a separate firmware file.
Paging audio is sent to the system via AVB or Dante streams as determined in Qt X system settings. Paging Audio (levels, compression, filters) is configured in the NPX paging section of the Qt X software setup. Page codes and their settings are also managed and assigned to system zones in the software.
Important Note: The NPX devices can either be configured with Tesira or Qt X software systems. Once the NPX is discovered or configured with Tesira it can not be discovered with Qt X software until the configuration is cleared, and the reverse is also true. If discovered or configured in a Qt X system, then it will not be discoverable in Tesira until it is removed from the system and the configuration cleared.
Network settings
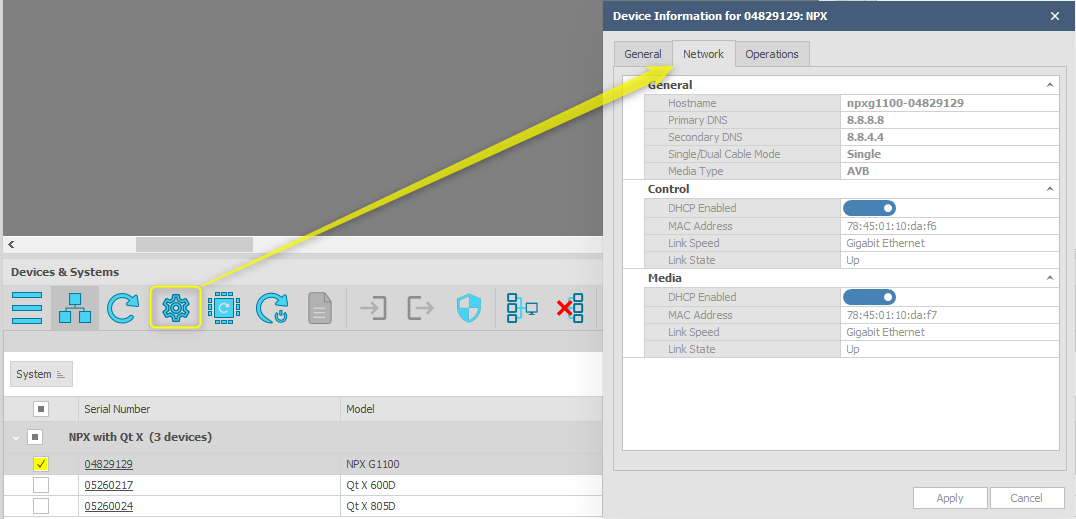
Note: The media type of the paging station will change when a configuration is sent to match with Media Type settings of the Qt X controllers. In Qt X software version 2.5.0 and later, NPX media type is also able to be manually set in when device is in unconfigured state.
Security settings
There are two separate security settings on an NPX:
- Device Configuration Security: The NPX device security is system-wide when configured with Qt X hardware.
- Device Access Security: On-device paging functions and settings can be secured with an on-screen 4-digit station pin code. This pin code option can be enabled in the Configuration or Live settings of Qt X software.
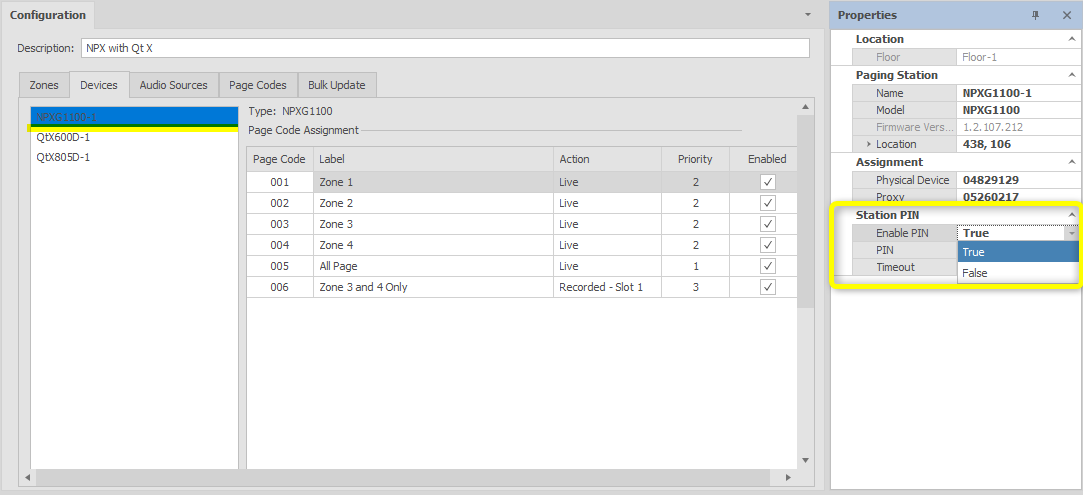
The Station PIN may be set up prior to sending a configuration to an active system by selecting the Paging station in the Devices tab and enabling it through the Properties window.
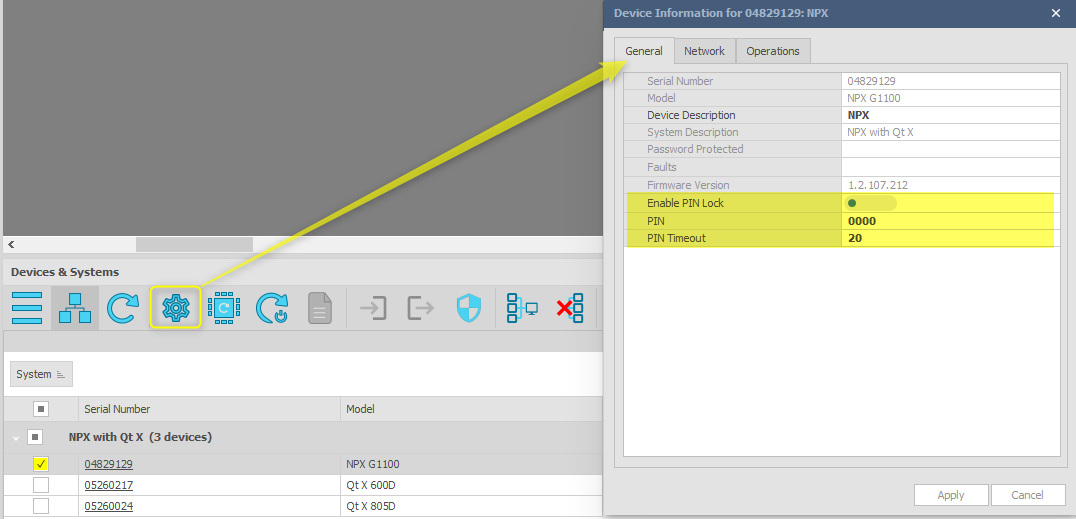
The PIN lock may also be enabled live on an active system by selecting the device in the "Systems" tab via the general section of the Device Information window.
Device Firmware Update
The firmware update process for the NPX follows the same steps as for Qt X devices:
- In Qt software, click the device in the "Devices & Systems" tab, then select the firmware update icon
 . All devices that have checkboxes selected will be included in the "Devices to Update" window.
 - Select the firmware file button
- Browse to the firmware update file, which should be a .qfa file.
- The firmware update dialog will only show devices that the selected firmware applies to. If an NPX firmware file is selected, only NPX stations that are selected and available will be updated.
Audio file management
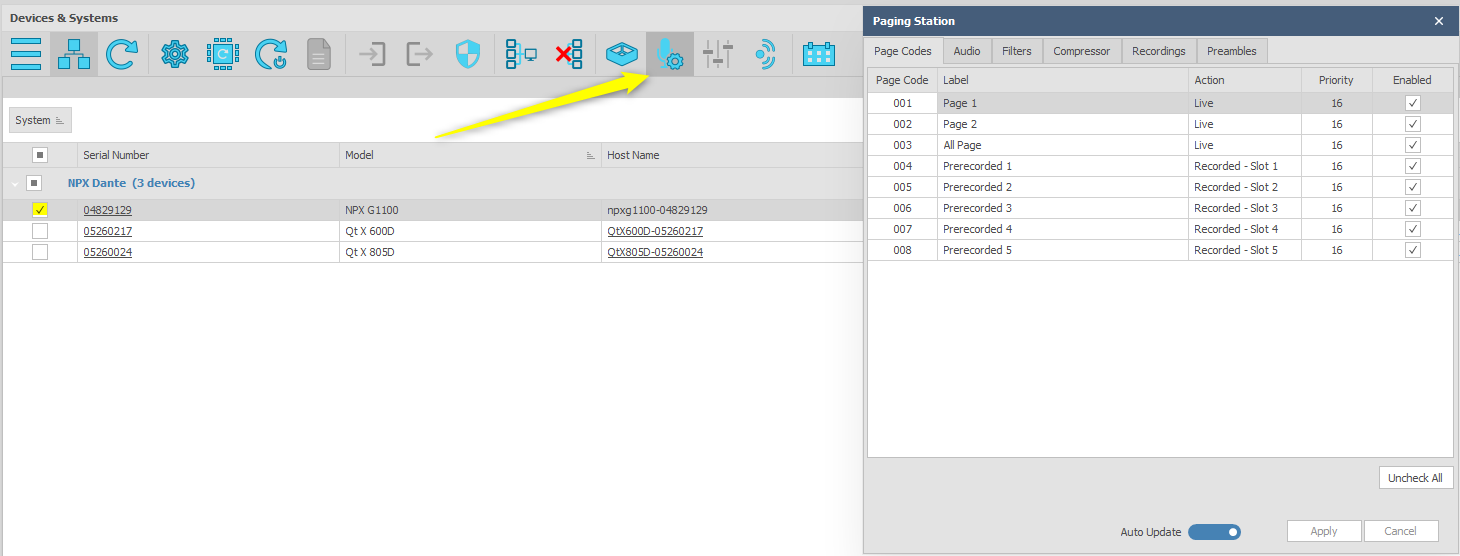
The 'Input' button opens the Paging Station dialog Page Codes, and Audio Settings along with ten slots each for Recordings and Preambles. By default all the slots are disabled. Audio files can be uploaded by clicking the up arrow which opens a standard Windows 'Open' Dialog.
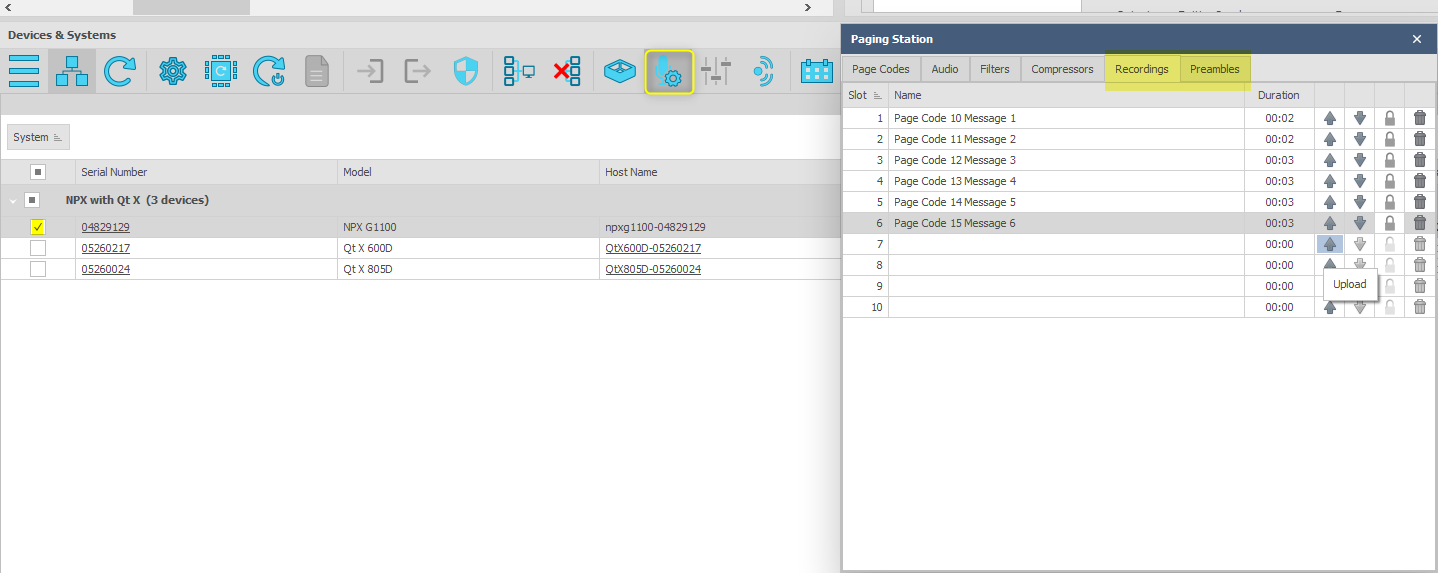
Alternately, audio can be recorded directly from the NPX device by selecting a slot and following on-screen instructions. Each NPX can store up to 50 minutes of audio shared across the 10 slots of recorded messages and preambles combined. Audio data does not sync across NPX devices and needs to be separately managed for each device.
Existing recordings (previously uploaded or recorded on device) or preambles can be downloaded and saved to a PC by clicking the down arrow icon and can also be deleted by clicking the trash can icon.
The ability to prevent messages from being overwritten or removed has been added to the NPX paging stations. The option will prevent an operator from overwriting an existing message by either recording a message to the slot from the paging station or by uploading a new message via the Qt X software.
To enable a message slot to be locked, use the lock icon (  ). Once a message lock is enabled, the Upload, Download, and Delete functions will be unavailable until such time the slot is unlocked again. The lock icon also serves to unlock the message slot.
To access the Recordings Slots and related controls, press the top and button buttons next to the NPX Screen

The NPX on screen UI provides options to select a slot, record audio, save and delete messages.

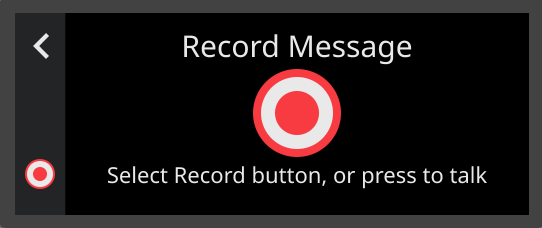
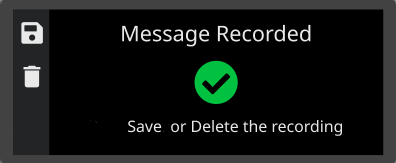
To access the Recordings Slots and related controls, press the top and bottom buttons next to the NPX Screen.
Once a new message has been added via the NPX paging station directly, it will need to be added to a new Page Code and enabled in the Qt X software via the Live system controls.
Audio settings
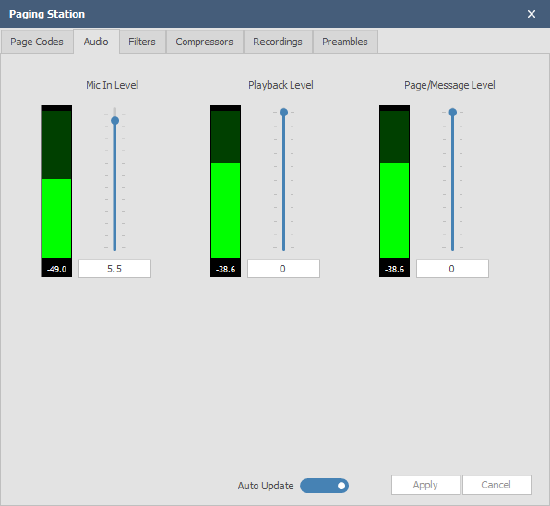
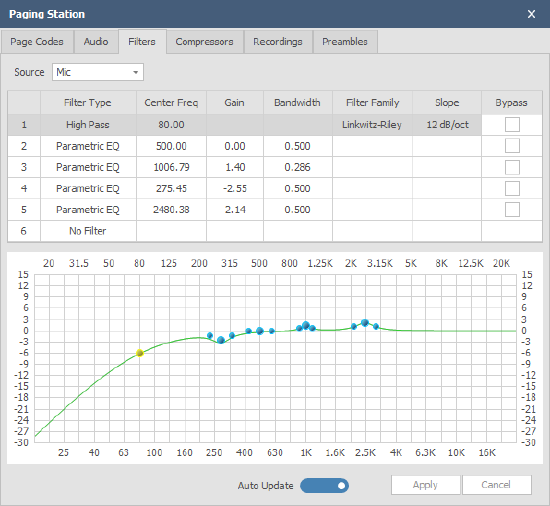
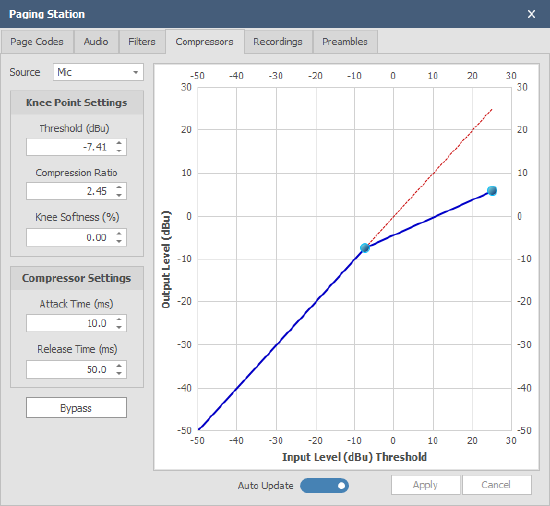
Each Paging Station block control dialog also includes tabs for Audio, Filters, and Compressor.
The Audio tab shows live level control and meters for NPX Mic, Record message Playback level, and Page Out levels. The Filters tab features 6 slots for adding up to 6 filters of various types. The Compressor tab contains a standard compressor-type UI with 1 active knee point.
Configuring a paging system
Step 1: Add paging blocks to Qt X configuration
From the toolbar, select a paging station to add to the floor plan.

As each controller is added to the floor plan, you will be prompted to edit the name. The edit may be done while adding controllers, or at any time during the configuration process via the properties window.
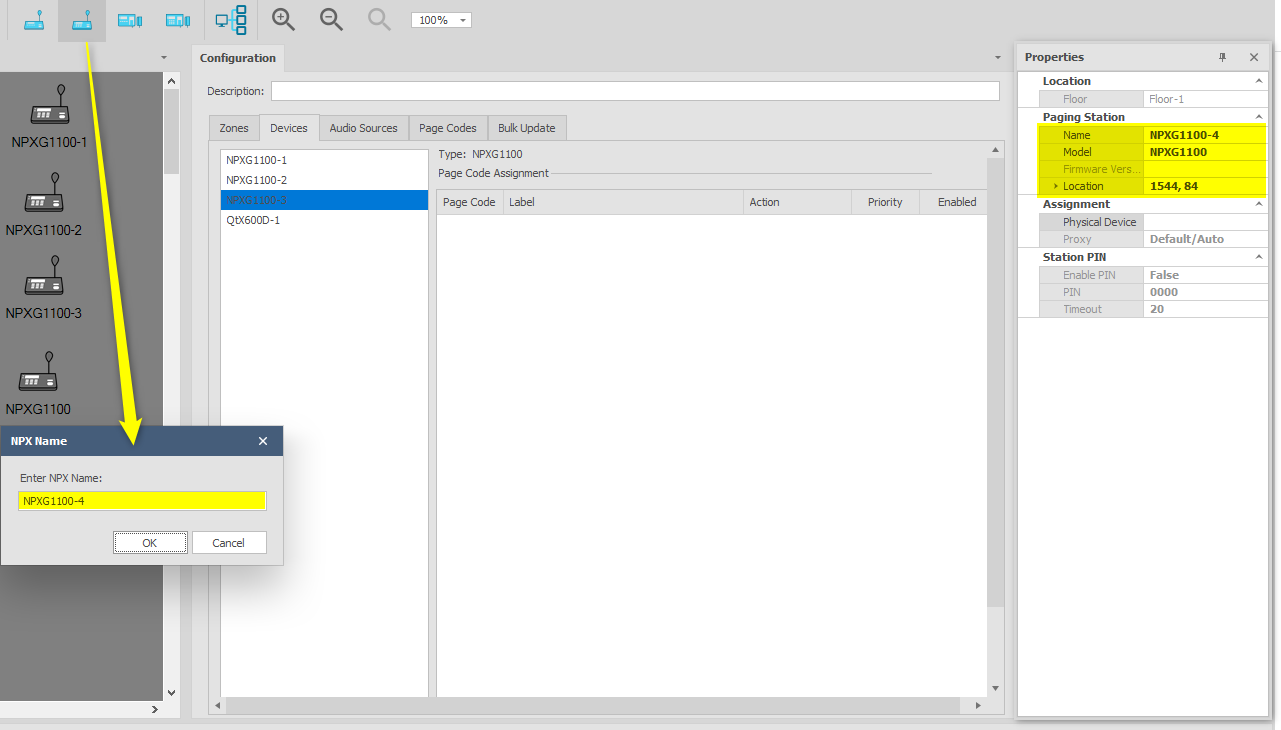
Note: Each Qt X configuration supports a maximum of 16 NPX paging stations. Up to 4 NPX paging stations may be assigned to a single controller in a configuration. If 4 NPXs have already been assigned to the Qt X in the floorplan, the Qt X shall not be listed as an available proxy.
Step 2: Create Page Codes
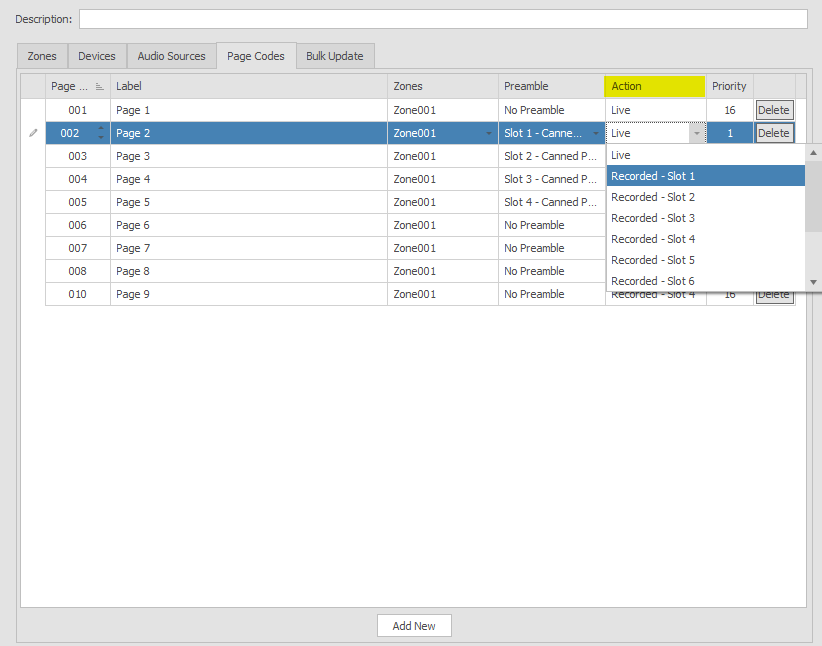
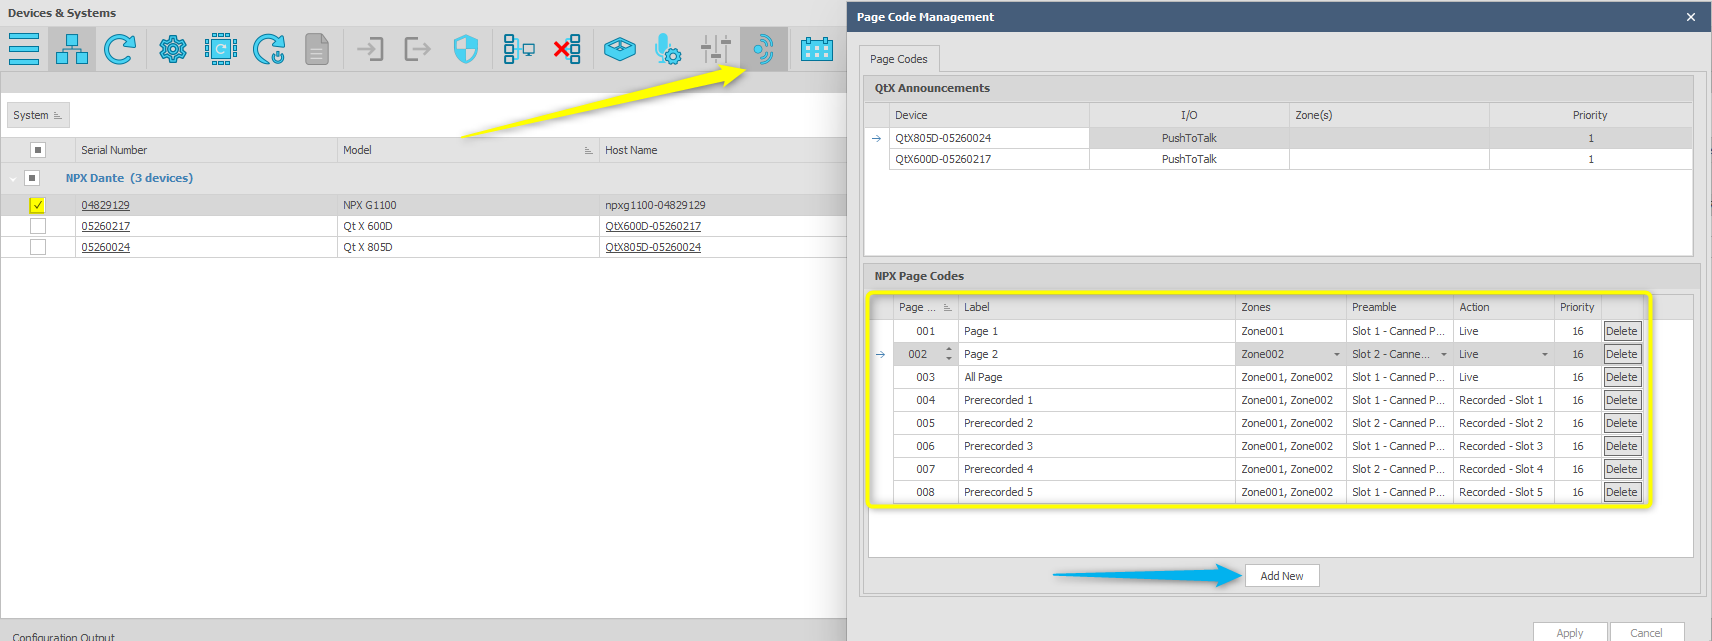
In the "Configuration" window, select the Page Codes tab and click 'Add New' to create Page Codes.
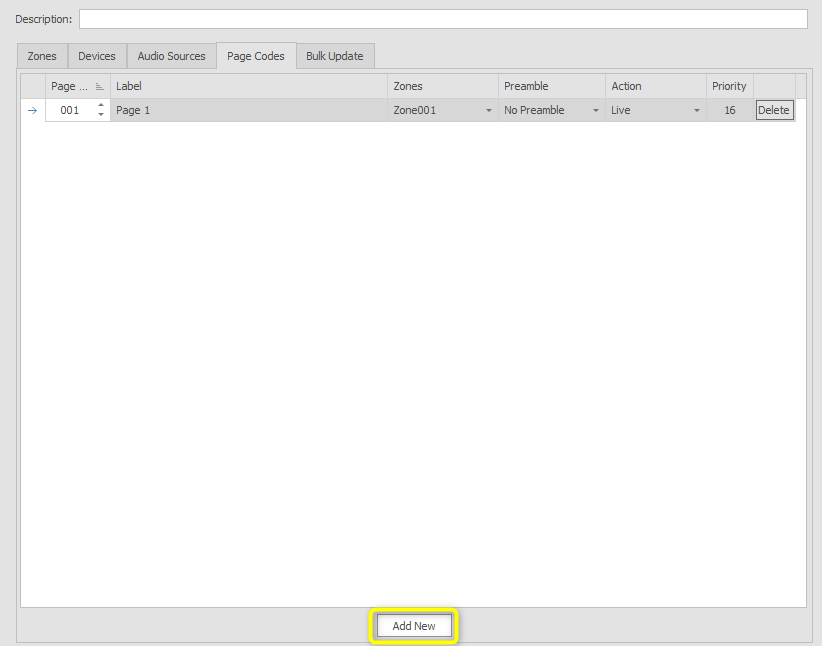
Page Codes define announcement action (Live or Recorded), Preamble or chimes that play prior, what zones the announcement would be heard, and the priority level of the announcement. Page Codes and properties are defined in the Paging and Zone Control dialog.
Up to 999 Page Codes can be created with unique labels and specific Zone combinations, Preambles, Action, and Priority.
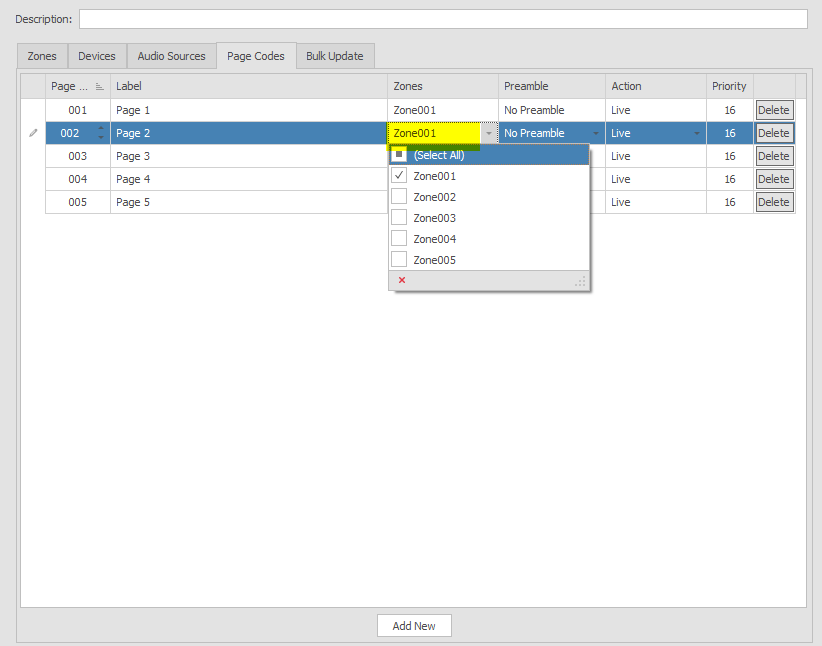
Select all zones required for a page code via the Zones dropdown menu. Each page code may be assigned to any or all of the available zones that have been added to the floor plan.
Qt X software includes five canned Preambles in Slots 1 through 5, with the option of uploading custom preambles in Slots 6 through 10.
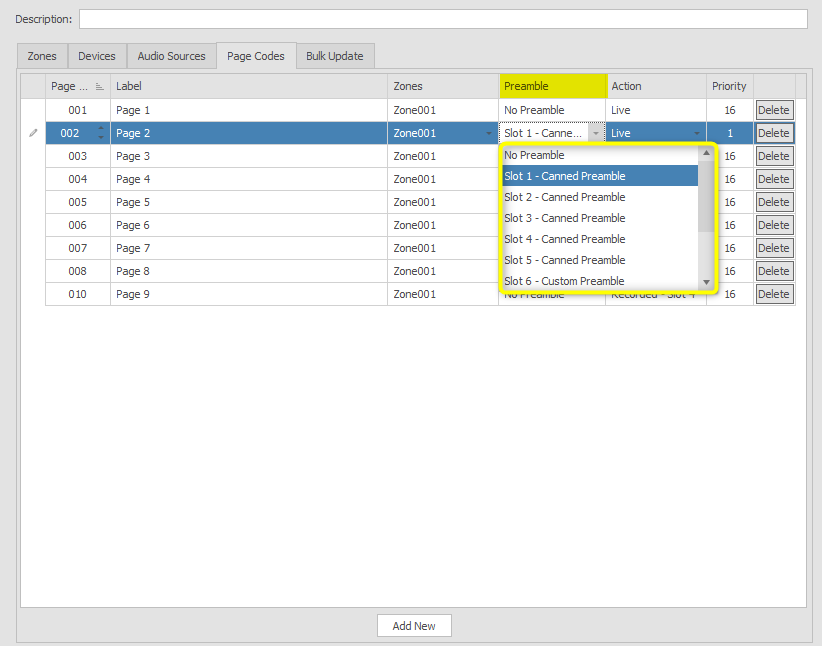
The Action dropdown allows for a page to be designated as Live or Recorded playback using one of the available slots. The user chooses which message slot to play.
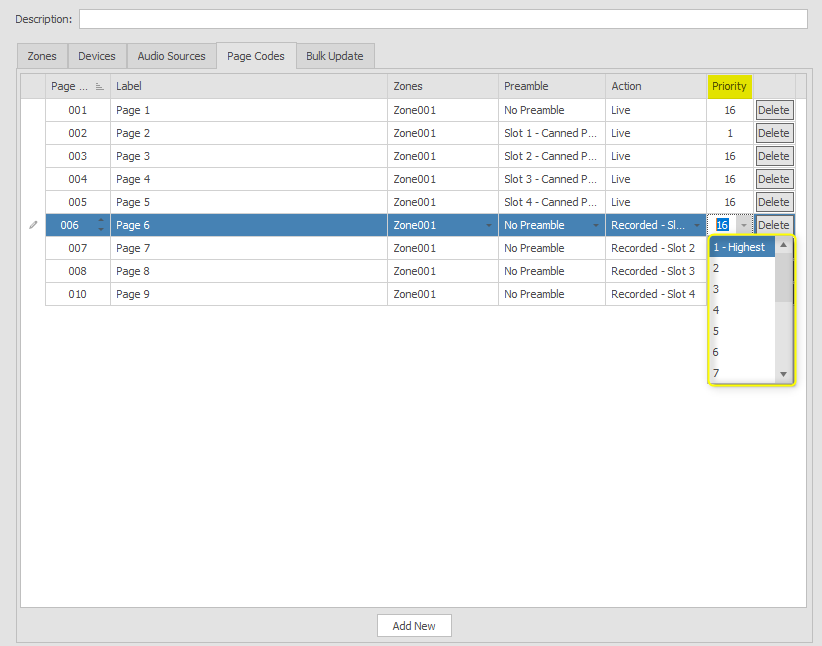
The Priority drop-down lists 16 levels of priorities with 1 being the highest and 16 being the lowest:
Step 3: Enable Page Codes to Paging Stations
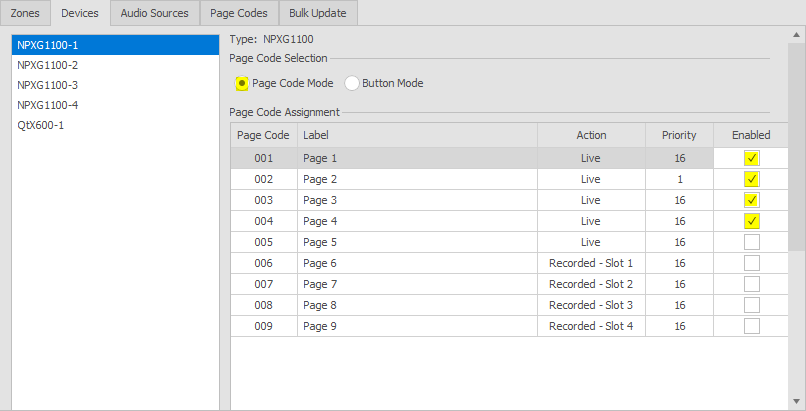
Open each paging station block and enable page codes in the desired combination. This action can be performed in the Configuration tab or with an Online system. Each paging station may have a unique set of enabled page codes as required. If a page code is not set as enabled, it will not be displayed on the paging station.
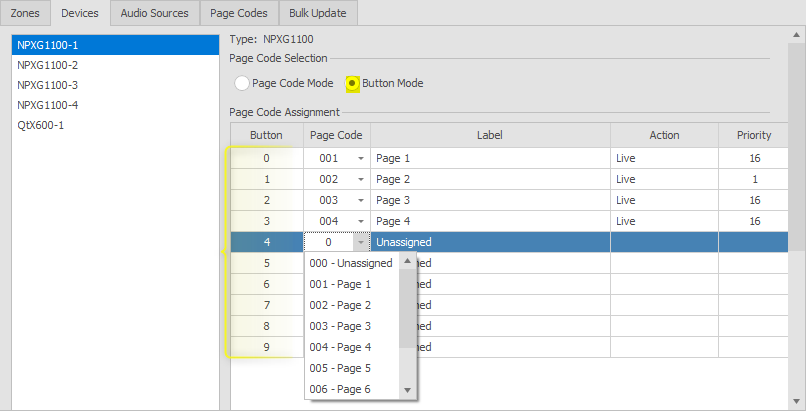
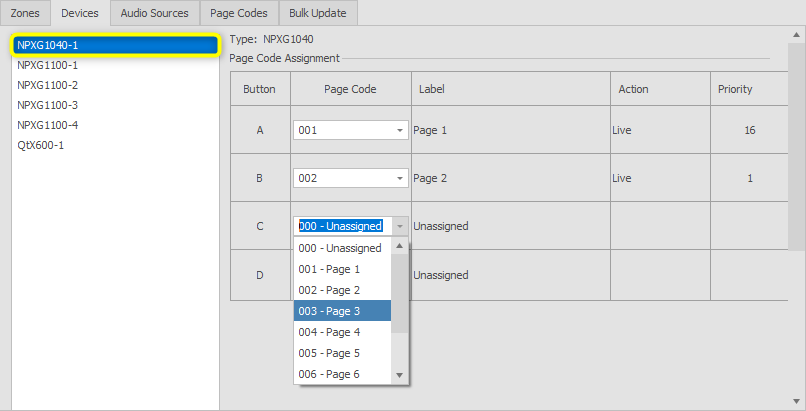
Page codes must be assigned to a button (NPXG1040, NPXH1040) or enabled (NPXG1100, NPXH1100) to be available once configured. The 10-button NPX devices also have a Button Mode option where particular pages can be assigned to a numbered button allowing for a single button press to initiate an assigned page.
NPXG1100, NPXH1100 (10-button) - Page Code Mode
NPXG1100, NPXH1100 (10-button) - Button Mode
NPXG1040, NPXH1040 (4-button) page code assignment
Step 4: Assign Paging stations to Physical Devices
Before sending the configuration to devices, you will want to assign the NPX paging station to a physical device. This works in the same way as the Qt X controller assignment from the properties window. Verify that the devices are seen in the "Devices & Systems" tab at the bottom and are cleared of any running active configuration. It is also important to verify that the devices that were added in the layout match the physical devices that are being used. Assignment is based on device type and availability. So, if a device does not match, it will not show up in the device dropdown window.
Select NPX paging station from the "Devices" tab and assign it to a physical serial number from the assignment section of the Properties tab.
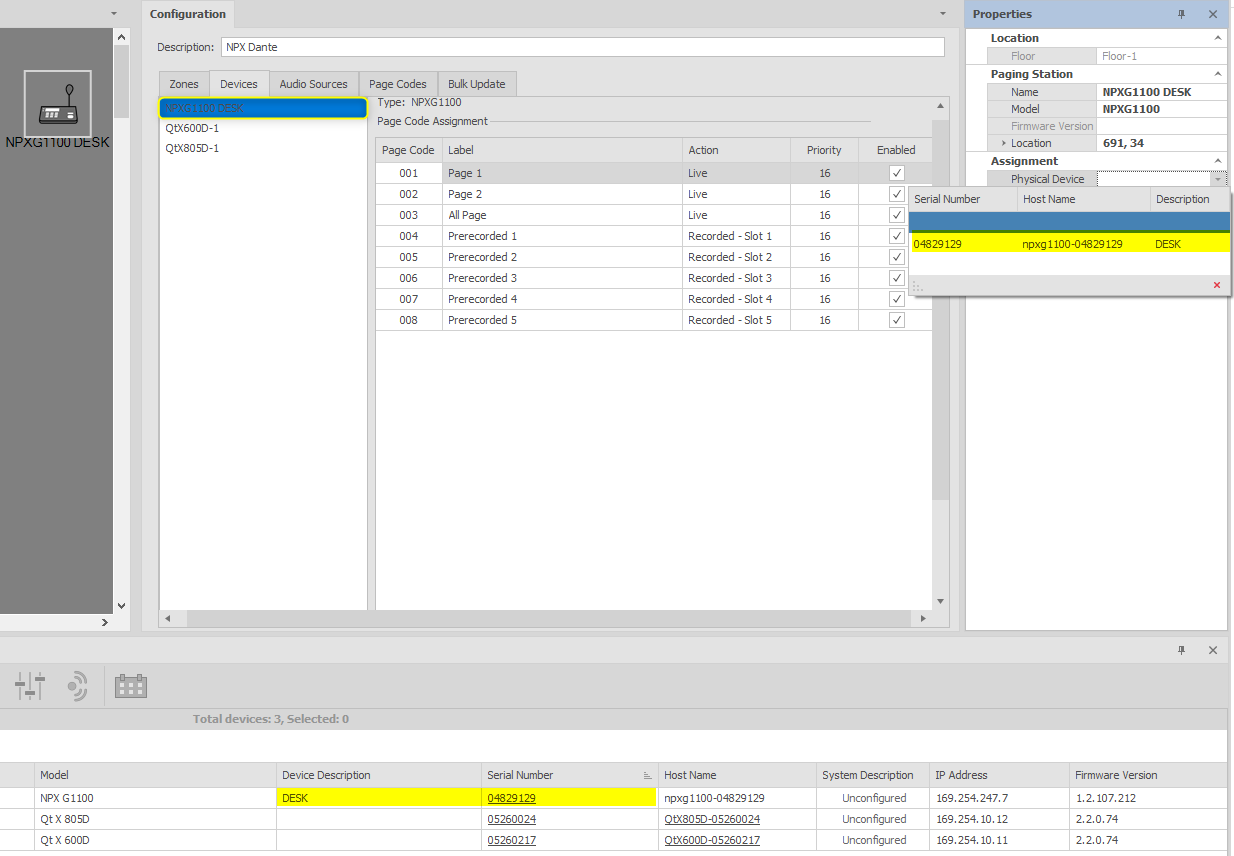
Note: If using multiple paging stations, it is a good practice to add additional info in the device description field of each to help identify them when assigning to paging stations from the layout. This saves some time and confusion with larger system configurations.
Step 5: Send Configuration
Once the system is programmed and the physical devices are connected, you can send the configuration to all the devices on the network. Click the  icon to send the configuration to the system. The Configuration Output window will list information and errors encountered during the system configuration. It does not monitor the system or devices in real time, just provides context to any configuration sending failures.
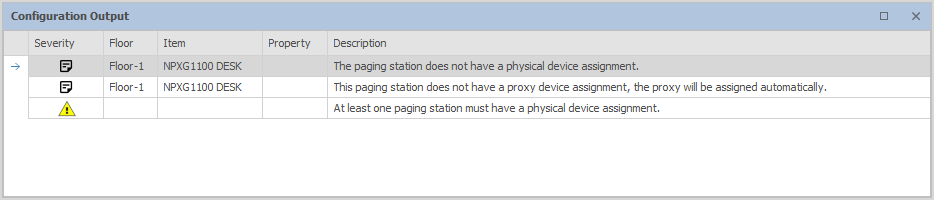
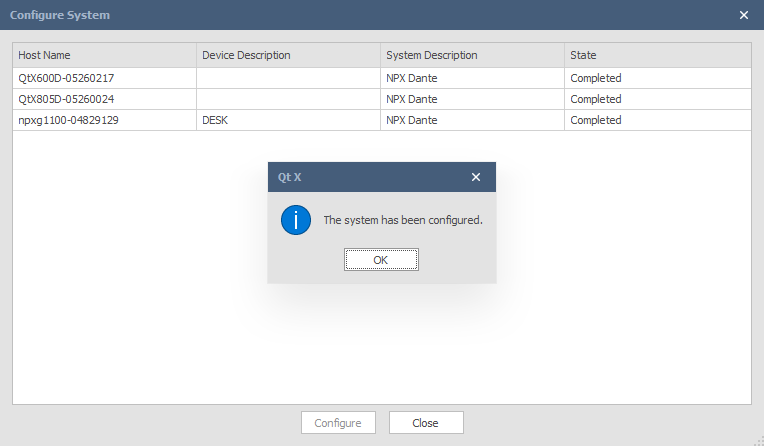
If no configuration errors are present, A pop-up window will indicate that the configuration is in process with a note that it has completed when successful.
Step 6: Live Paging Controls
Live controls are available within each paging station. Select the "Systems"  icon and highlight a paging station to select it's properties and input settings.
Settings tabs for Page Codes, Audio, Filters, Compressor, Recordings, and Preambles are available in system runtime.
Select the "Paging Control"  icon on a selected paging station to manage its page codes. Zone assignment, preamble selection, page action, and priority may be changed in the management window. Page codes may also be added or deleted during system runtime from this management window.
NPX Faults
| Fault Code | Description | Troubleshooting Steps |
| DEVICE_TEMPERATURE |
Device exceeded maximum temperature |
Remove the NPX from the network and allow to power off. If possible move to a cooler environment and allow time for the device to stabilize to a lower temperature before powering back on. Ensure that mounting location allows for at least 2-3 inches space on all sides to allow for proper air circulation. NPX Ambient Operating Temperature Range: |
| HOST_COMMUNICATION_FAULT | Host communication fault | Every 7 seconds the NPX controller is expecting a message from the Qt X host device to establish it is still present on the network. If this message is not received, the NPX will display this fault. Validate all network connectivity between NPX and Qt X devices. Check that NPX paging station can be discovered in Qt X software application. |
| MESSAGE_MEMORY_FULL | Message memory full | NPX in a system has 10 Independent message storage slots which share a total storage time of 50 minutes. This total includes messages and custom preambles. The time per message is shown in the |
| FIRMWARE_UPDATE_FAILURE | Firmware update failure | Ensure the connection is over a wired network, reboot NPX device and rediscover in SW then re-push FW to device. A factory reset of the NPX is also an option prior to pushing FW back to the unit. |
| AVB_STREAM_ERROR | AVB stream error | Validate network topology and cabling. AVB errors could be caused by switch settings, or timer values. Ensure that all connected switches have an active AVB license, AVB enabled on associated ports and recommended MRP timer values. If VLANs are setup, ensure that the proper ports are associated with the AVB VLAN. If multiple switches are involved, try to simplify the topology to a single switch to narrow down the issue. |
| DANTE_STREAM_ERROR | Dante stream error | Validate network topology and cabling. Ensure that all switch settings are configured for recommended Dante networks and IP addresses are in the same subnet across devices. Check Dante devices and clocking via Dante controller to confirm that all devices are present and routed. If multiple switches are involved, try to simplify the topology to a single switch to narrow down the issue. |