Biamp Launch
TesiraFORTÉ X and Devio SCX devices feature Biamp LaunchTM, and a suite of functions designed to speed up and optimize the installation and tuning of a Biamp conference system. This article offers an overview of Biamp Launch for auto-configuration of TesiraFORTÉ X and Devio SCX .
Biamp Launch technology triggers automatic discovery, configuration, and tuning of connected Biamp devices without the need for custom programming. In addition, Launch provides the user with a full performance report for the meeting space upon completion.
Auto-configuration may be initiated from the Launch button on the Audio page of the embedded user interface or from the Launch button on the front of the device itself.
If auto-configuration has already been completed and the Launch button is pressed again, a verbal or text confirmation that you wish to proceed will be given. If the user does not elect to re-run auto-configuration the update option will time out and the device will simply retain its prior configuration. Repeated runs of the auto-configuration process have been tested and the results found to be very consistent, meaning there would be no downside to re-running auto-configuration.
Getting started
Unbox and connect the Biamp Launch-capable hardware according to the included installation guide.
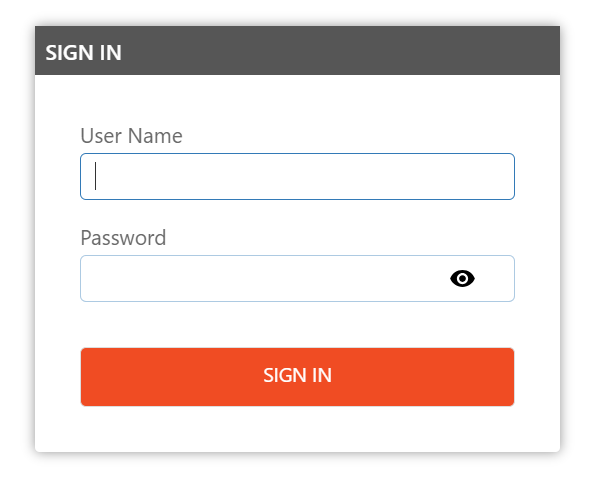
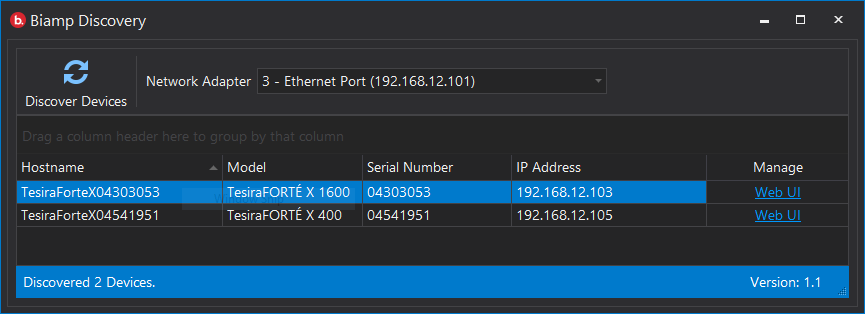 The device's IP address, serial number, and a link to the web UI can be found using the Biamp Discovery app. Click on Web UI to open the webpage, the web user interface (webUI) will prompt for authentication. The default username is admin and the default password is the device's 8-digit serial number.
Connected peripherals will be shown on the Devices page of the web UI. Peripherals must be connected to the media ports of the device (P2-5 in the default Dedicated Control and Media network mode) to be discovered and available for inclusion in the Launch process. Launch requires the use of Biamp Parle mics and amplifiers for room tuning.
- Always be sure to load the latest firmware to ensure hardware is up to date. Revision B Parle microphones and network boxes require system firmware version 4.2.1 or higher to function. Revision C Parle microphones and network boxes require system firmware version 4.4.1 or higher to function. Mics and boxes may appear to be unresponsive until firmware on the host TesiraFORTÉ X / Devio SCX is updated.
Supported hardware for auto-configuration includes:
- Biamp Parle microphones (TCM-1, TCM-1A, and TCM-1EX or TCM-X, TCM-XA, and TCM-XEX or TTM-X and TTM-XEX).
- Biamp Parle amplifiers (any combination of 8 channels connected to loudspeakers on AMP-450P, AMP-450BP, and TCM-XA or TCM-1A)
- TesiraFORTÉ X USB is configured as a 1x1 USB audio interface.
- (1) EX-UBT or (1) EX-USB with 1x1 USB audio and 2x1 Bluetooth audio (only available on EX-UBT).
- (1) HD-1 controller.
- Biamp Launch does not configure the Dante I/O on TesiraFORTÉ X devices. Dante I/O is only available when TesiraFORTÉ X is manually configured. Analog I/O (ch 1 in / ch 1 out) on TesiraFORTÉ X is enabled for use with a non-USB capable far end Rx/Tx device such as Cisco SX80. GPIO Logic Input 1 is enabled for Fire Alarm mute support.
Desono loudspeaker options:
- Tesira firmware version 4.11 or higher permit the selection of Desono loudspeakers installed in the room system. Confirm the proper model and select it via the web UI before running the Launch sequence. Selecting the proper loudspeaker model applies appropriate EQ curve which is subsequently fine tuned during the Launch sequence. The following loudspeaker options are available:
Biamp Launch
![]() After powering up the TesiraFORTÉ X / Devio SCX and peripheral Biamp AVB devices, the user will be greeted with a slowly pulsing green LED on the front right corner of the host TesiraFORTÉ X / Devio SCX device. This is the Biamp Launch button and the pulsing green LED indicates the new device is unconfigured and ready to be activated.
After powering up the TesiraFORTÉ X / Devio SCX and peripheral Biamp AVB devices, the user will be greeted with a slowly pulsing green LED on the front right corner of the host TesiraFORTÉ X / Devio SCX device. This is the Biamp Launch button and the pulsing green LED indicates the new device is unconfigured and ready to be activated.
A target SPL for the room can be manually defined on the Audio page of the web UI. The default target value is 70dBA and this has been shown to yield excellent results in most cases with a UC meeting volume at around 50%. An average spoken word volume of approximately 60dBA has been found to be a comfortable level. In Windows 10, a PC volume adjustment from 100% to 50% reduces level by 10dB.
The preferred UC vendor can be selected on the Audio page of the web UI. The Generic option is the default. Profiles for Teams, Zoom, and Google Meet are also available, These reflect the settings used with Biamp Tesira hardware during certification testing with each vendor platform. The UC Vendor setting can be changed at any time, without requiring Launch to be re-run.
- Launch can be initiated from the Launch button on the front panel.
- Launch can be initiated from the Audio page of the device's web user interface. The device's IP address and a link to the web UI can be found using the Biamp Discovery app.
Here is a video of the hardware setup and Launch process https://www.youtube.com/watch?v=iD-AQ__Ai3o


Web user interface
 The device's IP address, serial number, and a link to the web UI can be found using the Biamp Discovery app. Click on Web UI to open the webpage
- Since this is a webpage running on a local web server there is no valid SSL certificate present. This is normal. A warning that "Your connection is not private" will appear, in the Advanced option you can choose "Proceed to ip address (unsafe)" to load the web UI.
The web user interface (webUI) will prompt for authentication. The default username is admin and the default password is the device's 8-digit serial number. The password is expected to be reset with more secure unique credentials by the installer in most installations. Web page security is managed on the Settings page in the web UI.
Password changes persist through both device resets via Device Maintenance > Clear Configuration and pinhole resets.
The Devices, Audio, Network, Settings, VoIP, Event Scheduler, Troubleshooting, and About webpages are accessible when a device is Launch-capable. (A manually configured Forte X provides a subset of these pages.)
| Devices | Audio | Network | Settings | VoIP | Event Scheduler | Troubleshooting | About | |
| Pages available when Launch-capable |
|
|
|
|
|
|
|
|


Firmware updates
Unconfigured or Launch auto-configured TesiraFORTÉ X and Devio SCX devices support firmware updates via their web UI on the Settings page.
Automatic firmware updates are also possible via USB-X connection from a Windows host device. Further details on this update path are available:
The Launch room configuration experience
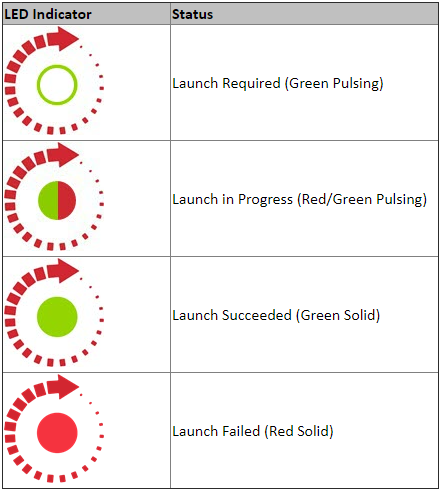 Following the initial Biamp Launch button press, the Launch LED will immediately shift from a green pulse to an alternating red and green pulse pattern for the duration of the configuration and tuning process. An introductory "Welcome to Biamp Launch" message will play out. In pre-4.2 firmware releases there is a period of 15-60 seconds of silence followed by a recorded welcome announcement (English language) advising the user that the automated process is about to begin. No further user interaction is required to set up the system.
If Launch is initiated from the device's web UI there may be a short lag after clicking Launch before the button test changes to "Launch Running".
If Launch has already been run to configure the device, users are verbally directed by the system to press the button again to confirm they wish to proceed with re-running Launch. If the button is not pressed again the system will remain unchanged.
It is important to stay silent during the Launch process so that it can run successfully. The system analyzes the background noise present in the room as well as the loudspeaker and room responses to test tones it produces. The Launch process will typically take between 3 and 8 minutes to complete, depending on your system configuration.
The web UI Launch button will indicate when Launch is in progress. The front panel Launch LED color will change to an alternating pulsing green-red until Launch is complete. In the web UI the Launch button's text will change to reflect the current status of the Launch process.
A series of automated tests and procedures are run which configure and tune the system. Test tones may be louder than is comfortable for some users. Users may run Launch remotely via the web user interface or choose to protect their ears as needed if they intend to remain in the room under configuration during Launch.
After Launch completes it will announce the system is ready for use and the LED will be steady green. A reboot of the device is recommended before first use to ensure transmit mute states are in sync with USB hosts. The reboot can be a soft reboot from the web UI or a hard reboot (power cycle).
The Launch configuration is retained through reboots.
If Launch fails
If Launch has failed the Launch LED will be steady red and the Launch button on the Audio window of the web UI will indicate "Launch Failed".
Always be sure to load the latest firmware to ensure hardware is up to date. Revision B Parle microphones and network boxes require system firmware version 4.2.1 or higher to function, mics and boxes may appear to be unresponsive until firmware on the host TesiraFORTÉ X / Devio SCX is updated.
- Confirm the expected devices are connected and are shown in the Devices page of the web UI.
- Confirm the host TesiraFORTÉ X / Devio SCX is running firmware version 4.2.1 or later.
- Check the Troubleshooting page of the web UI to see if any faults are shown, remedy the fault, and retry Launch.
- If a room fails with an "Excessive noise detected" warning you can raise the target SPL by 5 or 10dB and retry Launch.
- Confirm speakers are in correct mode (Launch will fail after the speaker locate tones if speakers are tapped for 25V/70V/100V rather than direct drive 4-ohm or 8-ohm).
- If multiple TCM-1A or TCM-XA are used ensure that each unit has at least 1 mic attached to it.
- If a TCM-X, TCM-XA, or TTM-X network box has a single mic connected ensure it is using the mic 1 port.
- Mixing mic types is not allowed with Launch (e.g. - you may not use both a TCM-1 and a TTM-X in the same system).
- Ensure that inaudible excessive ambient noise levels are not present in the room, nor occurring during the Launch process. 3rd-party ultrasonic proximity pairing tones and/or impedance monitoring tones may be interpreted as high ambient noise. A 3rd party RTA may show audio at 16k or higher.
- Press or click the Launch button to re-start the Launch process.
If Launch continues to fail contact us at support@biamp.com with a copy of the logs downloaded from the Troubleshooting page and a short video of the Launch process from start to failure so we can assist in determining the problem. If there are any other symptoms noted please be sure to include them.
Launch has previously been run
If Launch has been run successfully and the device is rebooted it will come up in the same "Launch Succeeded" state as it had when powered down.
If Launch has successfully completed but the far end cannot hear you, a reboot of the device is required to synchronize the transmit mute states with the host PC. The device will then maintain correct mute sync until the auto-configuration process is re-run.
If a user has pushed the Launch button by accident on a configured device then simply ignoring the 2nd voice prompt will halt the Launch process.
- Re-running the Launch process will not adversely affect a system and is recommended if the room has been physically modified by adding furnishings, carpets, or acoustic treatments.
- Launch can be re-run at any time but it will stop audio and will re-initialize USB connections so it should never be initiated while in a call.
- Launch can optionally be initiated from the device's web UI. When Launch is triggered remotely a popup message prompting the user to confirm they wish to proceed appears rather than the spoken confirmation message.
Factory Reset
A Factory Reset can be done at any time, it will clear the device configuration completely, resetting the device to an "out of box" state. A factory reset will restore Launch capability on a manually configured TesiraFORTE X, note that it will delete the existing configuration file in the process.
There are 2 ways to do a Factory Reset:
- Go to the Settings page on the web UI and select "Factory Reset" under Device Operations.
- Press and hold the rear panel pinhole reset button for 15 seconds.
Hardware discovery
Once initiated, Launch clears any prior Launch configuration settings and begins an automated sequence of tests using the connected Biamp hardware.
The first tests determine what Biamp hardware is connected to the host device. A system is created including all of the discovered connected devices up to the device limits. If additional hardware beyond the allowed limits is discovered then Launch will fail to execute and will report the fault.
Up to 8 Parle microphones and 8 Parle amplifier channels with connected speakers may be used with Launch. Amplifier channels without connected speakers are not included in the count.
Connected peripherals for auto-configuration may include:
- Biamp Parle microphones (TCM-1, TCM-1A, and TCM-1EX or TCM-X, TCM-XA, and TCM-XEX or TTM-X and TTM-XEX).
- When using Biamp Launch, up to (4) Parle microphones are supported in TesiraFORTÉ X 400 and Devio SCX 400
- When using Biamp Launch, up to (8) Parle microphones are supported in TesiraFORTÉ X 800, Devio SCX 800, and TesiraFORTÉ X 1600.
- Only one type of Parle mic can be used in a Launch-capable system
- TCM-1, TCM-1A, TCM-1EX or
- TCM-X, TCM-XA, TCM-XEX or
- TTM-X, TTM-XEX
- Biamp Parle amplifiers (AMP-450P, AMP-450BP, and TCM-XA or TCM-1A)
- Up to (8) total channels of amplification are supported in auto-configuration. The total number of amplifier channels on connected devices may be greater than 8, but only 8 can be connected to loudspeakers.
- TesiraFORTÉ X USB is configured as a 1x1 USB audio interface.
- (1) EX-UBT or EX-USB with support for 1x1 USB audio and 2x1 Bluetooth audio (only available on EX-UBT).
- (1) HD-1 controller.
TC-5 network appliances may be connected on P2-5 of the TesiraFORTÉ X / Devio SCX to increase the number of AVB and PoE+ network ports available. The unpowered port P1 of the TC-5 should be used to link the 2 devices. If the connected peripheral devices change then the Launch configuration may no longer be valid (e.g. - if a mic is removed) and the system will prompt that re-running Launch configuration is required.
TesiraFORTÉ X supports single channel analog input and output to support Cisco Webex devices. The analog input gain setting is set to 0dB. The analog output full scale setting is set to -31dBu (mic level). The device's analog gain levels are not user adjustable. The analog input volume can be fine tuned on the Audio web UI page.
Analog input channel 1 is routed to all speaker outputs and to the other available far end outputs (USB X, VoIP X, EX-UBT or EX-USB USB and Bluetooth (EX-UBT only)). Analog input 2 is unused.
Analog output channel 1 receives the room mics and any other available input paths (USB X, VoIP X, EX-UBT or EX-USB USB and Bluetooth (EX-UBT only)). Analog output channel 1 is a mic level output.
Analog output 2 supports an Assistive Listening feed. By default the far-end input paths (USB X, VoIP X, EX-UBT or EX-USB USB and Bluetooth (EX-UBT only) are routed to analog output 2 for a mic-level Assistive Listening feed. Via the web UI, it can be changed to be far-end only, near-end only, mixed, or off. Analog output channel 2 can be set to either mic (-31) or line (+24) level output in the web UI.
Support for analog input and output was added with Tesira firmware 4.2, support for assistive listening was added with firmware 4.4.3.
Note: In firmware releases 4.2 to 4.4.2 analog input 2 was also routed to all speakers and non-analog far-end outputs, in firmware 4.4.3 and later analog input 2 was muted. In firmware 4.2 to 4.4.2 analog output 2 was configured the same as analog output 1, with firmware release 4.4.3 it was re-purposed for use with assistive listening devices.
TesiraFORTÉ X USB is configured as a 1x1 USB audio interface.
GPIO Logic Input 1 for Fire Alarm Mute Support was added with Tesira firmware v4.4.3. Customizable GPIO logic otherwise is only available when TesiraFORTÉ X is manually configured.
Biamp Launch does not configure Dante I/O on TesiraFORTÉ X devices, those features are only available when TesiraFORTÉ X is manually configured.
If an HD-1 fails to get a configuration ensure that the Control port (P1) is in a unique IP subnet range from the media ports. If no DHCP server is present it may be necessary to assign a static IP address to the control port so the HD-1 can communicate via the media subnet. The Control port IP address can be changed in the web UI on the Network page, note that the web page will now be seen at the new Control IP address.
Launch system calibration
The Launch-capable Biamp processor and the Parle mics and amplifiers offer a known reference system to begin tuning the room. System adaptations are made based on measurements of the room’s acoustic response and the loudspeaker behavior.
During the Launch process the Biamp Parle mics are put into a special test mode allowing them to be used as a high quality omnidirectional test microphone. The output characteristics of the Parle test mic are known with a high degree of accuracy and so can be used as a reference mic for our room measurements.
In addition to the default speaker tuning profile, Biamp Launch supports user defined custom speaker tuning profiles. This feature is supported in devices running firmware 4.2 and later.
Launch works for systems including from 1 to 8 Parle microphones and from 1 to 8 channels of Parle amplification. While the best results are achieved with (1) loudspeaker per amp channel, (2) 8-ohm or (2) 16-ohm loudspeakers can be connected per amp channel on a Parle amplifier. This means a room with 8 channels of amplification driving 16 loudspeakers can be tuned with Biamp Launch.
Amplifiers and loudspeakers
The initial test tones are played through the loudspeakers during Launch allow the system to determine the efficiency of each loudspeaker; that is, how much output volume does it produce for a given input voltage.
Impulse sweep tones allow us to measure the time of flight for audio from each speaker back to each microphone in the room. This allows Launch to calculate the distance from each speaker to each mic.
Impulse sweep tones also reveal the frequency response of the loudspeaker’s output. A pre-Launch-tuning rating is assigned to the loudspeaker's frequency response based on its accuracy vs the source tones. This is shown in the report card as Initial Speaker Tuning.
The loudspeaker’s output is compared to our reference EQ response curve and EQ adjustments are applied for the loudspeaker to meet our reference EQ response curve.
Amplifier gain adjustments are applied to meet our target SPL level for the room to ensure comfortable conference volumes.
Peak limiters are set to prevent accidental episodes of volume above the target range.
The loudspeaker system is tested again with another impulse sweep to confirm the output matches the desired settings.
Microphones
The impulse response of each mic position is analyzed to determine the strength of "early" echo reflections in the room and apply the appropriate amount of Acoustic Echo Cancellation (AEC) processing for each mic location. Echo is eliminated from the mic by comparing any signal routed to the speakers with the input signal of the mic and cancelling out anything the two have in common. AEC prevents the far end audio from a call which is coming out of the loudspeakers and being "heard" by the mics from being fed back to the far end where it would be heard as an echo of their own voices.
 The measured RT-60 time of the room is used to determine the necessary levels of Non-Linear Processing (NLP) that needs to be applied to each microphone to squelch "late" echo reflections. NLP is also referred to as dereverberation. It provides adaptive filtering to reduce late reflection energy which arrive at the mic outside of the time window of the AEC algorithm. The applied settings available to Launch are None, Low, Medium, and High; where Low is a shorter time window and less aggressive filter and High is a longer time window and more aggressive filter. The NLP setting is shown in the Devices section of the report card for each microphone under 'Echo Reduction Applied'.
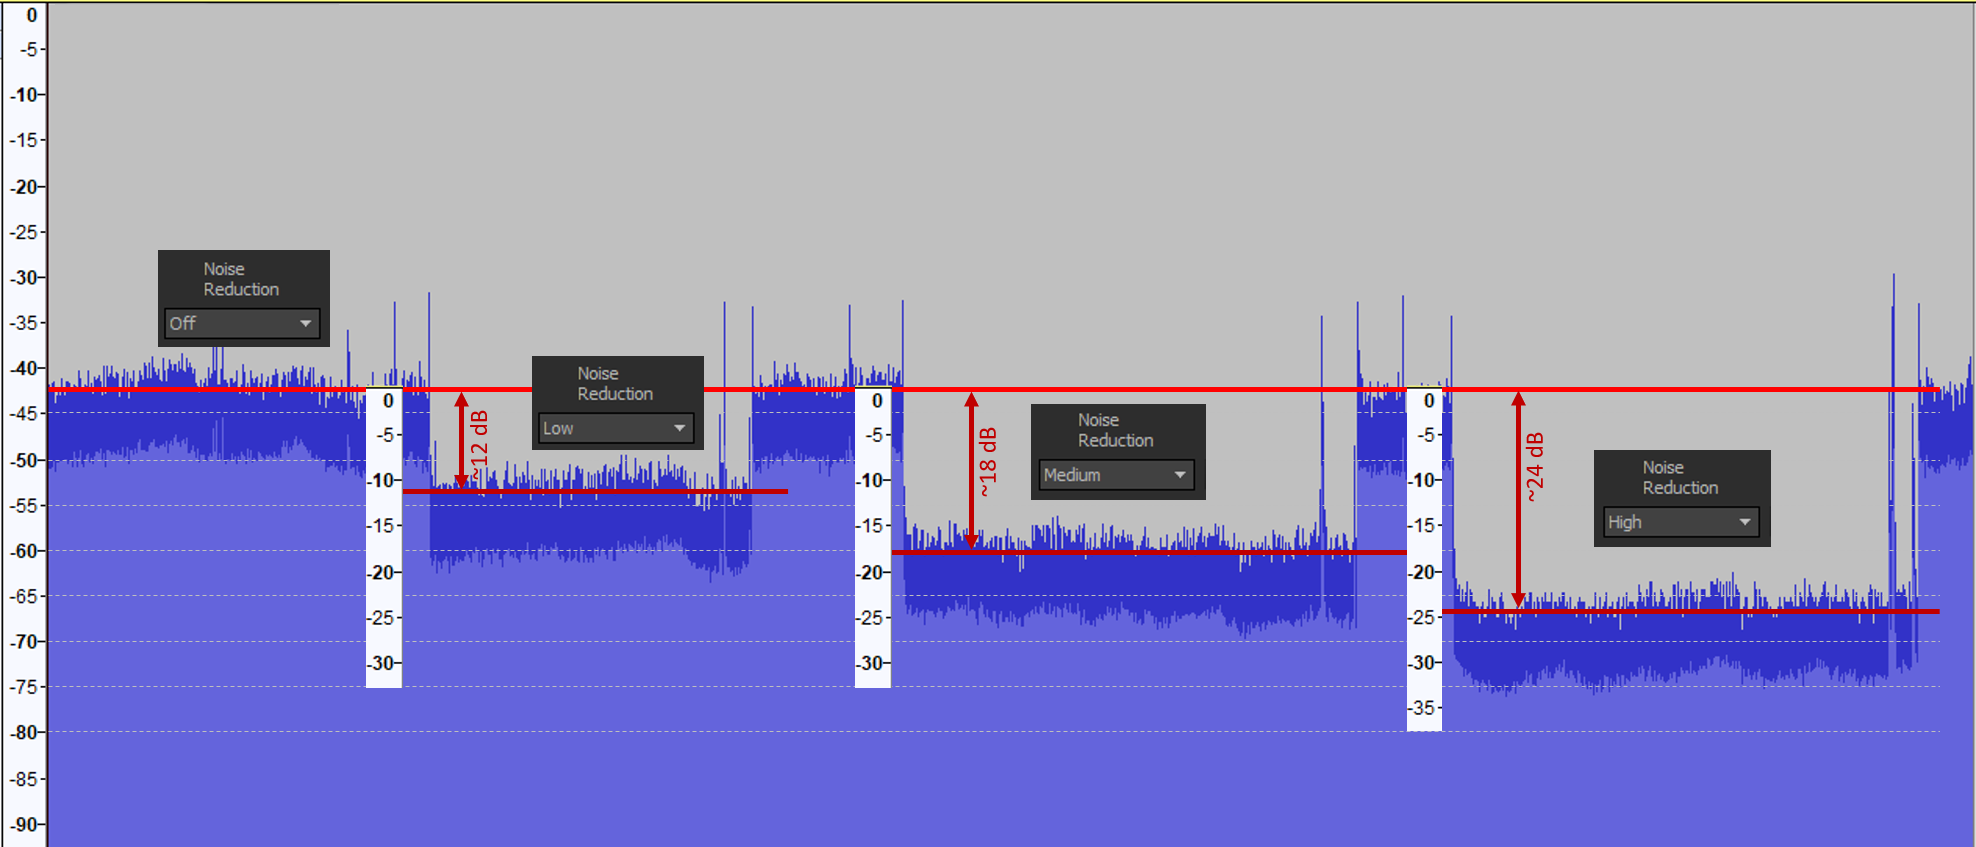
The noise floor of the room is assessed at each mic position to determine the amount of Noise Reduction (NR) that needs to be applied to reduce noise heard by listeners at the far end of a call to an acceptable level. Launch can choose from 4 discrete levels of NR, Off, Low, Medium, and High. The NR setting is shown in the Devices section of the report card for each microphone under 'Noise Reduction Applied'. AI Noise Reduction and Deverberation are used in the 'Generic UC' profile.
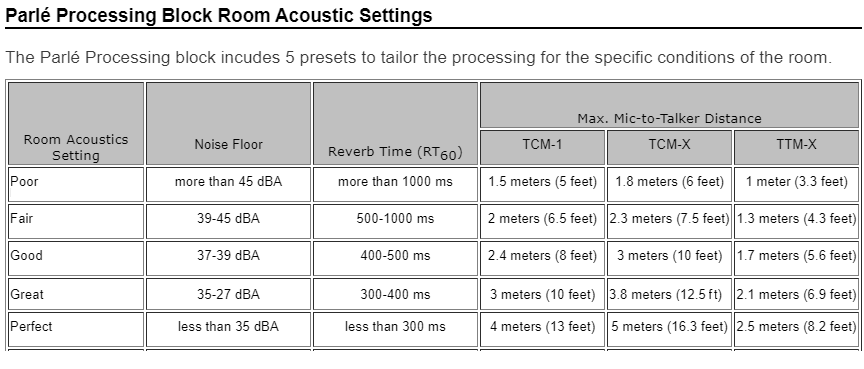 The appropriate Room Acoustics setting is applied to the Parle Processing block (a customized signal chain object from Tesira software) for each mic location based on the actual room acoustic measurements.
The appropriate Microphone Type settings are applied to the Parle Processing block to optimize EQ and automixing functions for the specific model of Parle mics discovered in the system.
Launch applies any UC-vendor-specific tuning settings to our Parle Processing block based on the UC Vendor selected on the Audio page of the web UI. The UC Vendor can be changed at any time after running Launch and the settings will be applied without needing to re-run Launch.
The final test signal played through the loudspeakers is the Speech Transmission Index (STI) test. The STI test signal is played after all the mic and speaker settings have been applied to verify that the system is performing as expected. This measurement evaluates whether the far end of a call should be able to clearly understand participants in a call from your Launch-calibrated conference room.
Acoustic measurements
During the Launch process a variety of test tones and verbal commentary will be played through the connected loudspeaker to perform and narrate the system setup process.
The tests allow the system to determine the room's noise floor and reverberance.
The room’s acoustic properties are measured and the mic and speaker performance are evaluated both before and after the tuning process.
The system calculates the distance from each mic to each speaker, adjusts the amplifier outputs per channel to match a target EQ profile, assesses the loudspeaker output volume and matches the desired target volume, sets limiters to protect against SPL overshoot, and then verifies the behavior with another impulse sweep.
Test components include:
 RT-60
RT-60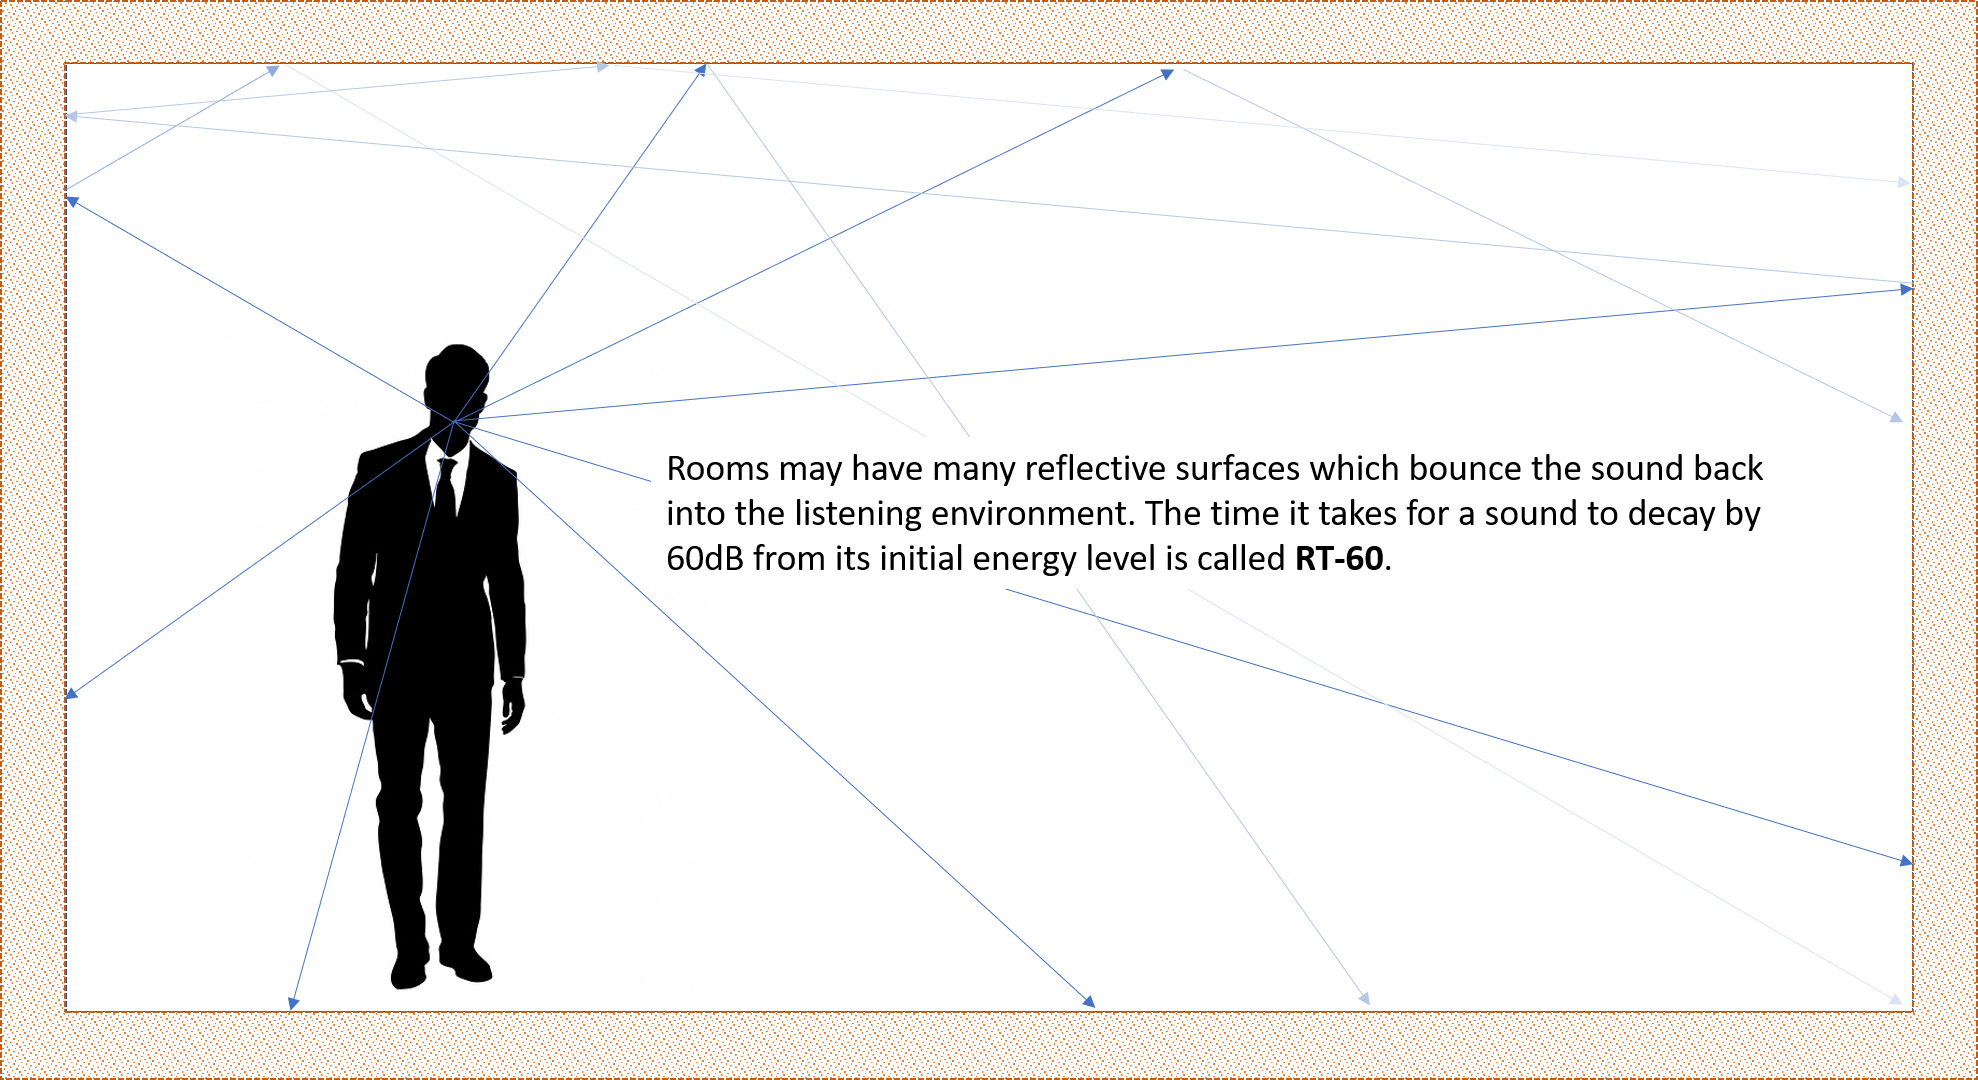

Measuring the room's RT-60 response.
Reverberance is acoustic energy – sound – bouncing from surface to surface within a room. Hard, smooth surfaces allow sound to reflect off their surfaces with very little loss of energy. Rooms with lots of hard smooth surfaces are generally described as being very ‘live’ and ill-suited for conference use.
A room’s reverberance is commonly documented by its RT-60 time. RT-60 is a measurement of the time it takes for acoustic energy to decay by 60dB (from very loud to almost inaudible) in a room. A 10dB drop in level is perceived as the sound being one-half as loud.
The RT-60 time is calculated for a set of frequencies across the audible spectrum. These measurements offer one insight into the overall suitability of the acoustics of the room for conferencing. An RT60 time of less than 0.5 sec is appropriate for most conferencing applications.
Rooms with long RT60 times tend to sound bad for conferencing purposes (but may be wonderful for a pipe organ recital). High reverberance (long RT60) cannot be corrected with electronics.
RT60 is reduced through physical modification of the space through the introduction of suitable acoustic treatments. The expense of the treatments can vary widely. There are many designer-friendly options available for use today, "acoustic treatment" does not mean "black foam eggcrate stapled to the walls."
RT60 response can be altered through the use of acoustic absorption panels, acoustic diffusion panels, bass traps, gobos, and a variety of room furnishings and treatments such as heavy drapery which can act as sound deadening materials as well as providing visual interest.
A room that sounds bad in person will typically sound even worse at the far end of a conference call. Room acoustics are a mechanical property determined by construction materials and design and issues must be solved via mechanical means such as upgraded windows, quieter air vents, sound blocking construction materials, isolation hangars for drywall and ceiling tiles, acoustic treatments, bass traps, and other methods. The better a room sounds to begin with, the better your results will be when attempting to mic it.
The effects of an overly reverberant room can also be mitigated with good (close) microphone placement to increase the ratio of direct sound captured vs. reverberant sound (direct-to-reverberant ratio).
RT-60 is an important consideration when designing conference systems with ceiling mics because the mics are at a distance from the talker and they will naturally capture more of the ambient sound of the room. The combination of a reverberant space with distant microphones can be highly problematic.
- A room with a long RT-60 time will generally be bad for conferencing (imagine the sound of voices in an echoey gymnasium or tiled hallway) while rooms with short to moderate RT-60 times may be well suited for conferencing.
- A room’s RT-60 times can be modified through the use of acoustic treatments to either absorb acoustic energy at certain frequencies, or to diffuse or scatter reflections from surfaces. Acoustic treatments can be incorporated into furnishings, artwork, and building materials.
- The types of furnishings and the number of people present in a room also affect reverberance.
Noise Floor
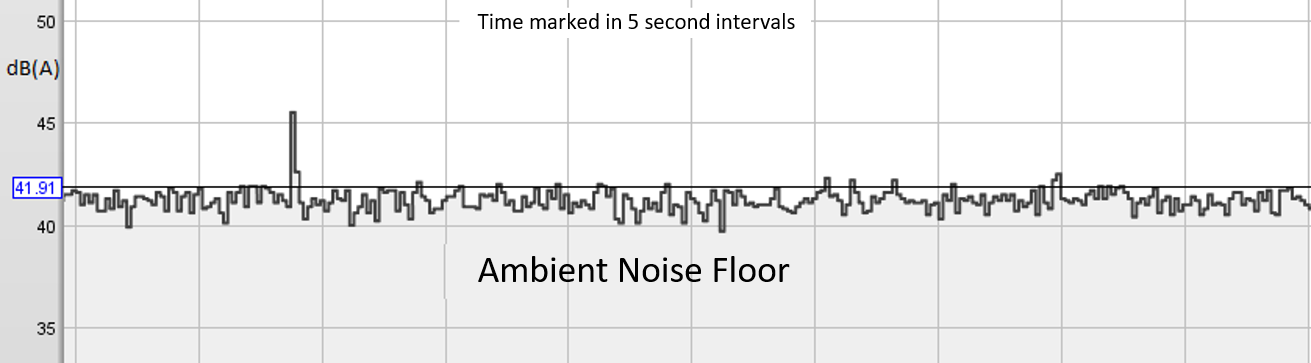 Measuring the room’s ambient background noise levels or noise floor.
The noise floor is the amount of ambient sound you hear in an otherwise quiet room. A low noise floor is generally conducive to focused conversation while a high noise floor makes conversation difficult or impossible.
A library or empty theater will generally have a very low noise floor, while a factory, coffee shop, or noisy restaurant will have a high noise floor.
A conference room with microphones should be thought of in the same manner as a recording or broadcast studio. In the same way poor lighting will result in a bad looking picture for video transmission, a high noise floor will result in bad sounding audio for audio transmission. The goal is to create a high-quality transmission for a remote audience.
The standard SPL measurement for noise floor uses A-weighting and a slow response. The noise floor will affect the results you can achieve with the conferencing system in terms of transmission clarity as well as intelligibility within the room.
If there are mechanical noise concerns (noisy air vents, air-conditioner blower noise, exterior noise sources transmitted through windows, walls, doors, or other sources) they should be identified, documented, and mitigated if possible. If there are intermittent but expected noises it is recommended to take measurements when these sources are active and inactive for comparison (eg - trains or subways passing, planes passing overhead).
What contributes to the noise floor of a room? Environmental noises which may be almost inaudible normally can affect a room, including wind and rain on the exterior of the building. Mechanical noises in the building generated by things such as HVAC system, plumbing, elevators, refrigerators, and manufacturing processes are common noise sources. External sound such as a nearby railway, roadway, or airport may raise the noise floor. Human noise is a contributing factor as well – talking, footsteps, people moving around the building, doors opening and closing, chairs rolling on the floor can all cause sounds which are transmitted through the structure of the building.
Microphones are made to capture all noise, regardless of the source of the noise. Microphone outputs can to be processed to mitigate the noises captured in a room through selective EQ, active noise reduction, and noise gating. The effectiveness of the processing done is dependent on the types of noise causing problems, some can be treated more effectively than others. It is always preferable to start with a pristine source which requires minimal processing.
Biamp Launch takes measurements of noise levels in a room at each mic position, then applies appropriate levels of noise reduction to the Parlé microphones. The result is a voice-focused audio signal delivered to the distant end of a conference call.
Noise Criterion
The Noise Criterion (NC) rating is a more detailed measurement of the noise floor of the space. The NC rating looks at the volume in multiple audio frequency ranges and rates them against standard response curves which correspond to how humans perceive sound.
A Noise Criterion Curve uses octave band noise measurements to represent noise level as a single value. This value represents the relative loudness of noise across a range of frequencies. The NC value is found by identifying the lowest NC curve not touched by the measured value plot. The recommended NC rating for a Conference Room is between NC-25 and NC-35.
It is possible to add acoustic treatments or sound deadening materials to suppress noise in targeted frequency ranges to improve the NC rating of a room.
Signal to noise ratio
The difference between the measured noise floor and the level of the talker at the microphone is referred to as the signal-to-noise ratio. This ratio must be at least 10dB, but should be closer to 25dB for optimal speech intelligibility. An ambient noise floor of 35-40dB(A) or lower is considered appropriate for a conference room. This level corresponds with the Noise Criterion curve of 25-30.
Some seats may have a noticeably higher noise floor versus others due to proximity to a nearby noise source. Be aware that a room that is relatively quiet at the desktop level may be much noisier at the ceiling mic locations.
A room measured at seat level may show a noise floor of 40dB(A), but a measurement made at the ceiling mic location, near an air handler, may show a noise floor of 65dB(A). In that case the 65db(A) noise floor is the most relevant data point since this is what the mic will "hear".
In addition to the issue of noise created by air handlers or vents themselves, air blowing across a microphone screen may result in air turbulence noises which can render a mic's output unusable.
If a room scores poorly for noise it may be necessary to manually take noise level measurements both at the listener and mic locations, and compare results.
Speech Intelligibility
Speech intelligibility is a determination of how well users can comprehend speech. Defining speech intelligibility is a complicated process that derives input from:
- RT60 values
- Signal to noise level
- Frequency response
- Distortions
- Overall equipment quality
Biamp Launch dramatically affects the intelligibility of the audio presented to the far-end participants by compensating for deficiencies in the local room acoustics. Biamp Launch also enhances speech intelligibility of the far-end audio in the local room by ensuring that room speakers are tuned to target values.
Measurements of speech transmission quality are made for each mic location.
The measurement of the Speech Transmission Index (STI) rating uses an industry standard test signal to measure how sound played through loudspeakers interacting with the room’s natural acoustic response affects intelligibility. The interaction is captured in a metric described on a scale of 0 = bad, to 1 = excellent. A low STI score will indicate it is difficult to understand speech in the space, typically this may be due to high ambient noise levels, excessively long RT-60 times, intrusive or competing sounds, inadequate sound pressure levels from the speakers, or poor quality or defective speaker installations not properly reproducing the audio in the listening area. A high STI rating indicates that the space is well suited for understanding speech content at the target volume.
To simplify the reporting of speech intelligibility, most standards organizations utilize a measurement technique that reports a single value. The most common scales for this value are the Speech Transmission Index (STI) and the Common Intelligibility Scale (CIS).
Auto-configured system
.PNG?revision=1) Once the auto-configuration process is complete the Devices page will list the system components and show their status.
Once the auto-configuration process is complete the Devices page will list the system components and show their status.
The Audio page shows:
- Microphone activity and privacy mute state.
- the "Track" button shows the Parle mic azimuth tracker which indicates talker position and intensity
- Input and output audio meters are shown for all connections.
- In the Event Scheduler Night Mode all output meters will be inactive, indicating the output paths are muted in the internal matrix. Mic meter activity is still seen but audio is blocked from all transmission paths.
- Input volumes can be manually adjusted on the Audio page.
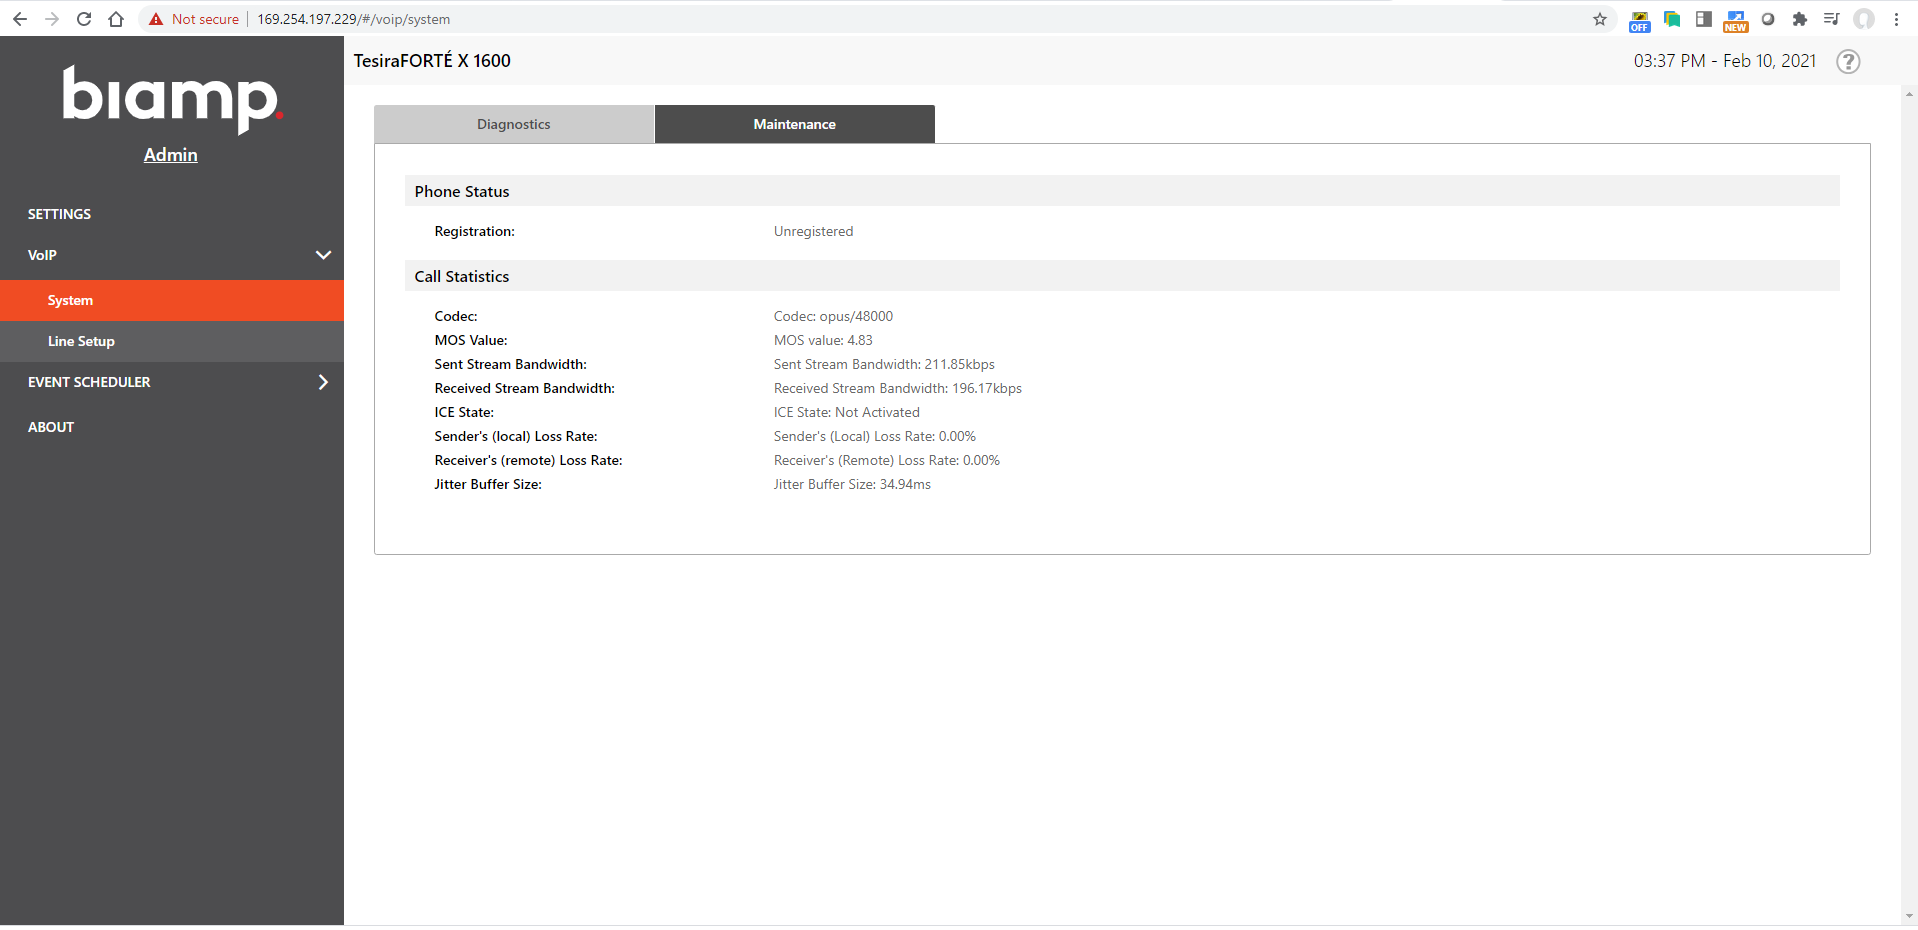
- VoIP call status activity (if configured) is shown in the VoIP section
- The VoIP > System page will show line registration status (if configured).
- USB connection, streaming, and mute status indication.
- USB endpoint can be renamed on the Audio page.
- EX-UBT or EX-USB USB and Bluetooth connection (EX-UBT only), streaming, and mute status indication.
- USB and Bluetooth endpoints can be renamed on the Audio page.
- Bluetooth capability and discovery in a connected EX-UBT can be managed here and Bluetooth discovery.
- Analog input and outputs (TesiraFORTÉ X only, firmware 4.2 and later)
Report Card and Advanced Report Card
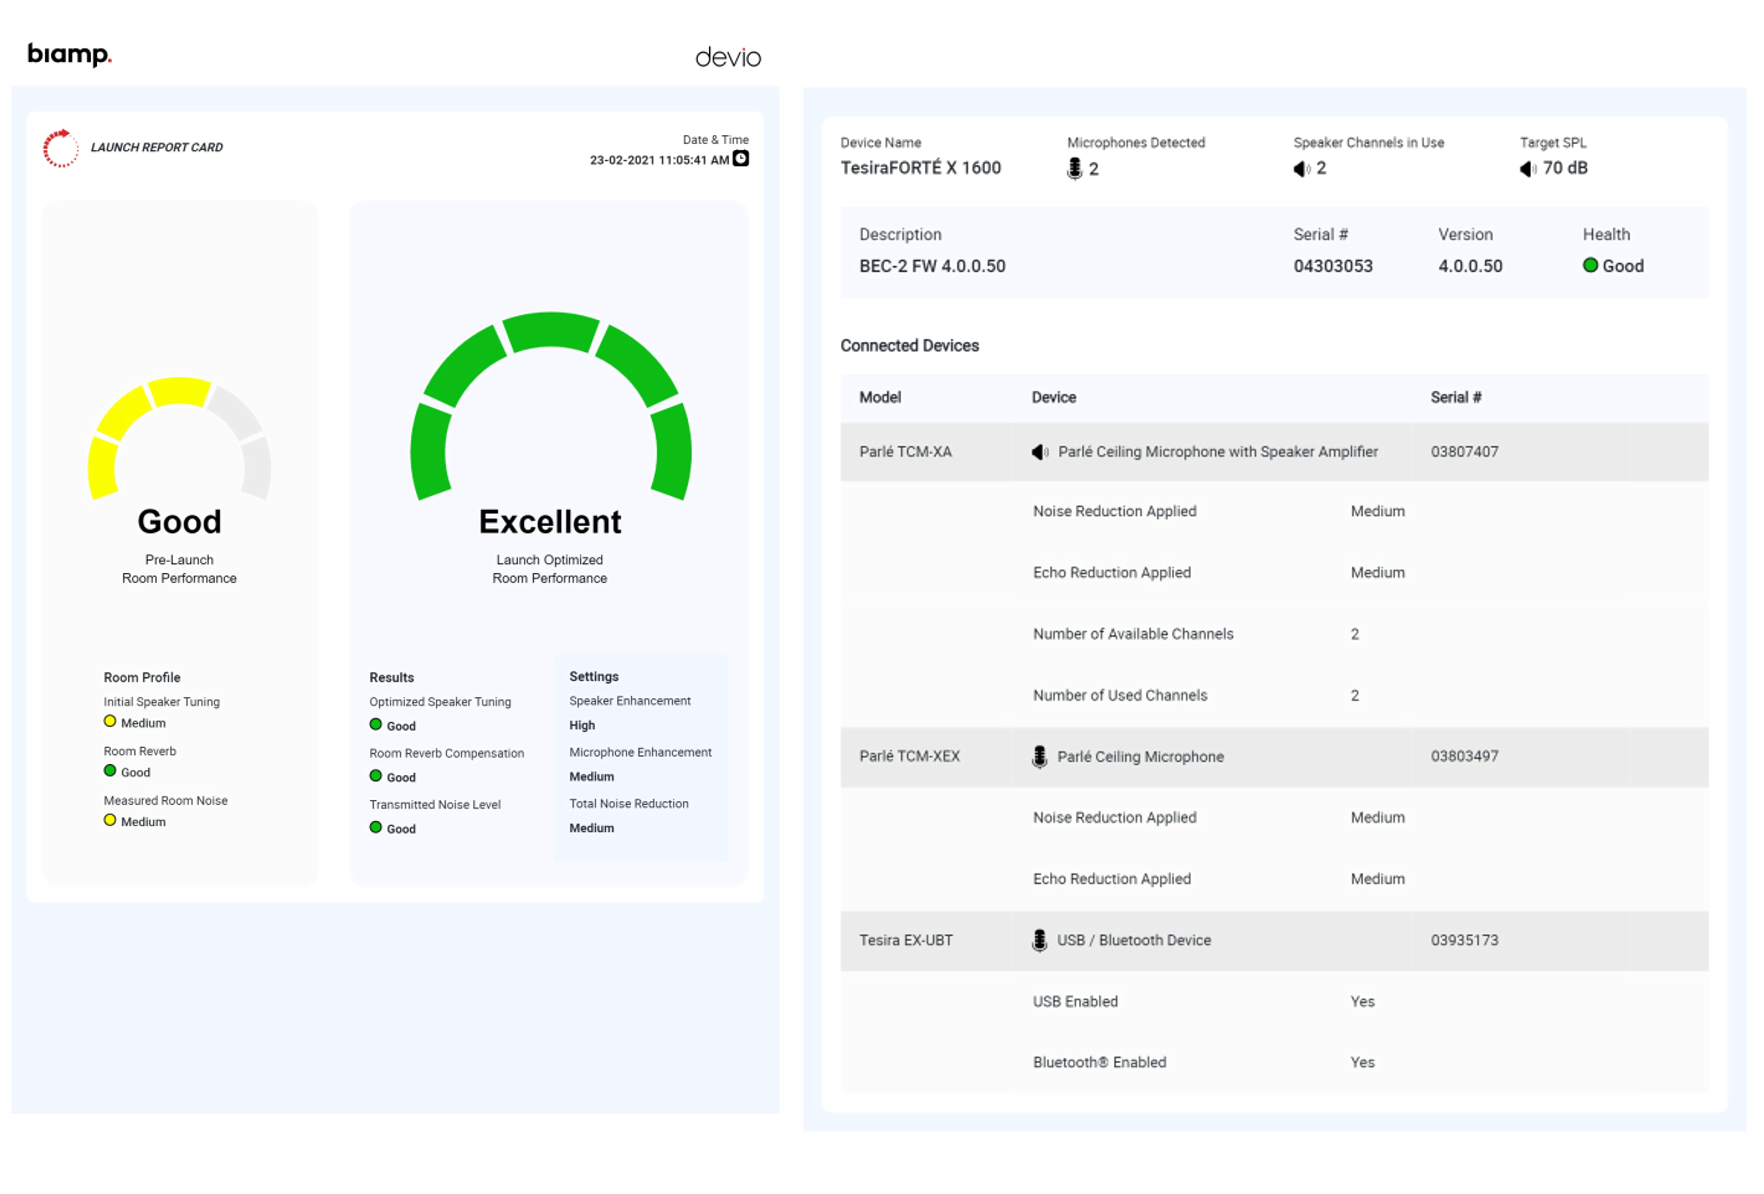
After the Launch process has completed, and the system has announced it is ready to use, a Launch report card is generated. To view the Launch report card, use a web browser to connect to the Biamp device at its IP address. Click the Audio tab to reveal the web-based Launch button (mirroring the function of the Launch LED button) and the Report Card button. Clicking the Report Card button opens a new webpage with details of the pre-Launch and post-Launch room acoustics measurements using easy to read graphics.
The Pre-Launch Room Performance assessment grades the room profile attributes: initial speaker tuning accuracy, the room reverb levels, and the measured room noise. Each category can be scored as Poor, Medium, or Good. A calculation based on all measurements is used to determine the overall room score. The pre-Launch room may receive an overall score of Poor, Fair, Good, Great, or Excellent
The Launch-Optimized Room Performance assessment grades the post-Launch performance results for: optimized speaker tuning, room reverb compensation, and transmitted noise level. Each category can be scored as Poor, Medium, or Good. It indicates the settings applied for speaker enhancement, microphone enhancement, and the total noise reduction. These can be scored as none, low, medium, and high. A calculation based on all parameters is used to determine the overall room score. The Launch-optimized room may receive an overall score of Poor, Fair, Good, Great, or Excellent
Note that certain room conditions (such as noisy HVAC systems) will limit the ability of Launch to attain Excellent results in every situation. Pre-launch conditions should be taken into consideration (a room initially rated as Poor will likely not be optimized to Excellent).
In the Connected Devices section each device can be opened to view some of the specific settings applied to the input or output channel.
The Report Card is a powerful tool for assessing the initial suitability of the room for conferencing. validating the room performance, and the expected results from the Launch-optimized Biamp system. The Report Card also gives a complete listing of the hardware devices in the system (device models, their serial numbers, firmware version, and more). The Report Card is generated as a pdf formatted for printing.
More detail on the Report Card and Advanced Report Card (available in version 4.2 and later) is available on the Biamp Launch Report Card page.
Mic LED behavior
Parle mic LEDs are normally illuminated in solid green unless mute is engaged, when they will be illuminated in solid red.
 When running firmware version 4.2 or higher, if Teams is selected as the preferred UC vendor, the Parle mic LEDs will be off when idle, green while streaming, and red when muted.
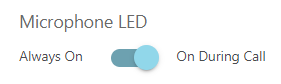
The default microphone LED state is "Always On". Users can manually select whether the LEDs are "always on" or are "on during call" for any UC vendor on the Audio webpage under Microphones.
Demo mode
The Demo mode changes the LED behavior on the TCM-X and TTM-X mics so they temporarily act in the same manner as the azimuth indicator. The mic's LEDs will indicate the direction and intensity of talkers relative to the mic. Demo mode automatically disables after 10 minutes.
Event scheduler
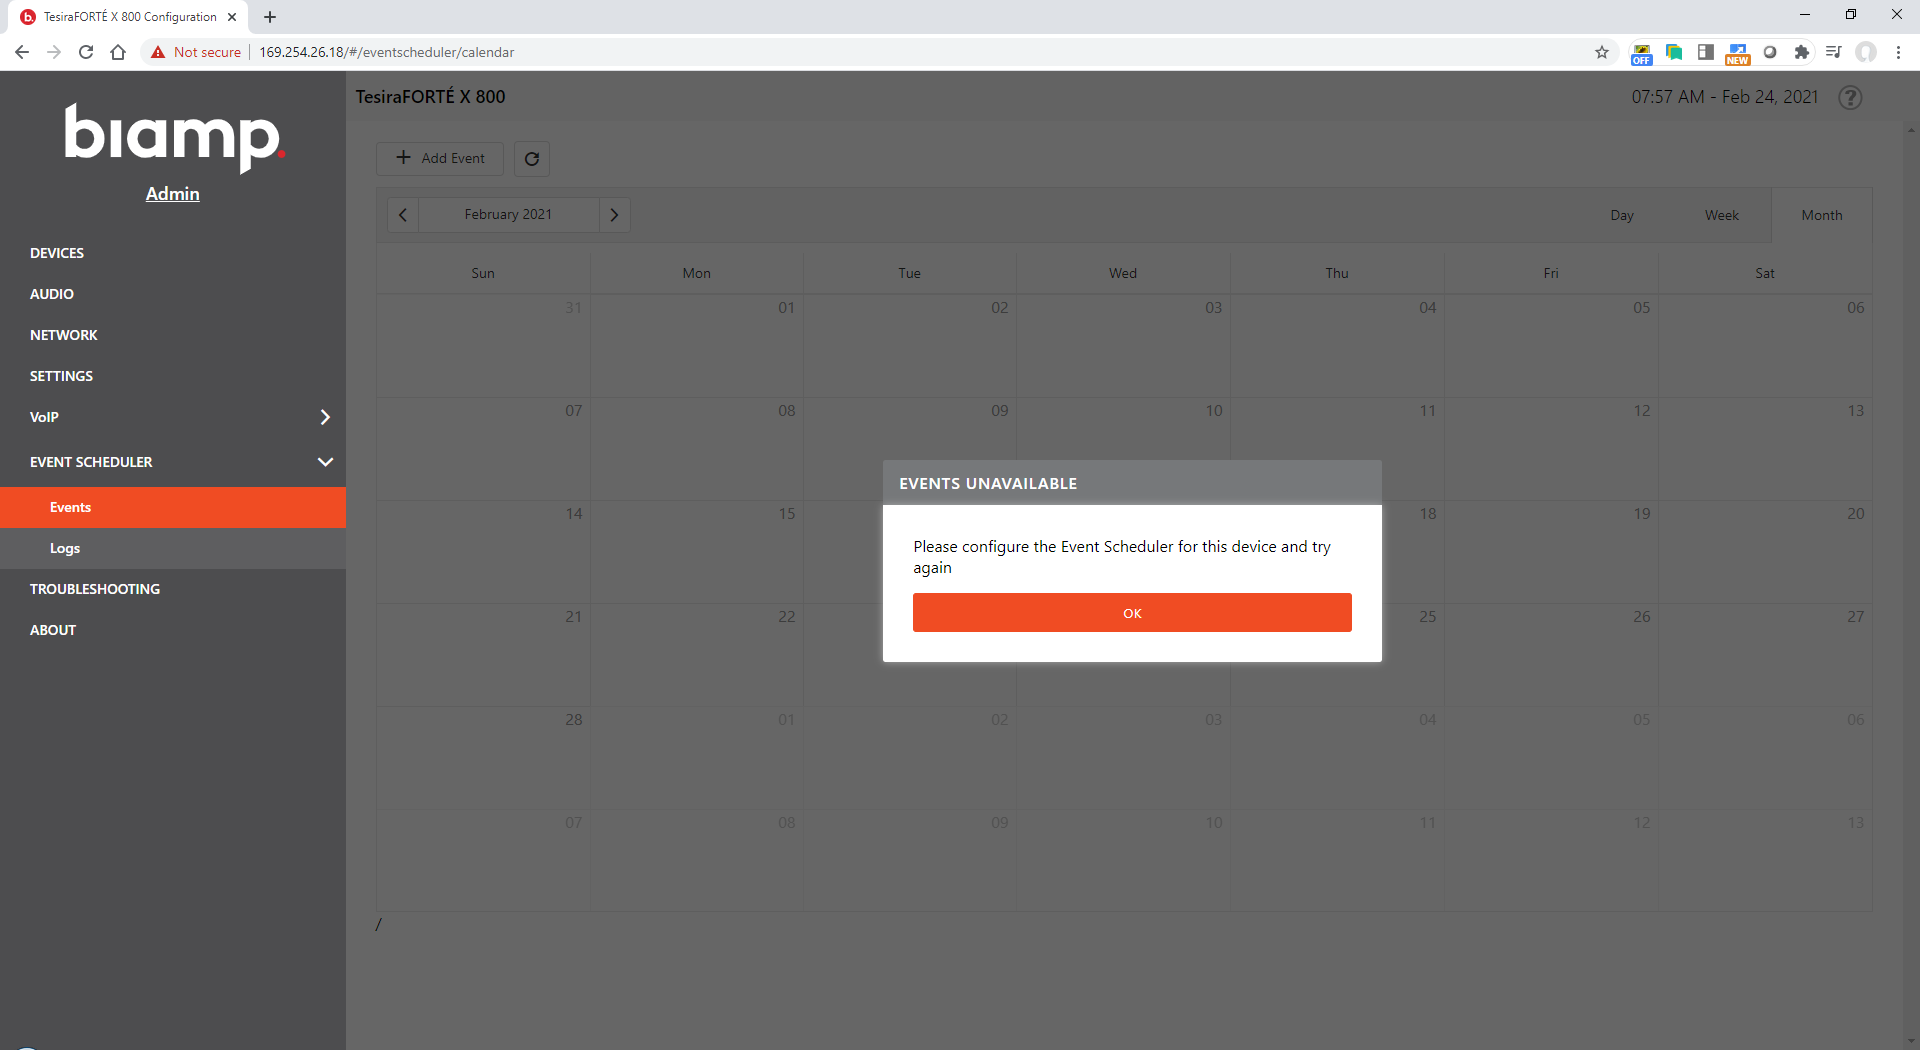
In systems which have been auto-configured using Biamp Launch, the Event Scheduler allows automated recall of a few pre-programmed preset states on a user defined schedule. Events can be defined as one-time events or recurring events. It is not possible to add presets to a Launch-configured system.
Events are configured in the web UI on the Network > Event Scheduler > Events page. To create an event click the "Add Event" button at the top left of the page, then edit the name (if desired), select the preset desired, set the time and date of the event, and click Save.
Day Mode
In day mode all features are active and available for use.
Night Mode
In night mode the device's output channels are muted in an internal matrix and the mic LEDs are turned off, indicating that the room is unavailable for use. This feature can be used to disable a room outside of normal operating hours if desired.
NTP servers
When the Event Scheduler is going to be used to control preset recalls in the system it is recommended that the system is set to use an NTP server to keep accurate time and date.
NTP settings are found in the web UI on the Network > Settings page or can be edited using Tesira software's Device Maintenance > Date/Time Settings > NTP Settings.
To enable NTP set "Use NTP" to On.
The NTP settings dialog provides a list of up to three NTP servers to which the device can attempt to automatically synchronize.
If your DHCP server supplies NTP server options, it can also be chosen as the preferred NTP address source.
Ensure that the device is configured with valid network settings (gateway / DNS server) so it will to be able to resolve and access NTP servers on the desired network.
Biamp highly recommends:
- Using NTP from the DHCP offer, or
- Manually entering public NTP server information such as:
- 0.pool.ntp.org, 1.pool.ntp.org, 2.pool.ntp.org (from ntppool.org)
- time.google.com (from Google)
- time.nist.gov (from NIST)
- Populating all fields is recommended.
- Mixing and matching is also permitted.
3rd party control
Tesira 5.0 and newer, permits control of a Launched system via TTP (Tesira Text Protocol).
- SSH is the default protocol for TTP but Telnet can be enabled if needed.
- The following control point instance tags are available to third party controllers:
- PrivacyMute
- Mutes all in-room microphones. Reflects the state of USB and HD-1 privacy mutes
- MasterLevel
- Controls in-room speaker output volume
- VoIPXControlStatus
- Supports typical dialing and control of VoIP-x if the line is registered for use.
- BluetoothControlStatus
- Available if EX-UBT is part of the system.
- Allows enabling/disabling BT radio and BT discovery
- LocalUsbInput or RemoteUsbInput (for EX-USB or EX-UBT)
- This is the USB Rx level from the UC Engine. If HID is supported by the connected device, level can be controlled on the UC Engine or from this block.
- LocalUsbOutput or RemoteUsbOutput (for EX-USB or EX-UBT)
- This is the USB Tx level of Parle mics to the UC Engine Far End. This level should be left at 0 or not used at all.
- The hookSwitch attribute may be useful for tracking the call state of the system.
- PrivacyMute
- Once the system has been launched, a power-on preset will set MasterLevel to 0 and unmute the PrivacyMute.
- For testing and validation, PuTTy can be used to query a Launched system for valid instance tags. The response will be tailored based on the devices included in the system. The following example shows a basic Forte X with TTM-X (no registred VoIP nor Bluetooth available):

- Further attributes for the USB blocks:

- Further attributes for the USB blocks:
