BMA 360D ceiling tile mic overview
A summary of the Biamp BMA360D mic array, how to connect to it and a primer of its various functions and features.

The Biamp BMA 360D microphone is a Dante capable microphone array that can be integrated with any Dante capable Biamp DSP. There are two models to support 2 ceiling grid types: 24in and 600mm. It incorporates a VESA-mount hole pattern that supports pole mounting. It has an optional Built-in robust power amplifiers, configurable as 4 x 15 Watt or 2 x 30 Watt, provide flexibility for driving loudspeakers. This microphone can support up to 12 directed beams to cover a wide variety of spaces and applications.
This article highlights and explains several features of the microphone as well as some guidance on device discovery, configuration using the BMA Console configuration software and how to integrate into a Biamp DSP file.
key features
- A Dante interface that will allow the microphone to be integrated into a Tesira DSP system that is Dante capable
- A built-in amplifier that operates in two modes:
- 4 x 15 Watt channel
- 2 x 30 Watt bridged channels
- Configurable LED with an array of colors and brightness settings that can be controlled via text commands.
- Up to 12 configurable directed beams sent via Dante to a Dante-capable DSP.
Wiring your BMA 360D
Connecting your BMA 360D to your Dante network
The Biamp BMA 360D has a single RJ-45 interface that will connect to your network, this interface has two distinct MAC addresses and two IP address.

- The first listed MAC is for the Dante interface.
- The second MAC is for Device discovery, configuration, and control.
The Biamp BMA 360D microphone can connect to a number of options depending on your application. Some options are:
- Connecting your Biamp BMA 360D to a Dante capable network switch.
- Connect your Biamp BMA 360D to TesiraCONNECT TC-5D to then feed it into an AVB-based Tesira DSP system.
- One of the Media ports on Forte X DSP. Consider the Port Mode of your Forte X to determine which port used.
For more information about Dante networking please see our Dante tech note
Deciding PoE requirements
The Biamp BMA 360D requires Power over Ethernet (Poe) to function. How much PoE the mic requires is based on your application, you have two options.
For more information on PoE see Biamp's tech note n the subject: Power over Ethernet (PoE)
No speakers - Only as a microphone
The Biamp BMA 360D can operate solely as a microphone. In this configuration it requires PoE+ and the POE requirements are 30W. At that point the BMA 360D can be plugged into a PoE+ switch and several options from Biamp:
- BIamp NMS - NG10GPX - This switch is both Dante capable and can provide PoE+ 10 ports with a total PoE budget of 240W
- Biamp NMS- NG26GPX - This Dante-capable switch has 26 ports and a total PoE budget of 480 W
- TesiraCONNECT TC-5 and 5D - Both the TC-5 and TC-5D support 4 ports capable of PoE+. The TC-5 can pass Dante audio, but it cannot convert Dante to AVB so it cannot be used to bridge a BMA360D to an AVB system. If you are bringing a CMA 360D into an AVB system use a TC-5D.
- Forte X - The Forte X has 4 ports capable of PoE+ and all 4 of these Ports can be configured to allow Dante traffic.
- POE29U-1AT(PL)D-r - Biamp resells a Poe+ injector that has been used in many applications and with many remote expanders it a gigabit Poe+ mid-span injector.
Other PoE+ switches and injectors are valid. Make sure they are robust enough to handle the Dante audio and control traffic.
Either 2 or 4 speakers
The Biamp BMA 360D can also support the use of up to 4 channels at 15W each or, by bridging the inputs, you can operate the BMA 360D with 2 channels of 30W each. However, in this type of setup, the power requirements of the BMA 360D increase to PoE++, which has a maximum of 90W.
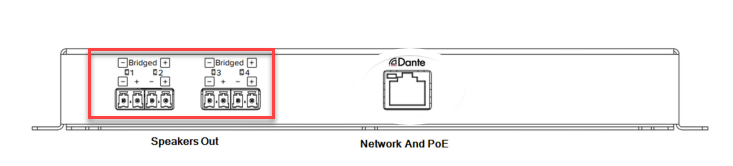
When bridging your connections you will wire the minus on input 1 with with plus on input 2 and minus on 3 with the plus on 4. This also has the added step within the Biamp BMA console software. There is a wiring guide within the software for your quick and convenient reference. More about these settings can be seen here
Regardless on how many speakers are used Biamp recommends that a PoE++ injector or switch be used:
- Biamp resells a gigabit PoE++ injector, the EasyConnect POE-90W
- Some switches do allow for 90W per port such as the GSM4212UX switch from Netgear.
- Make sure that any third party switch used in this application will work both with Dante and have the needed PoE budget for your application. for a guide on specifying Poe switches see Biamp's guide here.
BMA 360D Hardware installation
Download links - to be added once hosted on biamp.com
Biamp BMA Console software installation
Biamp has a dedicated software for configuring the BMA 360D . Its is available on biamp.com

- Download links - to be added once hosted on biamp.com
- Here are the requirments for the software to run
- Minimum screen resolution: 1024x768
- Requires .NET Framwork 4.5.2 or later
- Requires approximately 140 MB of disk space for installation
- 1 gigabyte (GB) RAM (32-bit OS) or 2 GB RAM (64bit OS) required
- Supports Windows 10 or 11; both 32-bit and 64-bit.
- Languages supported:
- English
- Spanish
- German
- Japanese
- Chinese (Simplified)
- Korean
- Brazilian Portuguese
- Arabic
- Russian
Device discovery of the BMA 360D
Network ports and protocols
Here are the list of protocols that the BMA Config software uses for the BMA360D microphones:
- UDP and TCP packet data on port 3602
- mDNS (Bonjour)
- UDP data sent by broadcast and directed IP
- FTP file transference to and from devices
- FTP web server access for firmware/software updates
The following network ports are required:
- 21 - FTP
- TCP 4912 - Communication
- UDP 3602 - Discovery
Discovering and connecting to a BMA 360D
The BMA 360D microphone by default is set to DHCP, and will resolve to a link-local subnet in the absence of a DHCP server. This is a Class B subnet and starts with 169.254. Connect your computer to the same network as your BMA 360D mic array and make sure your network interface is on the same subnet.
If you do not know the IP address of the mic array consult any available network documentation and, if needed, factory reset the device. The factory reset will wipe any custom project off the array
Once you open the software the software should discover any microphone on the same subnet as your PC. they will show up in the "Discovered Devices" window. If you have multiple NICs on your PC the BMA Config software will use all of them.
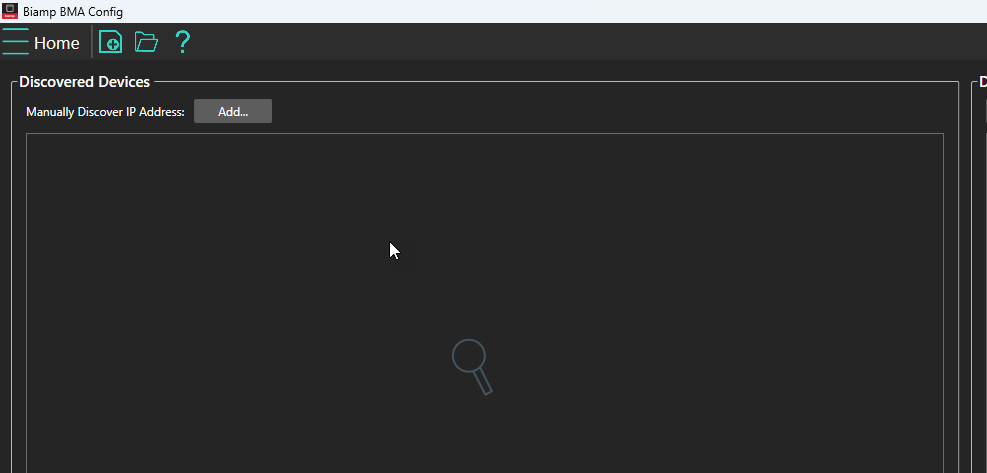
You can manually discover a BMA 360D by adding the IP address of a known Mic array using the "Add..." button. Once discovered the BMA will be present as a selectable device.
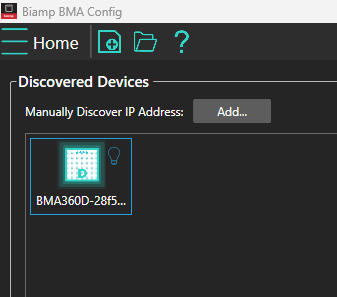
- Click the light bulb on the right side of the icon to engage a locate mode. this will make the LEDs on the device flash
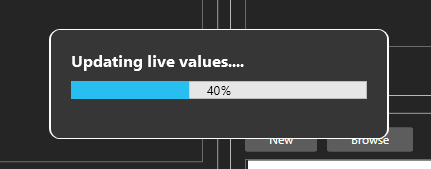
- Double-click on the Microphone to connect to the microphone which will open the "Channel Properties" window. While connecting you shall see a progress meter on your screen
Updating BMA 360D firmware
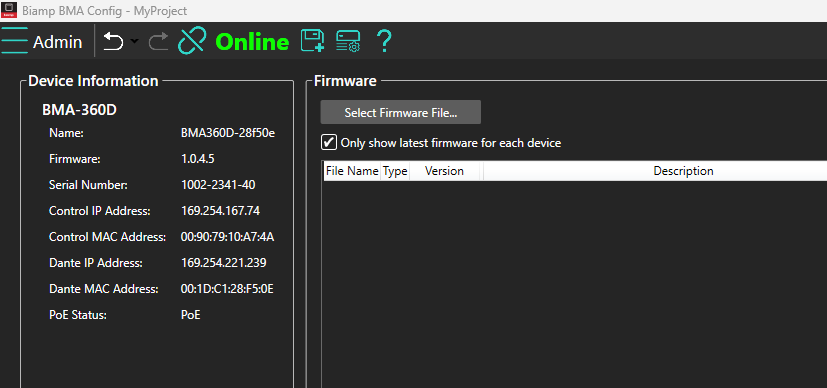
the BMA 360D mic array has two distinct firmware. The device firmware and the Dante firmware. The Device firmware can be updated within the BMA console software under the Admin screen. To access the Admin screen select the three horizontal lines in the software and select "Admin".
While the Dante firmware is updated in the Dante updated in Dante Controller software, There is a guide here.
Software configuration
For a more in depth guide on the Channel properties window, use this tech note.
Setting speakers and LED behavior
From the channel properties window, select the microphone icon and you will see where you can select whether the outputs are bridged and your preferred LED color and brightness.

Which will take you to this screen.

Changes in LED settings take effect immediately.
Selecting from presets
The BMA Console application comes with several preselect-able shapes and sizes for applications. This provides an easy starting point to your designs. see below for you list of options.

Also of note is that within presets you can move beams and direct them. These are starting points.
| Circle presets | Rectangle presets | Semi-Circle presets | |||
|---|---|---|---|---|---|
| Size | # of beams | Size | # of beams | Size | # of beams |
| Small (10’ x 10’ to 18’ x 18’) |
6 or 8 | Small (10’ x 14’ to 18’ x 22’) |
6 or 8 | Small (16’ x 8’ to 22’ x 16) |
6 |
| Medium (12’ x 12’ to 20’ x 20’) |
8 | Medium (10’ x 16’ to 18’ x 24’) |
6, 8, or 12 | Medium (16’ x 8’ to 22’ x 16) |
6 |
| Large (22‘ x 22’ to 24’ x 24’) |
8 or 10 | Large (12‘ x 22’ to 20’ x 36’) |
6, 8, or 12 | Large (16’ x 8’ to 22’ x 16) |
6 |
|
Extra Large |
10 | Extra Large (20’ x 36’ or larger) |
12 | Extra large (24‘ x 18’) |
11 |
Size estimates are based on a 10ft ceiling
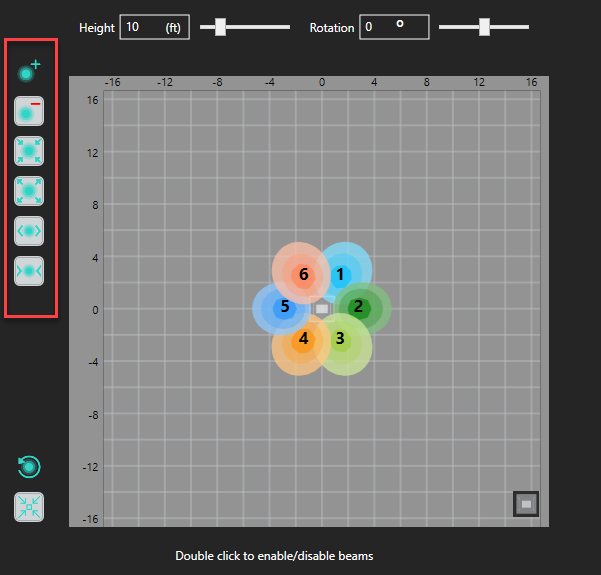
Adding/removing beams
Even if building from a Preset so long as there is not 12 in use, or if you need to disable a beam you can using the Console software. You can also remove beams as well. Within the Channel Properties window you will find the buttons on the left side of the screen.
Directing your beams.
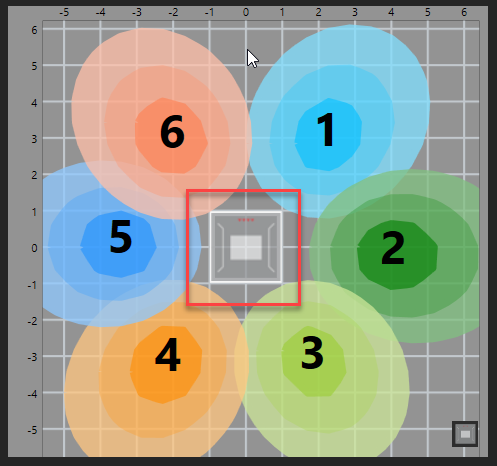
Within the BMA Console interface you can drag and move a Beam as needed. As you move beams in the software take note that the LEDs of the mic are at the top of the mic array in the software so you can orient yourself
Beams can be moved around the virtual space, and a mouse scroll wheel can zoom in or out. There is an icon in the lower left corner to reset the beams back to the last recalled preset

Saving your layout
Backups are always a good idea within the Channel properties window of the BMA Console application there is a save Icon. You can save a layout in case you must recall it at a later date or restore a previous setting.

Project files by default are saved to C:\Users\*YourUsername*\Documents\Biamp\BMA Config
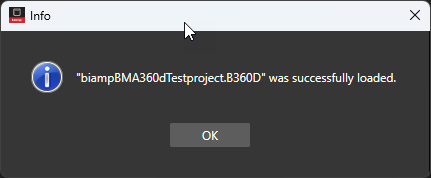
Then in the future if you need to reload your saved project this can be done under the "Admin" window in the BMA Console software
Once the project is selected to load a progress bar is seen followed by a confirmation window
Routing the BMA 360D audio in Dante Controller
Dante controller Device discovery
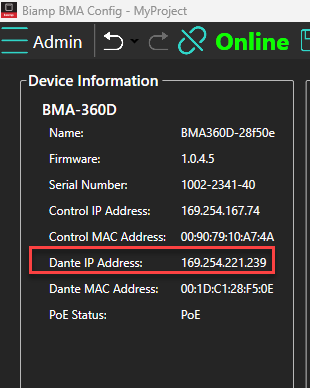
Routing your Audio to the DSP and back in your system is done via Dante Controller from Audinate. Just like the control IP address used for configuration of your BMA 360D the Dante IP address defaults to a DHCP address. If you are already looking at the mic in the BMA console application you can also check your Dante IP address while connected to the mic in the "Admin" section:
Routing Audio in Dante Controller
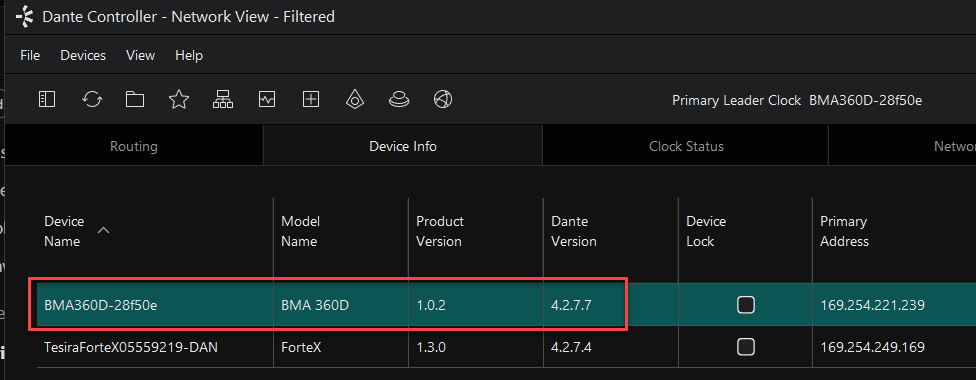
Once you know that IP address then you know what subnet to be on to discover it in Dante controller.
From there enable the cross points to direct your audio channels from a transmitter, such as the BMA 360D mic array to a receiver, such as a Tesira DSP.
Take note that for the microphone beams the BMA360D is a Transmitter and the DSP is the receiver, but for the speakers the DSP is the transmitter and the BMA360D is the receiver.

Note that regardless of how many beams you are using in your application all 12 beams plus the SmartMix are visible in Dante Controller.
Changing settings for the BMA 360D in Dante controller
In order to change names and settings for Dante side of the BMA 360 double click on the device in the device list.
Under the device view in Dante Controller you can edit settings such as:
- Beam names - these settings are preserved in a power cycle and visible in Dante controller
- Dante IP address - You can set the Dante IP address statically and the change will be reflected in the BMA Config console
- Device name - this will be preserved for a power cycle but it will require re-establishing crosspoints
- Latency and Encoding settings - these settings very rarely need to be edited from their default values
Tesira Software programming
Adding a BMA 360D microphone to a Tesira layout involves a Dante I/O block as these microphones do not support AVB. Any Tesira system that has a Dante interface including:
- Any AVB based Tesira system provided that you have a TesiraCONNECT TC-5D to bring in the Dante audio
- Any Rack mount FORTE that is a DAN model
- A FORTE X model
- Server I/O with a DAN-1 card (note a server I/O can have both an AVB-1 card and a DAN-1 card, but a DAN-1 is required to use a BMA360D)
For more information on channel counts and flows of our devices see this note Below are some Key notes to programming your Tesira file with a BMA360D
Per Beam vs SmartMix
A Tesira DSP is capable of taking in the SmartMix from the BMA 360D or an unprocessed beam block
In both cases use a Dante I/O block. once you place a Dante I/O block in your file Tesira software (Post 4.10) it will ask if Dante should be made clock leader instead of AVB. Generally this is a good practice if you need to make this change manually go to "System" then select "Media Clock setup"

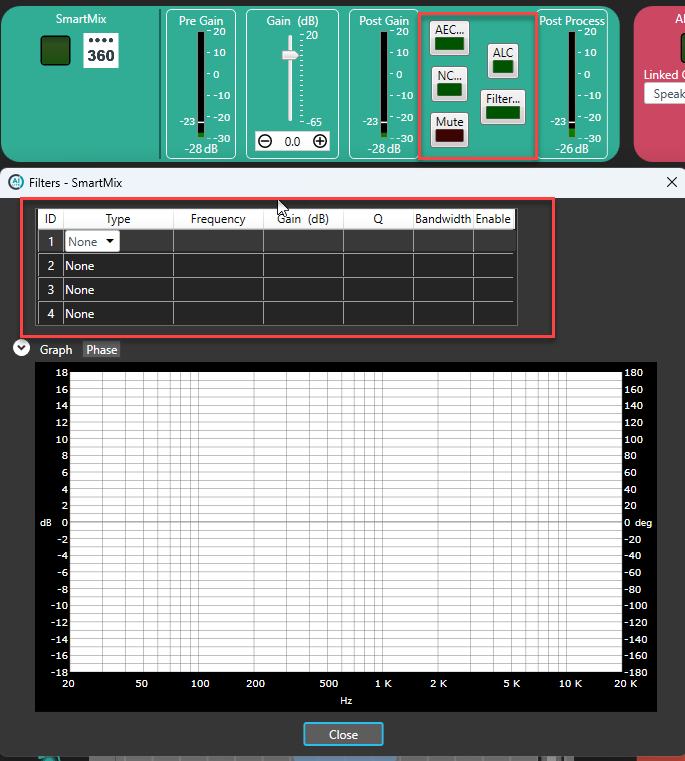
From there you process the signal on your file or in the BMA Console. If you are using the SmartMix you can access filter settings in the BMA console and send a processed signal to the DSP. for the Raw per beam Dante flows then Biamp recommends that the processing be done in the DSP. In all applications Biamp recommends that AEC be done in the DSP.
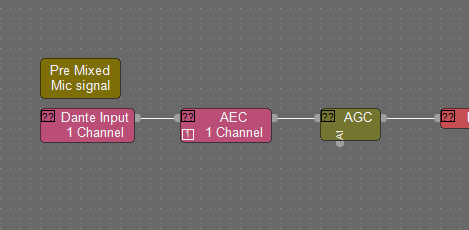
Per Beam signal flow

In this application the Raw audio is taken for each Biamp currently active and Fed back to the Tesira DSP
- Each beam delivered as its own Dante channel
- Tesira applies independent AEC, AGC, NRD, & EQ per beam
- Recommended for echo performance improvements
- Allows for more nuanced processing
SmartMix signal flow (Per Mic)
In this application we rely on the BMA 360D to apply its own Mixing before routing a single channel per AEC channel
- Tesira applies one shared AEC, AGC, NRD, & EQ chain to the entire mic
- Processing decisions apply to all talkers at once
- Suitable for smaller spaces and simpler applications.
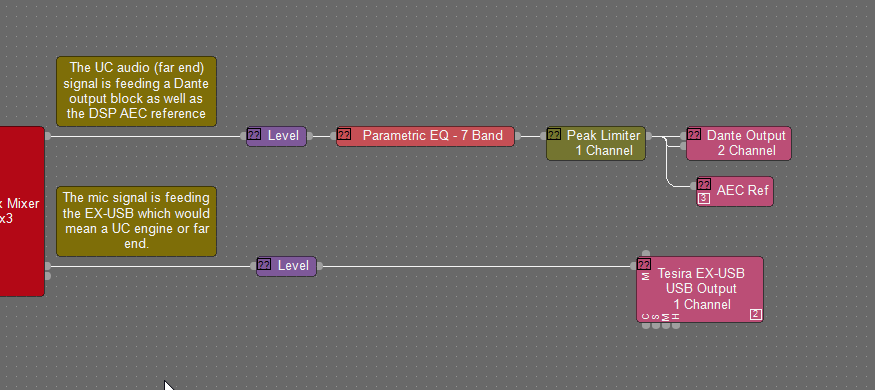
Loudspeaker output
To utilize the BMA360 amplifier then simply place a Dante Output block in your file. One channel on the Output block per channel used on the BMA360D
LED control and Command strings
For controlling the LED of the BMA 360D from Tesira we will make use of the network command string block. you can test these commands using a terminal program such as putty.

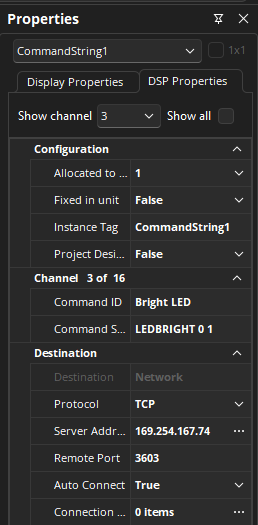
Here are the key settings you will need to set under DSP properties for the block
- Protocol: TCP
- Server Address: This will be the CONTROL IP of the BMA mic, this is the same IP you use to configure it in BMA Console
- Remote port 3603
Some sample commands have been provided as well for quick reference.
In some instances you may need to add a line feed and/or carriage return to the end of your command. If needed add ~0d~0a to any sent command.
| Command | Command with LF and CR | Effect |
|---|---|---|
| DANTEMAC | DANTEMAC~0d~0a | Queries the device for its Dante MAC address |
| LEDBRIGHT 0 0 | LEDBRIGHT 0 0~0d~0a | Sets the brightness of the mic LED to OFF |
| LEDBRIGHT 0 1 | LEDBRIGHT 0 1~0d~0a | Sets the brightness of the mic LED to high |
| LEDCOLOR 0 1 | LEDCOLOR 0 1~0d~0a | Sets the LED color to red |
| LEDCOLOR 0 4 | LEDCOLOR 0 4~0d~0a | Sets the LED color to green |
Processing library
Biamp has a sample set of blocks that can be imported as a processing library here: Biamp BMA 360D NCS Example.tlf
For a more detailed rundown of entire command string offering see this tech note on the subject
Further reading
Software sub-page deep dives: